
How to change battery on Philips hair clipper QC5580
Hello,
I would like to ask how to change the battery on Philips hair clipper DIY QC5580

Please help
Cette question est-elle utile ?
Indice
5
Rep: 73
![]() 3
3
![]() 2
2
Hello,
I would like to ask how to change the battery on Philips hair clipper DIY QC5580
Please help
Cette question est-elle utile ?

Rep: 127
![]() 2
2
![]() 2
2

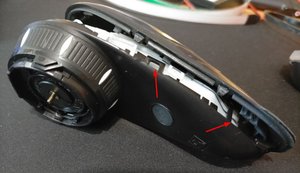
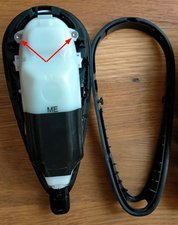
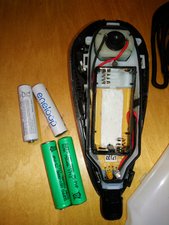
The screw driver image in the picture is wrong - I broke mine so you don’t have to.
Two plastic tabs either side near the charge port and either side near the power button.

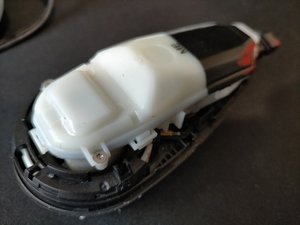
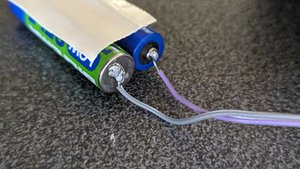
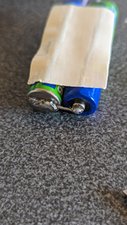
Here are the batteries.
Cette réponse est-elle utile ?
But how to access them
Thank you so much, I have been wanting to fix it for years!
ps. in order to ensure more visibility to this thread, I’ll report here the full model of this device: Philips Headgroom QC5580/32
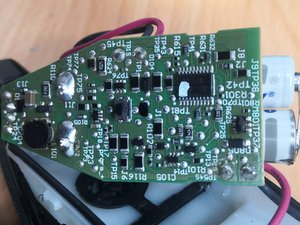
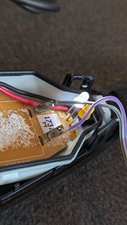
Could you please share with me a clear picture of the main board ( machine power board)
Rep: 1
![]() 3
3
![]() 1
1
Hello,
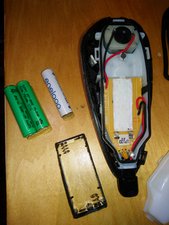
I tried to disassemble my Philips Headgroom QC5570 : it is not easy to replace battery.
You need a thin flat screwdriver to open device, and a micro torx screwdriver (T5 or T6 maybe) to open the waterproof container, in order to access to NiMh 700 mAh batteries.
Batteries are spot welded : this is typically a throwable device, shame on Philips!
Only experimented people with tools can replace those batteries…

Cette réponse est-elle utile ?

Rep: 460,1k
![]() 11
11
![]() 373
373
![]() 1,5k
1,5k
Hi @hamadareda ,
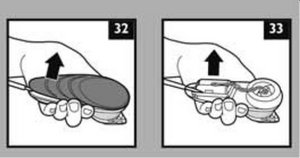
You should be able to access the battery by simply removing the back cover from the clippers.
Here’s the user manual for the clippers.
There are a series of images showing how to use the clippers etc and Fig 32 & 33 show how to access the batteries.
Here’s a zoomed in image (sorry about the poor quality) that shows what to do.
The type and value of the battery is usually marked on the battery so that you can get compatible replacements. Mostly these days they are NiMH batteries. Be sure to get replacement batteries with solder tabs (example only to show solder tabs on battery) because it is very difficult to solder wires directly onto batteries without them as you have to heat the battery too much to get the solder to flow and this could damage the battery
Hopefully this is of some help.
Cette réponse est-elle utile ?
This what show in the manual but actually it didn't open with me like that. I don't know why, that's why I was looking for another way or a video that show how.

Rep: 37
![]() 1
1
It is not difficult with the right tools but it took me a couple of hours or more.
I followed the other people advices plus I added a battery box from a toy (I had to cut it to fit in there), to put the batteries (Eneloop) inside.
I also soldered the end connections and charged it. Is working.
Now, it can last forever 😂
Cette réponse est-elle utile ?

Hello
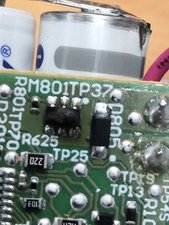
When I changed the battery for Philips hair clipper QC5580, the machine worked by it self and the start stop button stop working.
When I checked Tha main board I found a defect 6 lead IC
*
*
Cette réponse est-elle utile ?

Rep: 1
![]() 3
3
![]() 1
1
Well the following video might be helpful for you: https://www.youtube.com/watch?v=uZI9ZVli...
Cette réponse est-elle utile ?
It's not the same model if you have the same model could you please share with me a clear picture of the main board?
Thanks for the disassemble instructions! 🙏It's so nice to see what is inside before talking it apart.
I just soldered in two off-the-shelf 900mAh NiMH batteries into mine. I added some wires to the battery terminals instead of trying to work in that tiny space under those restrictions. There's plenty of room for those wires under the water resistant hood.
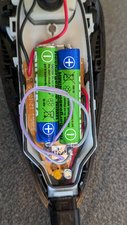
The trick to solder on the batteries (or wherever) is to add flux. It makes it super easy (not pretty, but easy).
Cette réponse est-elle utile ?
Hi @egholm,
FYI it may be easier in the future if you need to replace any similar batteries is to search for batteries that have solder tabs example only as sometimes it can be dangerous to solder wires directly to the battery as it may require too much heat being applied to the battery.
Cheers
@jayeff Good point!
Dernières 24 heures : 10
7 derniers jours : 54
30 derniers jours : 335
Total : 12,914
8 commentaires
Has anyone tried putting higher capacity batteries in, like 1100mah AAA?
Or could you fit IKEA LADDA 2450mah AA batteries? (query whether the AA form will even physically fit?)
par James Email
I need service centre near me and I need new battery
par vipin kumar
Hi, my QC5580 wouldn't hold a charge, which only lasted for five mins or so, so I used this guide to change the batteries. However, even though the new batteries work, I still have the same problem and the chaeg only lasts for five minuts. I was going to give up and just buy a new unit, but today I saw that it has been discontinued. So I wonder if there is a way to check and fix the charging mechanism. Any help most appreciated
par MARK DEVLIN
another one needing new batteries as it wont even start when plugged in. I opened it per the instructions above and wanted to try to disconnect the battery, attach the charger cable to see if it would work when plugged in. We don't need it transportable, so that would have been an easy solution. But turning on the power while the batteries are disconnected seemed to have killed the device, first the white LED turned on, and the turned off 2 sec later. And now nothing happens when plugged in, no light (with / without batteries).
I really hope it becomes a requirement/law that batteries should be made replaceable.
Thx everyone for this thread
par Kim
Hello guys
I made my fixing on the QC5580 adding a 2 AAA NiMh batteries but the device is now flashing red lights and not starting.
I tried to charge it couple of times (and correctly if flash white until it will become full charged) but when I push the on/off button it seems to start the engine for les then 1 sec then stop and after 2 or 3 attempts this red flashing light is appearing...similar to when is fully empty.
And more now is not even working when directly plugged on the cable.
Any idea and suggestion on how to fix?
Gio
par Giovanni Bergamaschi
Voir 3 commentaires en plus