Cette version peut contenir des modifications incorrectes. Passez au dernier aperçu vérifié.
Ce dont vous avez besoin
-
Cette étape n’est pas traduite. Aidez à la traduire
-
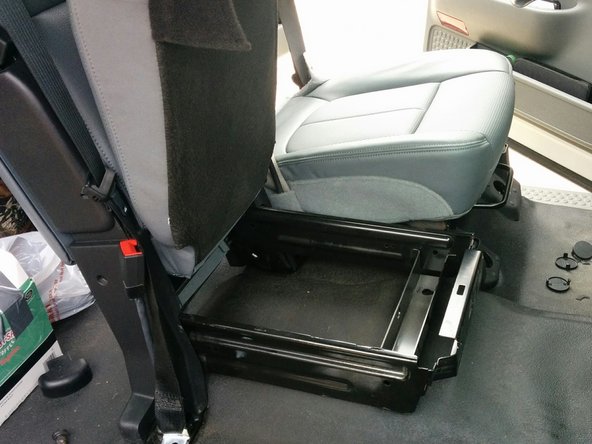
Before shot of bench seat in a 2005 Ford F-350 Super Duty. Removal of the seat requires an 18mm socket. Preferably a deep wall socket and a T60 Torx Bit w/ratchet or impact wrench.
-
-
Cette étape n’est pas traduite. Aidez à la traduire
-
Adjust the seat as far back as you can. Using an 18mm deep wall socket, remove the bolts on the front that attachs the seat to the floor. On my bench seat there were only two bolts. If you have a 60/40 seat or bucket seats there will be more.
-
-
Cette étape n’est pas traduite. Aidez à la traduire
-
Adjust seat to it's most forward position. Look for a stud with a plastic protection cap. Remove the cap with a screwdriver. Using an 18mm wrench or socket (if space allows) remove the bolt from the stud. On my bench seat there were only two studs/bolts. Other style seats will have more. Lift seat off studs and position seat forward of studs.
-
-
Cette étape n’est pas traduite. Aidez à la traduire
-
Using the T60 Torx bit, remove the bolts attaching the seat belt receivers to the floor and remove the seat belt receivers.
-
-
Cette étape n’est pas traduite. Aidez à la traduire
-
Unplug the seat belt receiver from the vehicle seat belt buzzer plug. it will be just under the back side of the seat.
-
-
-
Cette étape n’est pas traduite. Aidez à la traduire
-
You may now remove the old seat from the truck. if you have a bench seat like in this guide, you will need someone to help.
-
-
Cette étape n’est pas traduite. Aidez à la traduire
-
Next, if your truck was only using the outter body holes you will need to locate the two close to the transmission tunnel. You can press your finger in the center and locate the opening. Take a razor knife and gently cut an X over the hole. Gently remove each of the triangle shaped tabs exposing the additional hole. Repeat on opposite side.
-
-
Cette étape n’est pas traduite. Aidez à la traduire
-
Next place your jump seat in the middle on top of the transmission tunnel. The rear holes will line up with two of the existing holes where the seat belts were attached. Place two bolts in the holes but don't tighten completely. Lift the bottom seat up exposing the two bolt holes in the bottom of the jump seat.
-
-
Cette étape n’est pas traduite. Aidez à la traduire
-
Now mark and drill two holes in the transmission tunnel. Carefully check what is below the tunnel to make sure you don't damage wiring or other system that may be run along the path. This is best done with one person drilling and one person watching underneath. These are the only holes you must drill for 2011 to 2014 seats to fit.
-
-
Cette étape n’est pas traduite. Aidez à la traduire
-
Notice the jump seat is a little lower than the buckets. Place your buckets in temporarily and use washers or other spacers between the floor and jump seat frame to adjust the jump seat to the same level as the buckets.
-
-
Cette étape n’est pas traduite. Aidez à la traduire
-
Place your bucket seats in the truck. You should be able to line up all 4 holes in the seat frame with a hole in the truck body. You may use the same bolts you removed from the old seat to bolt the new seats down. Replace the plastic bolt covers on the new bucket seats.
-
-
Cette étape n’est pas traduite. Aidez à la traduire
-
In my case the seat belt buzzer on the new seat didn't match the vehicle plug. Simply remove the seat belt receiver from the side of the seat with a T60 Torq bit and re-attach your old seat belt receiver to the floor bolt. Using the old seat belt receiver gives you the proper connector and allows the buzzer to work properly.
-
-
Cette étape n’est pas traduite. Aidez à la traduire
-
Be sure to tighten all bolts properly. Your safety depends on it. You now have modern much more comfortable seats in your truck. Enjoy. Before and After pics below.
-


Annulation : je n'ai pas terminé ce tutoriel.
21 autres ont terminé cette réparation.
Équipe

Auburn Opelika Networks Membre de l'équipe Auburn Opelika Networks
Business
1 membre
3 tutoriels rédigés
41 commentaires
Thanks for the amazing writeup! We are linking to here from our website on an upcoming blog. Once again, thanks for your business. Glad we could assist in your project.
-Keith B
1-844-OEM-SEAT
I see that your truck is the extended cab, will this work a single cab? I have the same year truck as a work truck but the bench seat is really uncomfortable on long trips. I would love that jump seat specially since it also works as a center console.
From my understanding the front seat is the same regardless if it is a single cab, extended cab, or 4 door. If you will contact the good folks at http://www.oemcarandtruckseats.com/ I believe they can definitely answer your question. I can tell you this, if you change your bench seat out for the buckets with the jump seat it will be a 150% improvement in comfort.
JNoles -