Aller au contenu principal

ASUS Chromebook C424MA-DH48F Motherboard Replacement

Ce dont vous avez besoin

  1. ASUS Chromebook C424MA-DH48F Motherboard Replacement, Lower Case: étape 1, image 1 de 2 ASUS Chromebook C424MA-DH48F Motherboard Replacement, Lower Case: étape 1, image 2 de 2
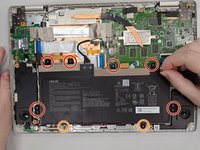
    • Use a Phillips #0 screwdriver to remove the eleven 6.9 mm screws that secure the lower case.

    • Make sure all the screws on this side get taken out because there could be a label or warranty sticker covering up a screw that might be missed.

    • Insert an opening pick into the gap between the lower case and chassis.

    • Slide the pick around the entire perimeter of the laptop until the lower case fully releases.

    • Remove the lower case.

  2. ASUS Chromebook C424MA-DH48F Motherboard Replacement, ASUS Chromebook C424MA-DH48F Battery Disconnection: étape 2, image 1 de 3 ASUS Chromebook C424MA-DH48F Motherboard Replacement, ASUS Chromebook C424MA-DH48F Battery Disconnection: étape 2, image 2 de 3 ASUS Chromebook C424MA-DH48F Motherboard Replacement, ASUS Chromebook C424MA-DH48F Battery Disconnection: étape 2, image 3 de 3
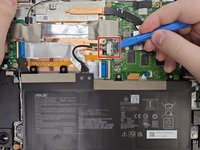
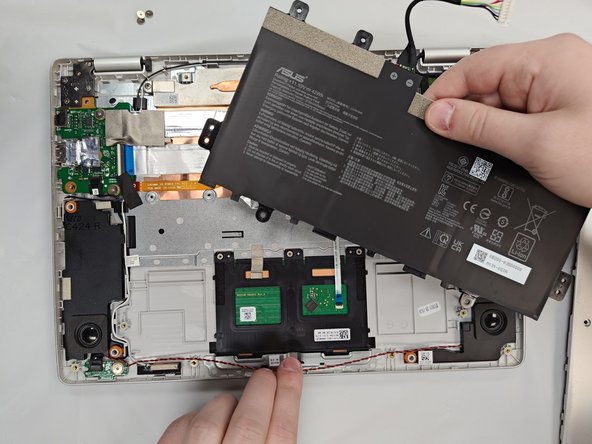
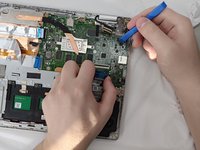
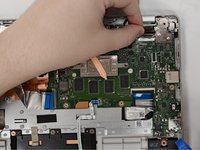
    • Use an opening tool to pop up the silver locking bar securing the battery connector.

    • Push the battery connector directly out of its motherboard port.

  3. ASUS Chromebook C424MA-DH48F Motherboard Replacement, Battery: étape 3, image 1 de 3 ASUS Chromebook C424MA-DH48F Motherboard Replacement, Battery: étape 3, image 2 de 3 ASUS Chromebook C424MA-DH48F Motherboard Replacement, Battery: étape 3, image 3 de 3
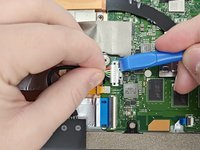
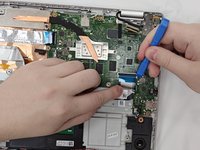
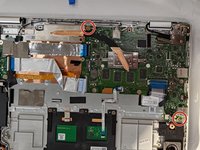
    • Carefully use the plastic prying tool and pop up the locking bar and lift the connector off with your hand.

  4. ASUS Chromebook C424MA-DH48F Motherboard Replacement: étape 4, image 1 de 3 ASUS Chromebook C424MA-DH48F Motherboard Replacement: étape 4, image 2 de 3 ASUS Chromebook C424MA-DH48F Motherboard Replacement: étape 4, image 3 de 3
    • Use a Phillips #0 screwdriver to remove the six 4.1 mm screws that secure the battery.

    • The two screw holes (marked in orange) on the bottom won't have screws associated with them since they were removed earlier when the base was removed.

    • Unseat the speaker cable from the black plastic hooks on the lower side of the battery.

    • Lift the battery up and out of the chassis.

  5. ASUS Chromebook C424MA-DH48F Motherboard Replacement, Motherboard: étape 5, image 1 de 1
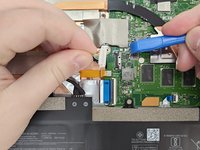
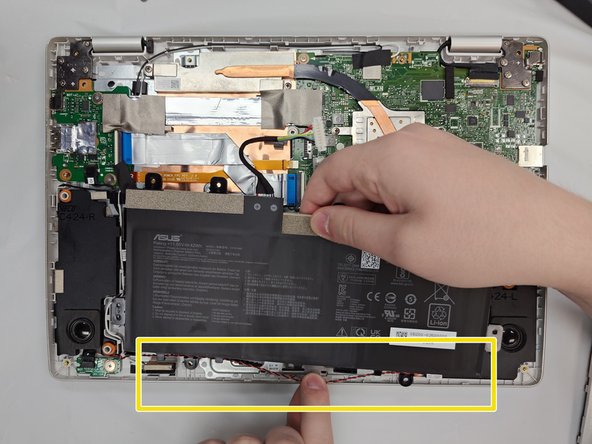
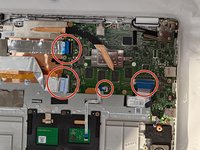
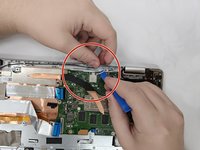
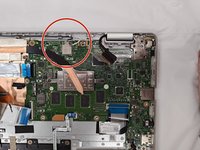
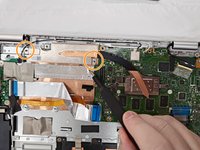
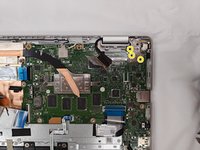
    • Remove the thermal tape covering the top left ribbon connector.

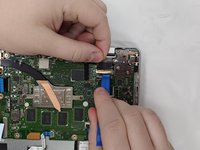
    • Remove the black electrical tape covering the top most connectors.

  6. ASUS Chromebook C424MA-DH48F Motherboard Replacement: étape 6, image 1 de 3 ASUS Chromebook C424MA-DH48F Motherboard Replacement: étape 6, image 2 de 3 ASUS Chromebook C424MA-DH48F Motherboard Replacement: étape 6, image 3 de 3
    • Use an opening tool or your fingernail to flip up the four black ZIF locking flaps that secure the four ribbon cables.

    • The ribbon connectors are thin and delicate, take care when handling to not tear them.

    • Gently disconnect all four ribbon connectors from the motherboard.

  7. ASUS Chromebook C424MA-DH48F Motherboard Replacement: étape 7, image 1 de 1
    • Use an opening tool to gently lift the press connector labeled "IO" straight to disconnect it.

  8. ASUS Chromebook C424MA-DH48F Motherboard Replacement: étape 8, image 1 de 2 ASUS Chromebook C424MA-DH48F Motherboard Replacement: étape 8, image 2 de 2
    • Use an opening tool to lift and disconnect the black and white antenna cables wires from the wireless module.

  9. ASUS Chromebook C424MA-DH48F Motherboard Replacement: étape 9, image 1 de 2 ASUS Chromebook C424MA-DH48F Motherboard Replacement: étape 9, image 2 de 2
    • Peel away the clear tape covering the display connector.

    • Lift up the display connector lock bar with an opening tool to release it.

    • Disconnect the display connector.

  10. ASUS Chromebook C424MA-DH48F Motherboard Replacement: étape 10, image 1 de 1
    • Use your fingernails or two opening tools to "walk" the speaker connector out of its socket.

  11. ASUS Chromebook C424MA-DH48F Motherboard Replacement: étape 11, image 1 de 3 ASUS Chromebook C424MA-DH48F Motherboard Replacement: étape 11, image 2 de 3 ASUS Chromebook C424MA-DH48F Motherboard Replacement: étape 11, image 3 de 3
    • Remove the two 2.8 mm Phillips screws that secure the motherboard.

    • Remove the two 3.3 mm Phillips screws.

    • Remove the three 1.4 mm Phillips screws that secure the hinge located at the top-right section of the motherboard.

  12. ASUS Chromebook C424MA-DH48F Motherboard Replacement: étape 12, image 1 de 1
    • Lift up on the top-right hinge until it's out of the way of the motherboard.

  13. ASUS Chromebook C424MA-DH48F Motherboard Replacement: étape 13, image 1 de 1
    • Lift and remove the motherboard.

    • When lifting avoid any twisting or jerking motions as this could result in damage to the board or CPU cooler.

Conclusion

To reassemble your device, follow the above steps in reverse order.

Take your e-waste to an R2 or e-Stewards certified recycler.
Repair didn’t go as planned? Try some basic troubleshooting, or ask our Steam Deck answers community for help.

Jacob Mckee

Membre depuis le 08/28/24

169 Réputation

1 tutoriel rédigé

Équipe

0 commentaires

Ajouter un commentaire

Nombre de vues :

Dernières 24 heures : 2

7 derniers jours : 10

30 derniers jours : 13

Total : 37