Introduction
Use this guide to remove and replace the Acer Chromebook 15 CB3-532-C47C battery.
The battery is responsible for a device to function without being plugged into an external power source. Signs of a faulty battery include the laptop losing a charge more quickly than usual, not turning on when not attached to an external power source, or not turning on at all.
Make sure you have read the troubleshooting page before starting this guide to rule out other causes of the computer not charging.
If the battery appears swollen, please use safety measures to prevent fire cased by a punctured battery.
Power off and unplug the laptop before beginning the replacement.
Ce dont vous avez besoin
-
-
Using the Phillips #1 screwdriver, remove eighteen 7 mm screws from the back panel of the device.
-
-
-
-
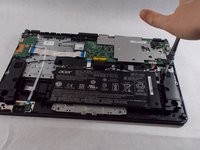
Push on the sides of the connector with a plastic spudger to separate the cable from the motherboard.
-
-
-
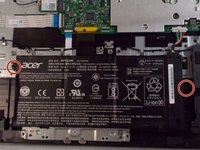
Using the Phillips #1 screwdriver, remove the two black 5.5 mm screws securing the battery.
-


To reassemble your device, follow these instructions in reverse order.
For optimal performance, after completing this guide, calibrate your newly installed battery.
Take your e-waste to an R2 or e-Stewards certified recycler.
To reassemble your device, follow these instructions in reverse order.
For optimal performance, after completing this guide, calibrate your newly installed battery.
Take your e-waste to an R2 or e-Stewards certified recycler.
Annulation : je n'ai pas terminé ce tutoriel.
3 autres ont terminé cette réparation.
Équipe

UMass Dartmouth, Team 3-2, Sinclaire Fall 2021 Membre de l'équipe UMass Dartmouth, Team 3-2, Sinclaire Fall 2021
UMASSD-SINCLAIRE-F21S3G2
3 membres
7 tutoriels rédigés