Aller au contenu principal
Pour réparer ensemble - Je crée un compte

Akai MPK25 LCD Replacement

Ce dont vous avez besoin

  1. Akai MPK25 LCD Replacement, Face Plate: étape 1, image 1 de 1
    • Remove all the selector knob covers by pulling them off.

    Demander à FixBot
  2. Akai MPK25 LCD Replacement: étape 2, image 1 de 1
    • Using needle nose pliers, remove the washers from the four corner selector knobs.

    Demander à FixBot
  3. Akai MPK25 LCD Replacement: étape 3, image 1 de 1
    • Flip the device over. Using a Philips #2 screw driver, remove the fourteen 10.3 mm black screws holding the back panel in place.

    Demander à FixBot
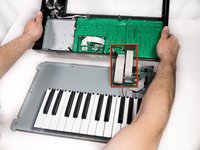
  4. Akai MPK25 LCD Replacement: étape 4, image 1 de 3 Akai MPK25 LCD Replacement: étape 4, image 2 de 3 Akai MPK25 LCD Replacement: étape 4, image 3 de 3
    • Carefully flip the device to the front making sure you secure the face plate and the chassis together.

    • Please use care in following the step above to avoid ripping the ribbon cables connecting the two sides.

    Demander à FixBot
  5. Akai MPK25 LCD Replacement: étape 5, image 1 de 3 Akai MPK25 LCD Replacement: étape 5, image 2 de 3 Akai MPK25 LCD Replacement: étape 5, image 3 de 3
    • Rotate the device 180 degrees and carefully remove the face plate by slightly lifting the screen side towards you and then sliding the bottom out from under the keys.

    • Use care when doing the step above so that the ribbon connectors which connect the top of the chassis to the top of the face plate are not damaged.

    Demander à FixBot
  6. Akai MPK25 LCD Replacement, LCD: étape 6, image 1 de 1
    • Using a Phillips #00 screwdriver, remove the four 8.9 mm screws.

    Demander à FixBot
  7. Akai MPK25 LCD Replacement: étape 7, image 1 de 1
    • Using a Phillips #2 screwdriver, remove the one 9.8mm screw holding down the ground wire.

    Demander à FixBot
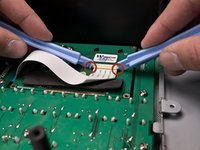
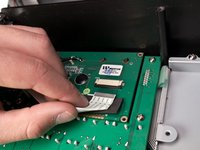
  8. Akai MPK25 LCD Replacement: étape 8, image 1 de 2 Akai MPK25 LCD Replacement: étape 8, image 2 de 2
    • Using two plastic opening tools, slide the black locking mechanism on the ZIF connector towards you. This will remove the ribbon cable connecting the motherboard to the screen.

    Demander à FixBot
  9. Akai MPK25 LCD Replacement: étape 9, image 1 de 1
    • Lift the screen from either side, removing it from the board.

    Demander à FixBot
Conclusion

To reassemble the display, follow these instructions in reverse order.

3 autres ont terminé cette réparation.

Will Saba

Membre depuis le 01/11/13

412 Réputation

2 tutoriels rédigés

Équipe

Cal Poly, Team 20-6, Maness Winter 2013 Membre de l'équipe Cal Poly, Team 20-6, Maness Winter 2013

CPSU-MANESS-W13S20G6

5 membres

6 tutoriels rédigés

1 commentaire de tutoriel

Where can I find a new ribbon?

Wise Professor - Réponse Partager

Ajouter un commentaire

Nombre de vues :

Dernières 24 heures : 0

7 derniers jours : 3

30 derniers jours : 44

Total : 2,464