Aller au contenu principal

Apple Watch Adhesive Replacement

Ce dont vous avez besoin

  1. Apple Watch Adhesive Replacement, Adhesive: étape 1, image 1 de 2 Apple Watch Adhesive Replacement, Adhesive: étape 1, image 2 de 2
    • Use a plastic opening tool to scrape adhesive off the back of the screen.

  2. Apple Watch Adhesive Replacement: étape 2, image 1 de 2 Apple Watch Adhesive Replacement: étape 2, image 2 de 2
    • You may be able to peel up the adhesive with tweezers.

    • Once you have all of the pieces of adhesive removed, you may want to use an alcohol soaked q-tip to clean any residue off the back of the screen.

  3. Apple Watch Adhesive Replacement: étape 3, image 1 de 1
    • Use tweezers to peel the outer ring off of one of the adhesive strip pads.

    • Be sure to get both the double-sided adhesive and the brown backing paper.

    • Be very careful not to fold, bend, or stretch the adhesive tape, as this will make it too thick to seal the screen without a ridge between the screen and the case.

  4. Apple Watch Adhesive Replacement: étape 4, image 1 de 3 Apple Watch Adhesive Replacement: étape 4, image 2 de 3 Apple Watch Adhesive Replacement: étape 4, image 3 de 3
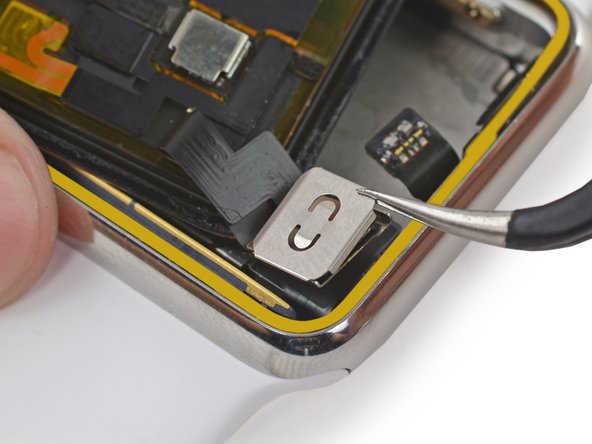
    • Lay the backed adhesive tape down on the Force Touch sensor, around the edge of the case where the screen rests.

    • Start in a corner with the tape as close to the corner wall as possible.

    • Press on the brown backing paper with a plastic opening tool to secure the adhesive around the entire perimeter.

  5. Apple Watch Adhesive Replacement: étape 5, image 1 de 2 Apple Watch Adhesive Replacement: étape 5, image 2 de 2
    • Use a plastic opening tool to reconnect the display data and digitizer cable connectors.

    • Be careful not to touch any of the contacts directly, as your finger oils may impede connectivity.

  6. Apple Watch Adhesive Replacement: étape 6, image 1 de 3 Apple Watch Adhesive Replacement: étape 6, image 2 de 3 Apple Watch Adhesive Replacement: étape 6, image 3 de 3
    • To reinstall the metal bracket, line up the single tab with the slot in the top of the lower half, and slide the bracket down.

    • Snap the upper bracket in place.

  7. Apple Watch Adhesive Replacement: étape 7, image 1 de 3 Apple Watch Adhesive Replacement: étape 7, image 2 de 3 Apple Watch Adhesive Replacement: étape 7, image 3 de 3
    • Line the battery connector up with its mate on the cable inside the watch body.

    • Use tweezers to press the two connectors together.

  8. Apple Watch Adhesive Replacement: étape 8, image 1 de 3 Apple Watch Adhesive Replacement: étape 8, image 2 de 3 Apple Watch Adhesive Replacement: étape 8, image 3 de 3
    • If your replacement battery came with pre-installed adhesive, peel off the protective tab now, exposing the adhesive.

    • Rotate the battery down into its slot, and press it into position.

    • Press the battery down against the S1 to re-adhere it in place.

    • Now is the best time to test powering on your watch—if it doesn't turn on, double check all three connectors and try again.

  9. Apple Watch Adhesive Replacement: étape 9, image 1 de 1
    • Use tweezers to peel off the adhesive backing strip.

    • Peel the backing strip up halfway, then snip it with scissors so you can peel the rest off without it snagging on the display.

  10. Apple Watch Adhesive Replacement: étape 10, image 1 de 3 Apple Watch Adhesive Replacement: étape 10, image 2 de 3 Apple Watch Adhesive Replacement: étape 10, image 3 de 3
    • Move the screen back to the right, folding the display data and digitizer cables neatly.

    • Center the screen over the case and press it down firmly onto the adhesive.

Ligne d'arrivée

227 autres ont terminé cette réparation.

Andrew Optimus Goldheart

Membre depuis le 10/17/09

502 858 Réputation

407 tutoriels rédigés

Équipe

iFixit Membre de l'équipe iFixit

Staff

135 membres

16 817 tutoriels rédigés

46 commentaires

Where can I find the new screen.

Crissel Largo - Réponse

THERE WOULD BE A PROBLEM WITH THE I.C. rewriting aiu moment of the change of LCD.?

wallace@freesurf.ch

vallottonge - Réponse

How long before the adhesive strips will be back in stock? I've been waiting months now and still no update :)

Annie Booth - Réponse

me too when can we expect it?

Luis Deluna -

me too!!!!!!

Anthony Zamora -

Ajouter un commentaire

Nombre de vues :

Dernières 24 heures : 44

7 derniers jours : 387

30 derniers jours : 1,636

Total : 328,379