Introduction
Votre batterie a des problèmes et doit être remplacée ? Ce tutoriel vous guidera à travers les étapes nécessaires pour installer une nouvelle batterie dans votre Nintendo 3DS XL en un rien de temps !
Ce dont vous avez besoin
-
-
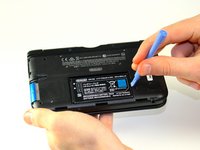
Desserrez les deux vis cruciformes #00 de 4,2 mm de long situées en haut de la coque arrière.
-
-
-
-
Tenez l'appareil de manière à ce que la coque soit orienté vers le haut.
-
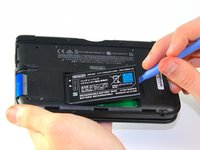
À l'aide d'un outil d'ouverture en plastique, soulevez la coque en commençant par le coin supérieur droit.
-
Tenez le bord de la coque pour vous assurer qu'il ne se remet pas en place.
-
Recherchez la petite section sous le compartiment du stylet. Retirez la coque à ce stade si elle est toujours attachée.
-
Retirez la coque de l'appareil et mettez-la de côté.
Note that on the lower side (opposite to the hinges), there are small hooking tabs. These require you to lift the top (screw side) off towards you, then the lower area.
-
-
-
Insérez l'outil d'ouverture en plastique dans l'ouverture située sur le côté droit de la batterie.
-
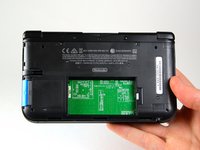
Retirez la batterie du boîtier inférieur.
-
Retirez la batterie du boîtier et mettez-la de côté.
My 👴 grandpa was helping me 🔧 repair my 3ds xl and ⚡️electrocuted himself with the 🔋battery while we was taking it out with a 🔪 knife. 💀 Rip grandpa 😔
-


Pour remonter votre appareil, suivez ces instructions dans l'ordre inverse.
Pour remonter votre appareil, suivez ces instructions dans l'ordre inverse.
Annulation : je n'ai pas terminé ce tutoriel.
52 autres ont terminé cette réparation.
Merci à ces traducteurs :
100%

Ces traducteurs nous aident réparer le monde ! Vous voulez contribuer ?
Commencez à traduire ›
Équipe

Cal Poly, Team 9-13, Regan Spring 2014 Membre de l'équipe Cal Poly, Team 9-13, Regan Spring 2014
CPSU-REGAN-S14S9G13
5 membres
44 tutoriels rédigés
6 commentaires
Time estimate: 3 - 9 hours Difficulty: Very difficult ??????
More like 30-90 seconds, and that's if you have to search for a screwdriver.
It should be noted that the bottom three clips on the bottom of the backplate can’t just be snapped in, they need to be slipped in, so when removing the backplate, it should be tiled away from the system and then pulled up from the bottom, and those three clips on the bottom should be the first clips in when you’re putting it back together, sliding them in with the backplate at an angle, and then the rest of the clips just snap in.
Nice tip. Ty.
Just did this. For reasmbly I recommend putting the bottom/lower part of the case on first before you screw it back on.
I just bought a 3ds battery for my new 3ds XL and while the battery initially had a charge, it became stuck in red bars unless i kept it plugged in. So I read up on what the issue is, it was mentioned somewhere that to recalibrate it, i had to charge it then let the battery drain, then it should charge properly after. Now the system doesnt even turn on even with it plugged into the charger. I don't know what the issue is now.
Note: If your top or bottom screen was working before disassembly and doesn't work after reassembly, then it's likely that the connector is loose or dirty or damaged or not clipped or PLACED UPSIDE-DOWN. I had this issue with my Super3DS XL(2015) and it turns out that the reason why my top screen wasn't working after put together, was because I had the top LCD connector upside-down. After I correctly put the connector in, It worked again!
justjustintuber - Réponse
what type screwdriver do i use?!? its so small!!!!
Matthew - Réponse
I had success using a #00 Phillips head
Jake S -
Can't clip the front of the back cover back in
Macro Man - Réponse
I had trouble too, but got past it by slipping the bottom edge into the three indents first then easing the rest of the cover on!
Issu -
I found these were actually #00
Demosthien - Réponse
The screws in the 1st picture are stripped. What screwdriver head do I use?
Adric101 - Réponse
The official battery replacement guide by Nintendo says the screws should indeed be removed by a Phillips #00 screwdriver, so I've edited the guide to reflect that.
They are actually JIS screws though so they could be stripped by that screwdriver
MightyOak - Réponse