Introduction
This guide teaches you how to repair and replace the cooling fan on the Dell Inspiron 15-7560 laptop.
Ce dont vous avez besoin
-
-
Power off the laptop and place the laptop with the bottom facing upwards.
-
Remove eight 5 mm screws from the bottom of the laptop.
-
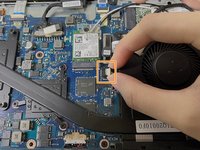
Loosen the three captive screws.
-
Use an iFixit opening tool to pry the bottom cover away from the laptop.
-
-


To reassemble your device, follow these instructions in reverse order.
To reassemble your device, follow these instructions in reverse order.
Annulation : je n'ai pas terminé ce tutoriel.
6 autres ont terminé cette réparation.
Merci à ces traducteurs :
100%


Ces traducteurs nous aident réparer le monde ! Vous voulez contribuer ?
Commencez à traduire ›

Équipe

York University, Team 1-4, O'Regan Winter 2022 Membre de l'équipe York University, Team 1-4, O'Regan Winter 2022
YORK-O'REGAN-W22S1G4
1 membre
2 tutoriels rédigés