Aller au contenu principal

Front Panel Assembly Removal

Conditions préalables uniquement
Ce tutoriel est uniquement destiné à être utilisé comme prérequis d'autres tutoriels. Il ne se suffit pas à lui-même.

Ce dont vous avez besoin

  1. Front Panel Assembly Removal, Disconnect the home button: étape 1, image 1 de 2 Front Panel Assembly Removal, Disconnect the home button: étape 1, image 2 de 2
    Outil utilisé dans cette étape :
    Tweezers
    $4.99
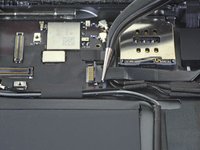
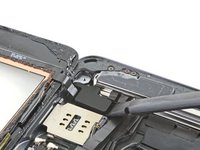
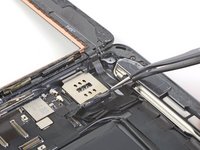
    • Use a pair of tweezers to peel off the tape covering the home button cable ZIF connector.

  2. Front Panel Assembly Removal: étape 2, image 1 de 2 Front Panel Assembly Removal: étape 2, image 2 de 2
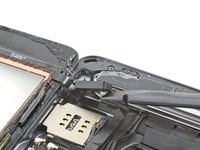
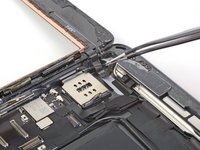
    • Use the tip of a spudger, an opening tool, or your fingernail to flip up the small, hinged locking flap on the home button cable ZIF connector.

  3. Front Panel Assembly Removal: étape 3, image 1 de 2 Front Panel Assembly Removal: étape 3, image 2 de 2
    • Use a pair of tweezers to carefully pull the home button ribbon cable straight out of the ZIF connector.

  4. Front Panel Assembly Removal, Disconnect the display cables: étape 4, image 1 de 3 Front Panel Assembly Removal, Disconnect the display cables: étape 4, image 2 de 3 Front Panel Assembly Removal, Disconnect the display cables: étape 4, image 3 de 3
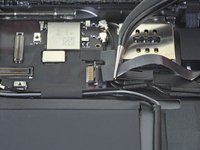
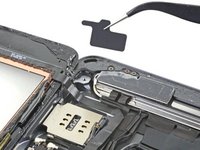
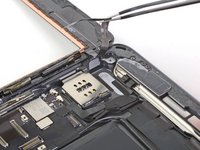
    • Use the flat end of a spudger to disconnect the two digitizer cables by lifting straight up on the press connectors.

    • To avoid damaging your iPad, pry only on the connectors themselves, not on the socket on the logic board.

  5. Front Panel Assembly Removal, Remove the vibration isolator: étape 5, image 1 de 3 Front Panel Assembly Removal, Remove the vibration isolator: étape 5, image 2 de 3 Front Panel Assembly Removal, Remove the vibration isolator: étape 5, image 3 de 3
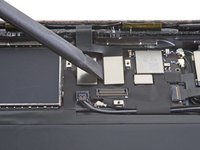
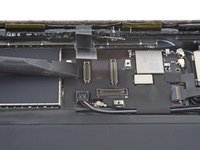
    • Use the flat end of a spudger to pry up the vibration isolator below the SIM card reader.

    • Take care not to puncture or tear the home button ribbon cable.

    • Remove the vibration isolator.

  6. Front Panel Assembly Removal: étape 6, image 1 de 3 Front Panel Assembly Removal: étape 6, image 2 de 3 Front Panel Assembly Removal: étape 6, image 3 de 3
    • Use a pair of tweezers to peel the home button cable away from the rear case.

    • The cable is secured with some light adhesive.

  7. Front Panel Assembly Removal, Remove the front panel assembly: étape 7, image 1 de 3 Front Panel Assembly Removal, Remove the front panel assembly: étape 7, image 2 de 3 Front Panel Assembly Removal, Remove the front panel assembly: étape 7, image 3 de 3
    Outil utilisé dans cette étape :
    Polyimide Tape
    $9.99
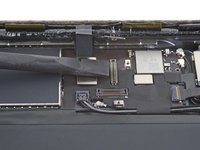
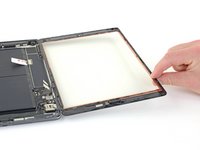
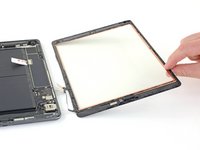
    • Remove the front panel assembly.

    • Use an opening pick to cut away any residual adhesive that may still be connecting the front panel assembly to the frame.

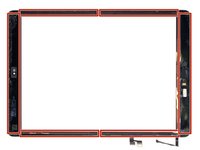
    • If you experience "ghost" or "phantom" touch input issues with your new display, this can be resolved by adding a layer of very thin insulating tape, such as Kapton (polyimide) tape, to the highlighted areas on the back of the panel. iFixit replacement digitizers come with the proper insulation and should not require the addition of any tape.

    • Without the proper insulation, these areas of the digitizer can ground out against other components, causing touch input malfunction.

    • The insulation is not visible to the naked eye, and is different from the foam dust barrier strips found on many iPads.

    • During reassembly, before installing a display, remove any remaining adhesive from the iPad, and clean the glued areas with high concentration isopropyl alcohol (90% or greater) and a lint-free cloth. This helps prep the iPad for fresh adhesive and ensures that it will bond properly.

    • Test your iPad's functions and install pre-cut adhesive strips to the back of the display using our display adhesive application guide before sealing it up.

Conclusion

To reassemble your device, follow these instructions in reverse order.

Robert Boyd

Membre depuis le 02/01/21

29 322 Réputation

94 tutoriels rédigés

0 commentaires

Ajouter un commentaire

Nombre de vues :

Dernières 24 heures : 1

7 derniers jours : 11

30 derniers jours : 14

Total : 28