Introduction
Follow this guide to replace the screen and battery assembly on your Samsung Galaxy S20.
This guide is written for the screen and battery assembly. The assembly consists of the screen, battery, and frame together in one part. Be sure you have the right part before you begin the repair.
This guide is written with the Verizon UW model, which contains two mmWave antennas. If you don't have the UW model, skip the mmWave antenna steps.
If your battery is swollen, take appropriate precautions. Before disassembling your device, completely discharge the battery. This reduces the risk of a dangerous thermal event if the battery is accidentally damaged during the repair.
Note: Retaining water resistance after the repair will depend on how well you reapply the adhesive, but your device will lose its IP (Ingress Protection) rating.
Ce dont vous avez besoin
-
-
Insert a SIM card eject tool, bit, or a straightened paperclip into the hole on the SIM tray, located at the top edge of the phone next to the plastic antenna band.
-
Press in firmly to eject the tray.
-
-
-
Heat an iOpener and apply it to the back cover's bottom edge for two minutes.
-
-
-
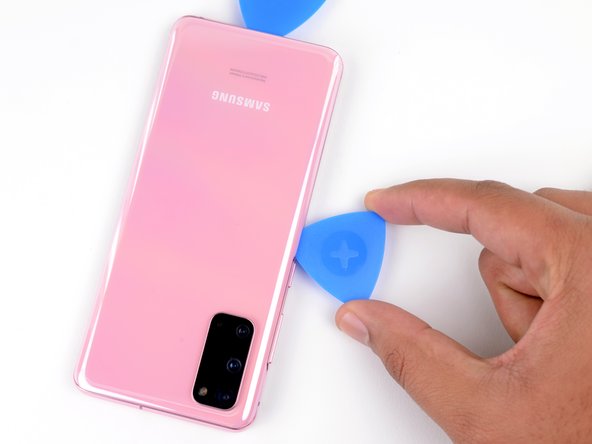
Apply a suction cup to the back of the phone, as close to the center of the bottom edge as possible.
-
Pull on the suction cup with strong, steady force to create a gap between the back cover and the frame.
-
Insert the point of an opening pick into the gap.
-
-
-
Apply a heated iOpener to the left edge of the back cover for two minutes.
-
-
-
Apply a suction cup to the back of the phone, as close to the center of the left edge as possible.
-
Pull on the suction cup with strong, steady force to create a gap between the back cover and the frame.
-
Insert the point of an opening pick into the gap.
-
You can try also applying a few drops of high concentration (over 90%) isopropyl alcohol into the seam to help loosen the adhesive.
-
-
-
Apply a heated iOpener to the right edge of the back cover for two minutes.
-
-
-
Apply a suction cup to the back of the phone, as close to the center of the right edge as possible.
-
Pull on the suction cup with strong, steady force to create a gap between the back cover and the frame.
-
Insert the point of an opening pick into the gap.
-
-
-
Apply a heated iOpener to the top edge of the back cover for two minutes.
-
-
-
Gradually slide the pick from the right edge of the device around the top right corner.
-
Continue slicing along the top edge all the way to the top left corner to fully separate the back cover adhesive.
-
-
-
Lift the back cover slowly. Use opening picks to slice any remaining adhesive.
-
Remove the back cover.
-
This is a good point to power on your phone and test all functions before sealing it up. Be sure to power your phone back down completely before you continue working.
-
Remove any adhesive chunks with a pair of tweezers or your fingers. Apply heat if you're having trouble separating the adhesive.
-
If you're using custom-cut adhesives, follow this guide.
-
If you're using double-sided tape, follow this guide.
-
-
-
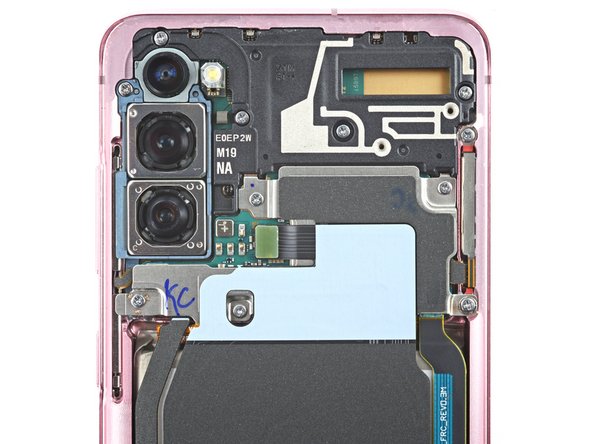
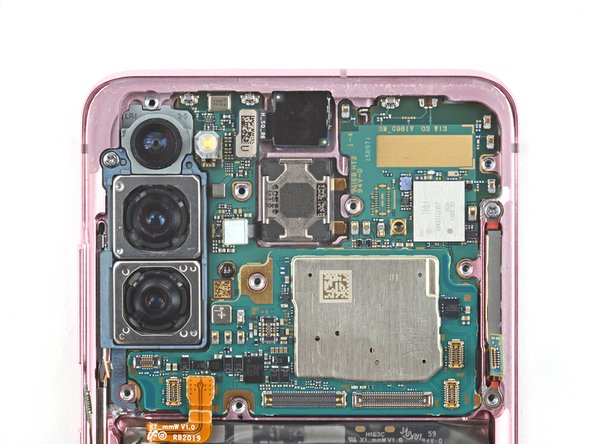
Use a spudger to pry up and disconnect the wireless charging coil's press connector on the motherboard.
-
-
-
Use a Phillips #00 screwdriver to remove the five 4 mm-long screws securing the motherboard bracket.
-
-
-
-
Use a pair of blunt-nose tweezers to gently pull up and unclip the motherboard bracket from the plastic midframe.
-
-
-
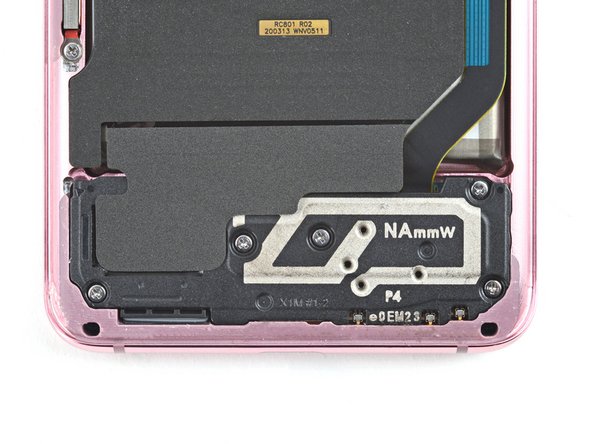
Use a Phillips #00 screwdriver to remove the five 4 mm-long screws securing the loudspeaker and lower midframe.
-
-
-
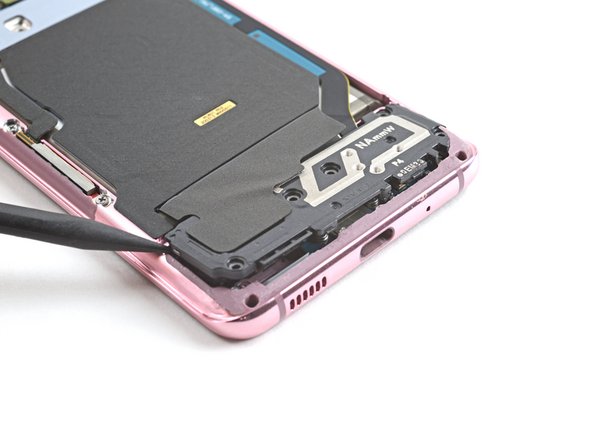
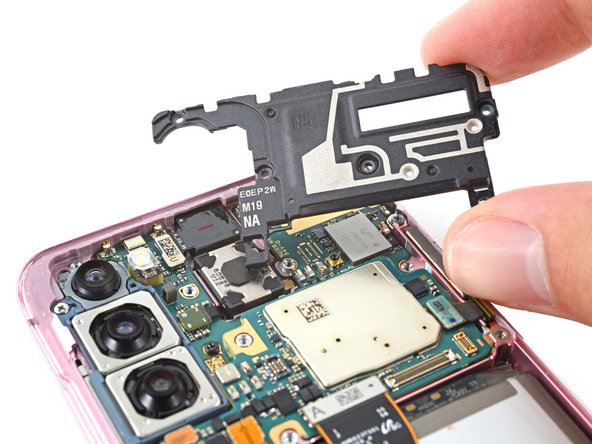
Insert the point of a spudger into the notch in the top left corner of the midframe and pry up to release the clips holding it in place.
-
-
-
Insert the point of a spudger into the notch in the top left corner of the midframe and pry up to release the clips holding it in place.
-
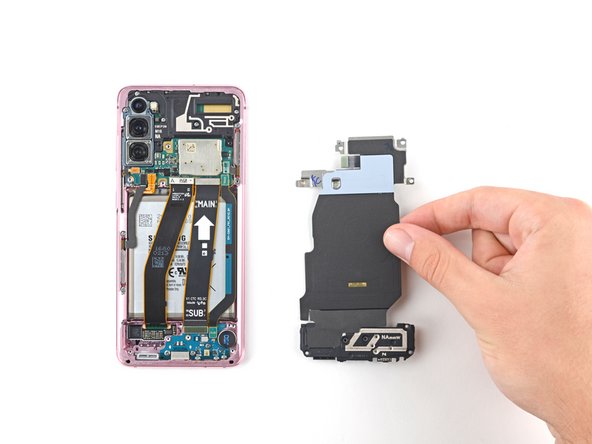
Remove the wireless charging coil.
-
-
-
Use a spudger to pry up and disconnect the battery's press connector on the motherboard.
-
-
-
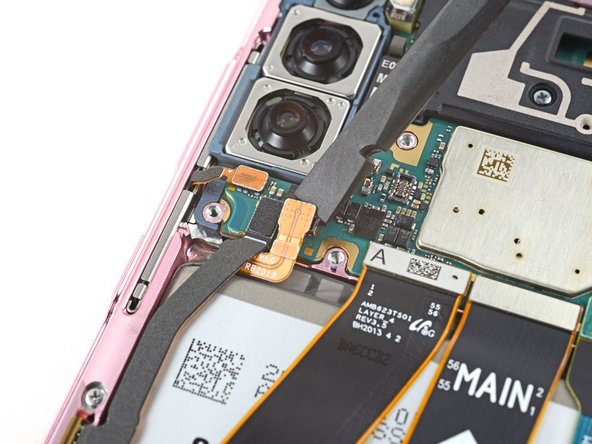
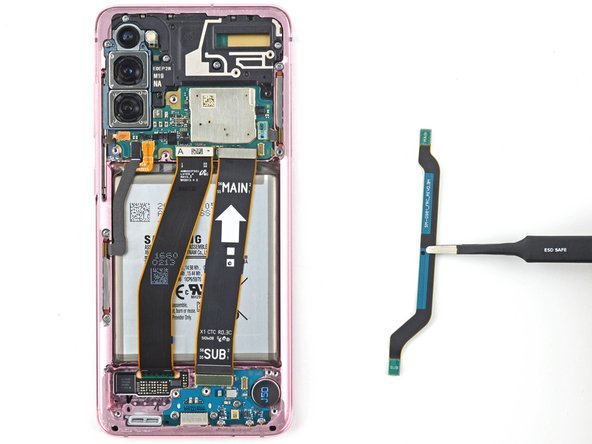
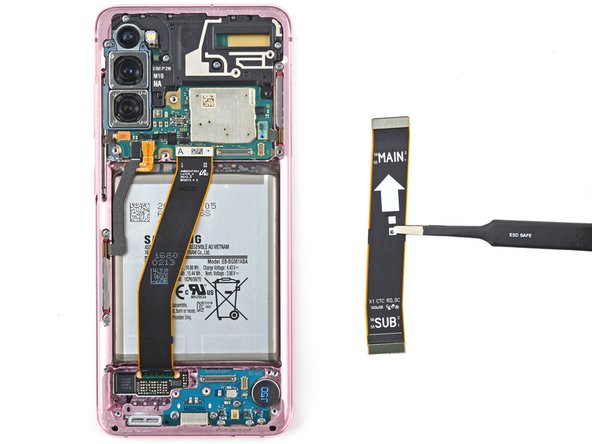
Use a spudger to pry up and disconnect the primary and secondary flex cables from the motherboard.
-
-
-
Use a Phillips #00 screwdriver to remove the three 3.4 mm-long screws securing the USB-C port and daughterboard.
-
-
-
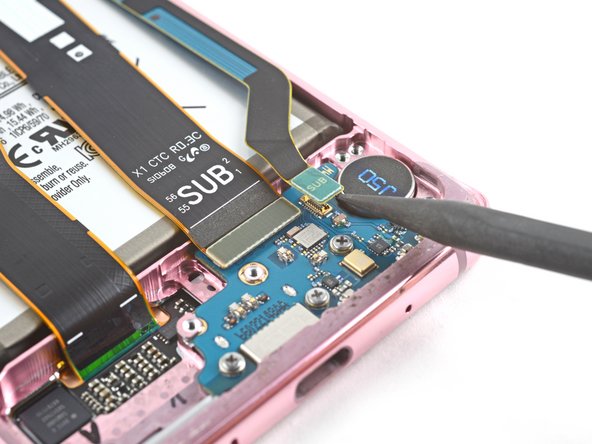
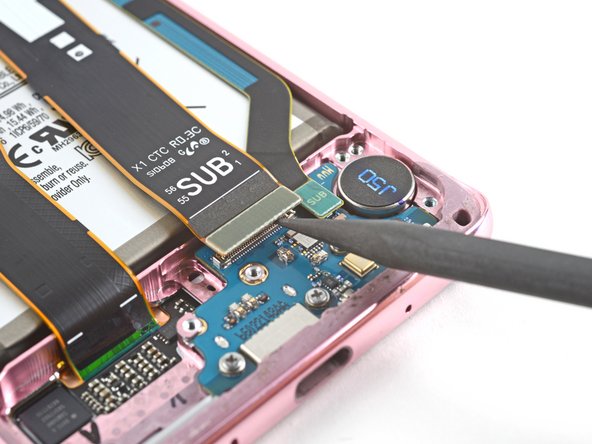
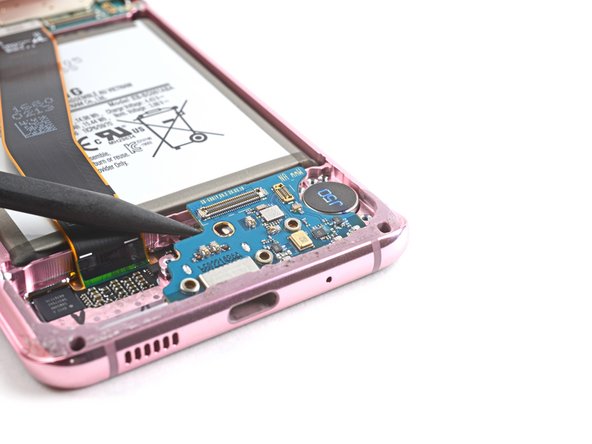
Insert the pointed end of a spudger under the left edge of the daughterboard and pry up to release it from its recess.
-
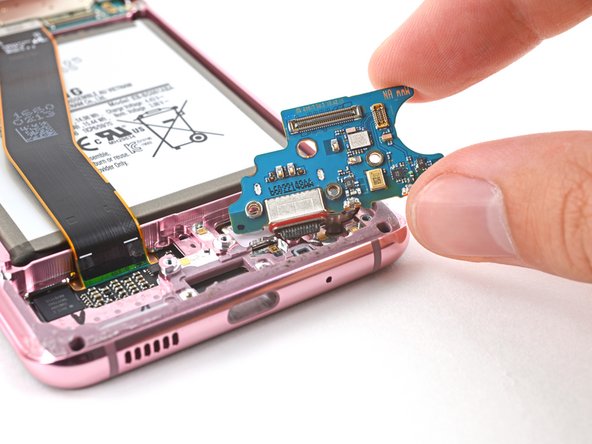
Use a pair of tweezers to pull the daughterboard up and away from the bottom of the device and remove it.
-
-
-
Apply a heated iOpener to the bottom-right corner of the device for 90 seconds.
-
-
-
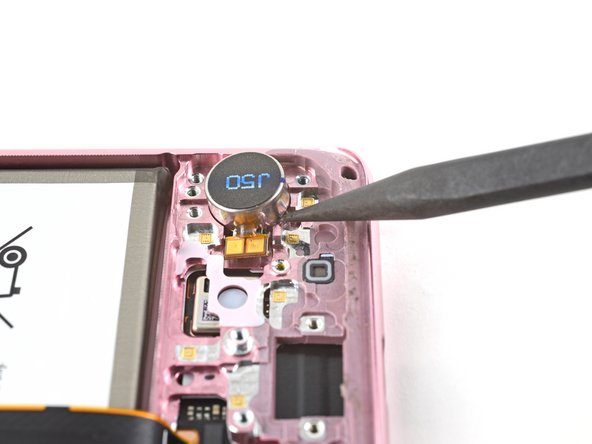
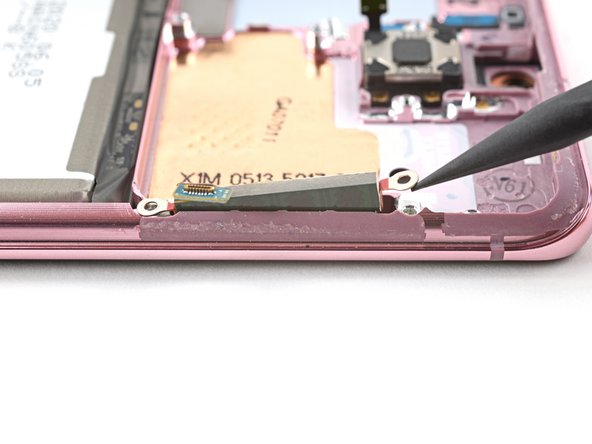
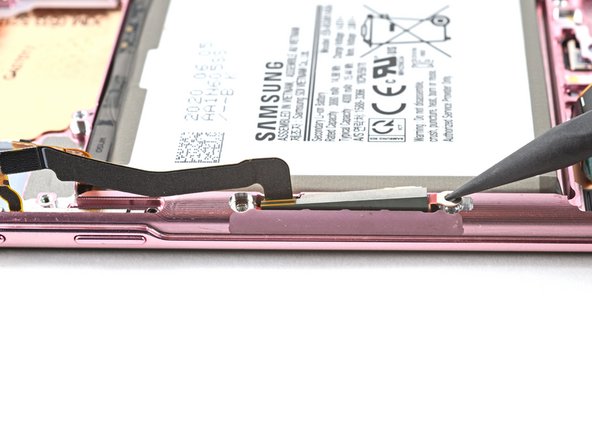
Insert the tip of a spudger between the frame and the notch in the vibrator's edge, close to the bottom edge of the device.
-
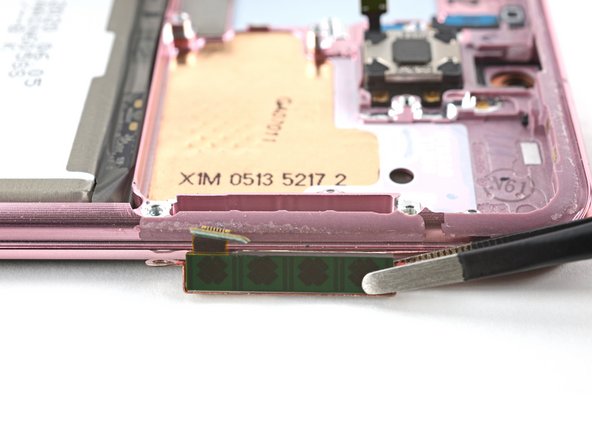
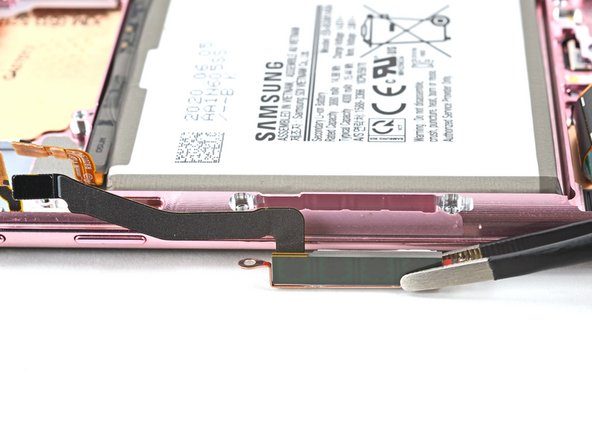
Pry up with the spudger to separate the vibrator from the frame.
-
Remove the vibrator.
-
-
-
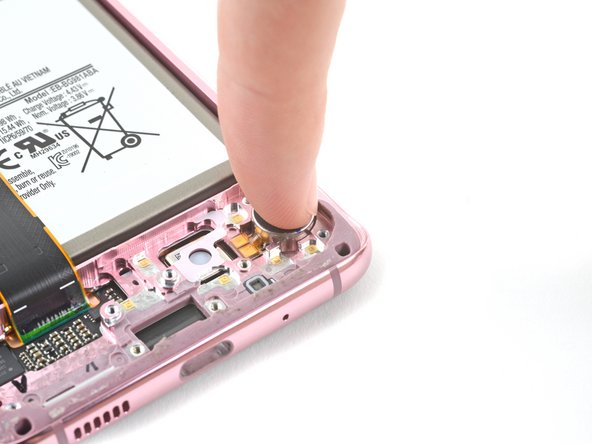
Peel off the vibrator adhesive from its liner and apply the sticky end to the frame.
-
Use tweezers, or your fingers, to pull on the tab and expose the top layer of adhesive.
-
Insert the vibrator and apply pressure to adhere it to the frame.
-
-
-
Use a Phillips #00 screwdriver to remove the four 4 mm-long screws securing the upper midframe.
-
-
-
Insert the point of a spudger into the notch on the right side of the upper midframe and pry up to release the clips holding it into place.
-
Remove the upper midframe.
-
-
-
Use a spudger to pry up and disconnect the left 5G mmWave antenna's press connector from the motherboard.
-
Repeat for the power button cable.
-
-
-
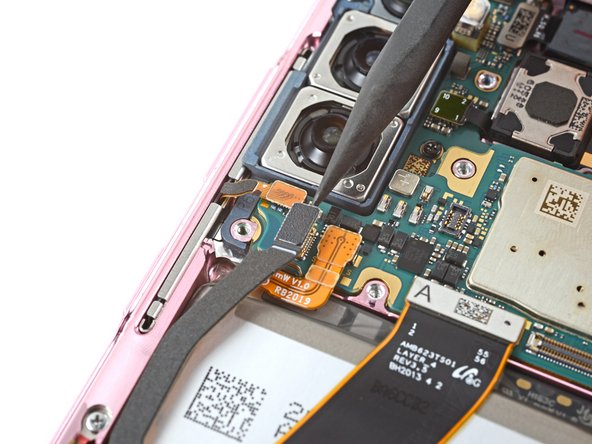
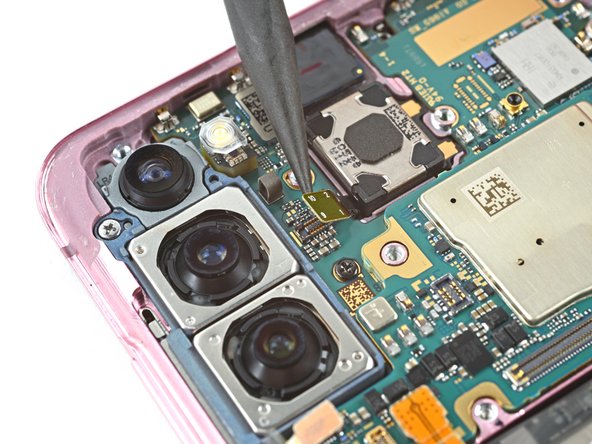
Pry up and disconnect the front facing camera flex cable from the motherboard.
-
Bend the cable out of the way of the motherboard.
-
-
-
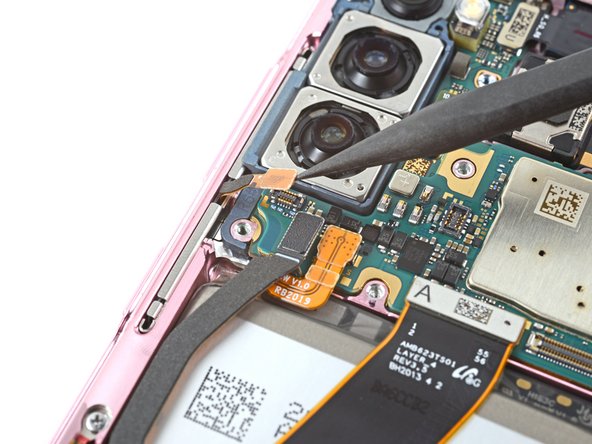
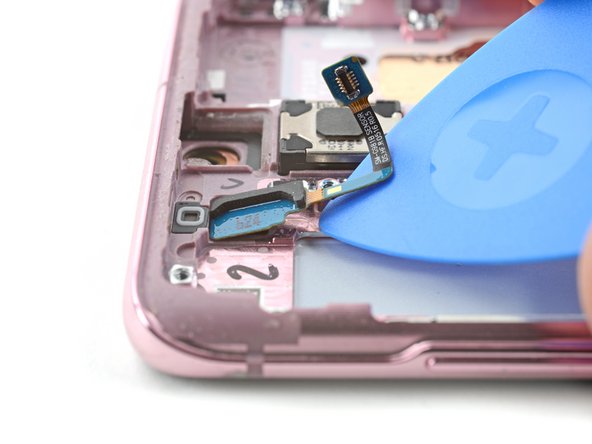
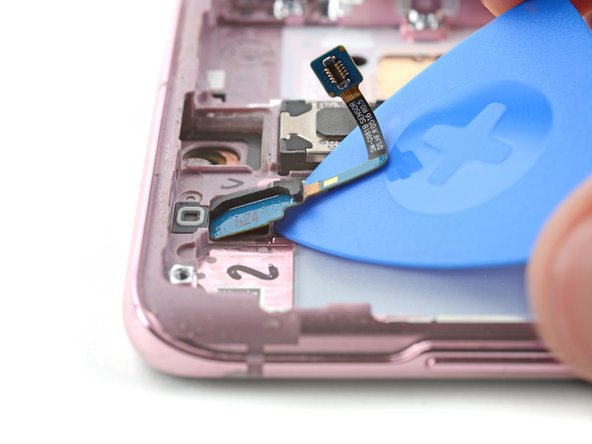
Pry up and disconnect the proximity sensor cable from the motherboard.
-
Bend the cable out of the way of the motherboard.
-
-
-
Use a spudger to pry up and disconnect the right 5G mmWave antenna's press connector.
-
-
-
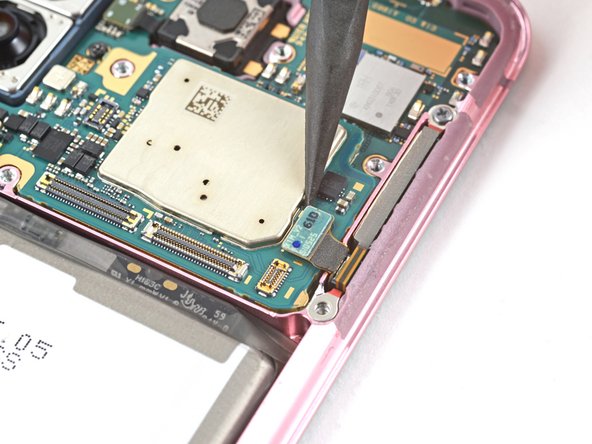
Use a spudger to pry up and disconnect the main display flex cable from the motherboard.
-
-
-
Gently peel up and bend the display flex cable out of the way of the motherboard and battery.
-
-
-
Use tweezers, or your fingers, to gently peel the left 5G cable away from the device.
-
-
-
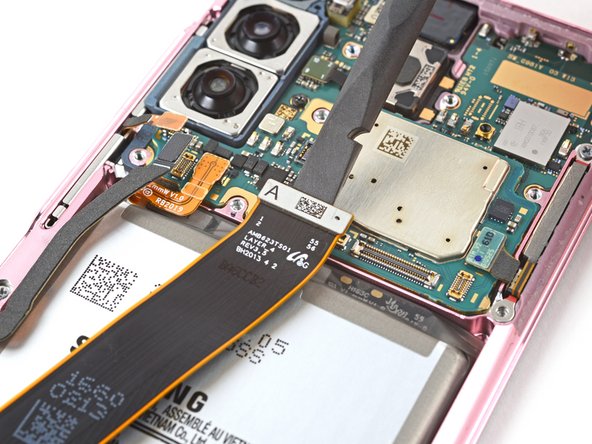
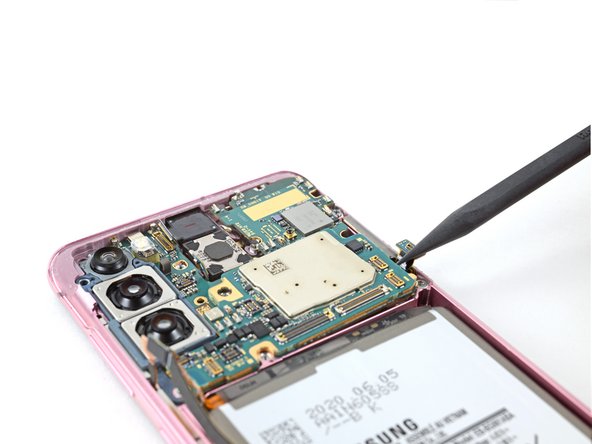
Use a Phillips #00 screwdriver to remove the two screws securing the motherboard and camera assembly:
-
One 4 mm-long screw
-
One 3 mm-long screw
-
-
-
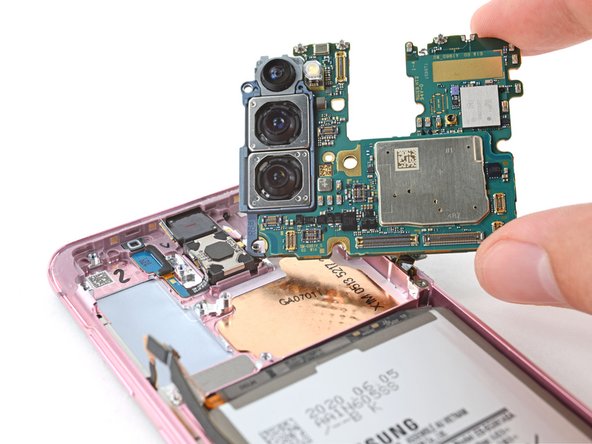
Insert the flat end of a spudger into the bottom left corner of the motherboard assembly and pry up to release it from the phone body.
-
Remove the motherboard assembly.
-
-
-
Insert a spudger into the gap between the frame and the front camera.
-
Pry up with the spudger to separate the front camera from the frame.
-
Use tweezers, or your fingers, to remove the front camera.
-
-
-
Peel off the front camera adhesive from its liner and apply the sticky end to the frame.
-
Use tweezers, or your fingers, to pull on the tab and expose the top layer of adhesive.
-
Insert the front camera and apply pressure to adhere it to the frame.
-
-
-
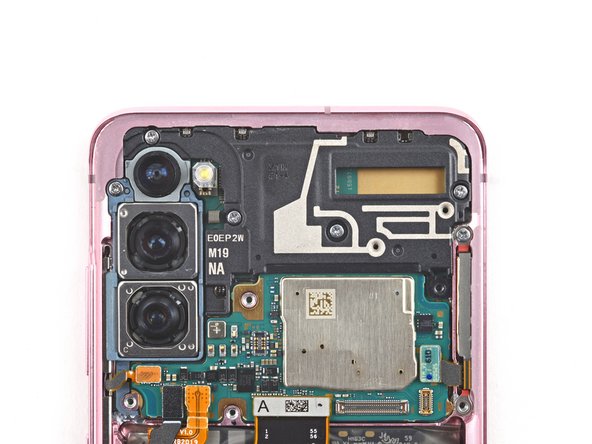
Use a Phillips screwdriver to remove the three 3.4 mm-long screws securing the 5G mmWave antennas.
-
-
-
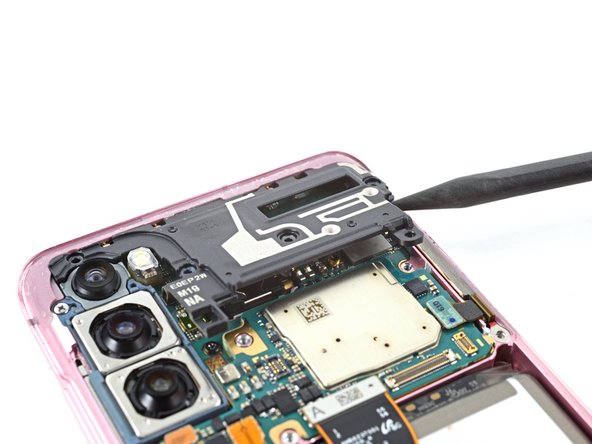
Use the point of a spudger to pry up on the 5G mmWave antenna bracket's bottom screw tab.
-
Use tweezers, or your fingers, to remove the 5G mmWave antenna.
-
-
-
Use the point of a spudger to pry up on the 5G mmWave antenna bracket's top edge.
-
Use tweezers, or your fingers, to remove the 5G mmWave antenna.
-
-
-
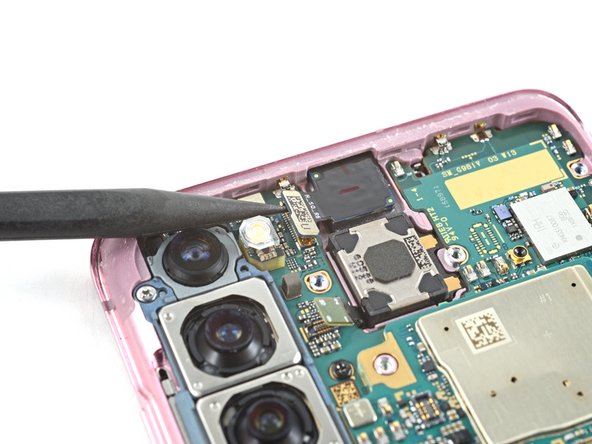
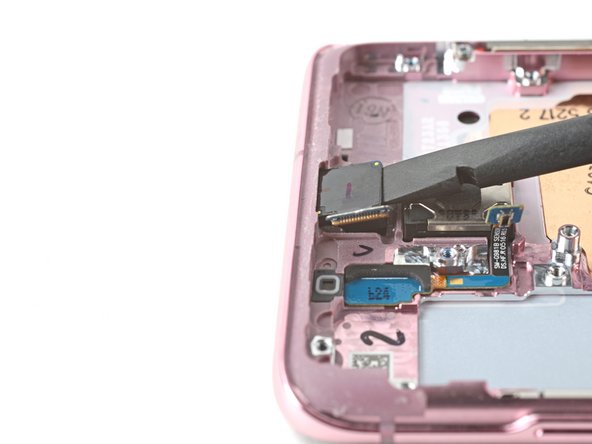
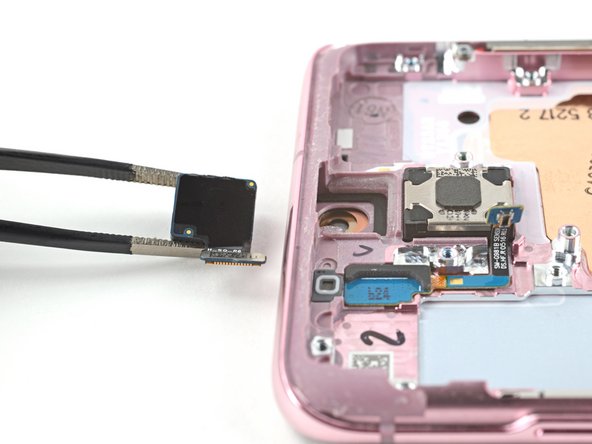
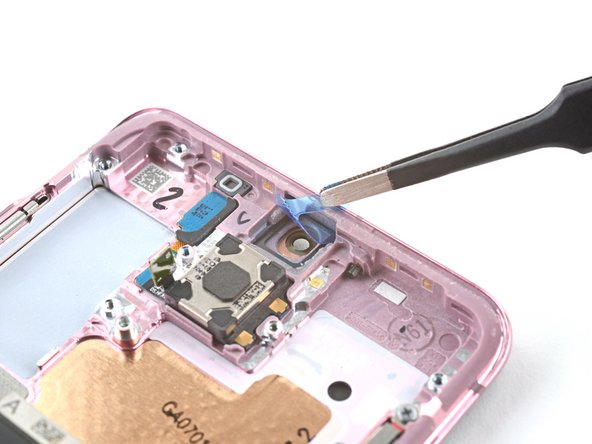
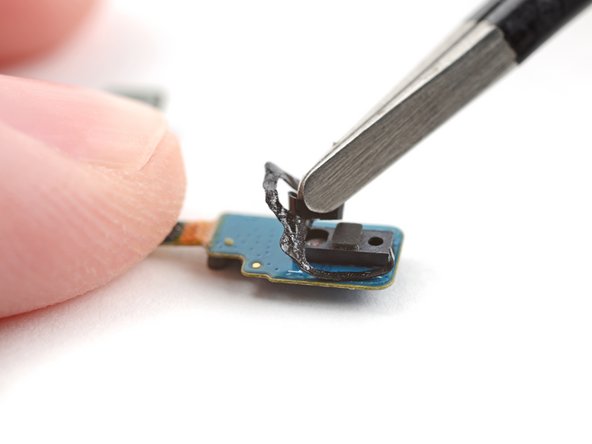
Heat an iOpener and apply it to the proximity sensor for two minutes.
-
-
-
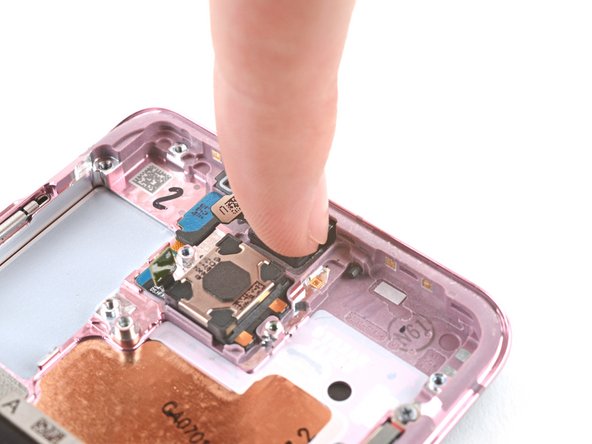
Insert an opening pick between the bottom of the proximity sensor and the frame.
-
Slide the pick towards the top of the phone to separate the proximity sensor adhesive.
-
-
-
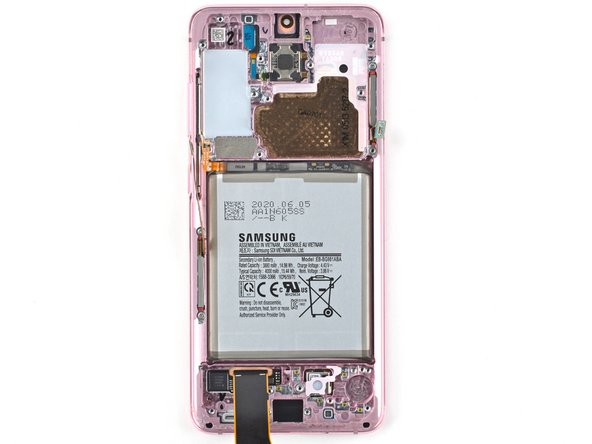
You're now left with the screen and battery assembly.
-


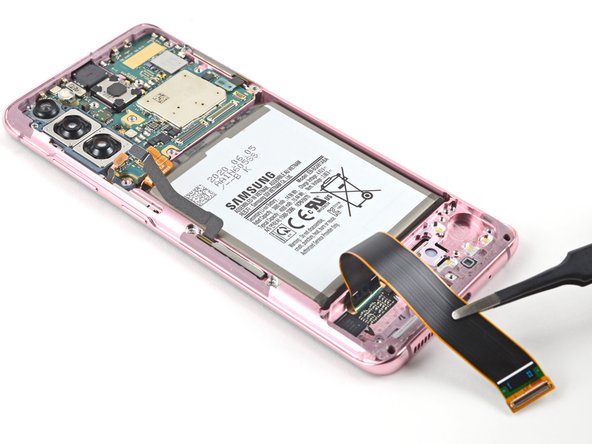


To reassemble your device, follow these instructions in reverse order.
Take your e-waste to an R2 or e-Stewards certified recycler.
Repair didn’t go as planned? Check out our Answers community for troubleshooting help.
To reassemble your device, follow these instructions in reverse order.
Take your e-waste to an R2 or e-Stewards certified recycler.
Repair didn’t go as planned? Check out our Answers community for troubleshooting help.
Annulation : je n'ai pas terminé ce tutoriel.
10 autres ont terminé cette réparation.


5 commentaires
There were a few minor differences with my disassembly I wanted to note in case other users run into the same thing:
Note: The biggest curve ball for me was that the guide does not discuss how to remove the proximity sensor from the old assembly and move it to the new one. I winged it, but hopefully iFIXIT will update this guide, and also provide new adhesive for the sensor, because this is absolutely a necessary step to make.
Step 16: It was not necessary to disconnect the wireless charging coil. There was no fastened connection, just contact.
Step 31: The location of the screws for the upper midframe is slightly different on my model. The second from the right screw is closer to the middle.
Step 33: There was only one cable coming from the left frame. There was no 5G cable
Step 36: not present
Step 42-44: The replacement assembly includes the front camera
Step 45-47: Not applicable
Everything went well replacing the display and battery. The most difficult part was that there was not mention of the proximity sensor from the old assembly and just had to figure it out myself. Heated it up to remove but had to use the old adhesive. Also, should have purchased a new back cover because getting the old adhesive off was not easy. Phone now works like new.
I left a few comments on steps within the guide that should help any slight variations during the procedure. In the conclusion, there is a repair app that is supposed to allow you to calibrate the new hardware, but I wasn't able to open the app, and my kit didn't come with the tools for calibrating the fingerprint sensor anyways. This doesn't seem to be a absolutely necessary though; the battery is auto-calibrating with full charge and drain cycles, the new fingerprint reader still works perfectly with my original fingerprints, and the front camera is fully functional. Additionally, all tests in the Samsung Members app passed, so everything seems to be 100% functional.
The reason for reading this was for the battery replacement and going through the whole thing I read the last instruction, "You're now left with the screen and battery assembly"... Am I missing something? (I read through, luckily did not actually do the steps).