Aller au contenu principal
Pour réparer ensemble - Je crée un compte

HP G62-223CL RAM Replacement

Ce dont vous avez besoin

    1. HP G62-223CL RAM Replacement, Battery Removal: étape 1, image 1 de 2 HP G62-223CL RAM Replacement, Battery Removal: étape 1, image 2 de 2
      • Removing the battery while the laptop is still on may corrupt your files.

      • Turn the device over to expose the bottom of the device.

      • Slide the battery release all the way to the left.

      • There will be a click and the battery will be released from its compartment.

      Demander à FixBot

      Ajouter un commentaire

    2. HP G62-223CL RAM Replacement: étape 2, image 1 de 1
      • Carefully remove the battery from its compartment.

      Demander à FixBot

      Ajouter un commentaire

    1. HP G62-223CL RAM Replacement, RAM: étape 3, image 1 de 1
      • Locate three Phillips head retaining screws which secure RAM compartment.

      • Use a Phillips #0 screwdriver to loosen the screws.

      • Remove the panel covering the compartment.

      • Ground yourself before attempting to touch any components. To ground yourself, touch a conductive metal to eliminate any static buildup in your body, which can damage computer components.

      Demander à FixBot

      Ajouter un commentaire

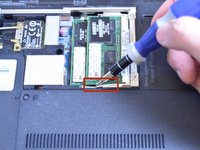
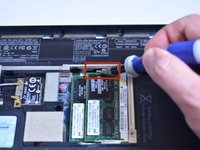
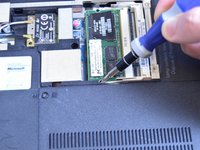
    2. HP G62-223CL RAM Replacement: étape 4, image 1 de 2 HP G62-223CL RAM Replacement: étape 4, image 2 de 2
      • Use the tip of a screw driver to press the release clips away from the RAM module.

      • Once the second clip is released, the module will automatically pop up.

      Demander à FixBot

      Ajouter un commentaire

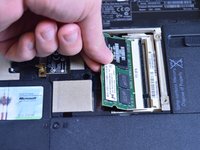
    3. HP G62-223CL RAM Replacement: étape 5, image 1 de 1
      • Carefully remove module from slot.

      • Be careful not to damage modules when removing them from their slots.

      Demander à FixBot

      Ajouter un commentaire

    4. HP G62-223CL RAM Replacement: étape 6, image 1 de 2 HP G62-223CL RAM Replacement: étape 6, image 2 de 2
      • Repeat steps 4 and 5 for additional RAM modules.

      Demander à FixBot

      Ajouter un commentaire

Conclusion

To reassemble your device, follow these instructions in reverse order.

Annulation : je n'ai pas terminé ce tutoriel.

Une autre personne a terminé cette réparation.

Garret Layton

Membre depuis le 01/13/15

687 Réputation

5 tutoriels rédigés

Équipe

USF Tampa, Team 1-4, Sullivan Winter 2015 Membre de l'équipe USF Tampa, Team 1-4, Sullivan Winter 2015

USFT-SULLIVAN-W15S1G4

4 membres

10 tutoriels rédigés

0 commentaires de tutoriel

Ajouter un commentaire

Nombre de vues :

Dernières 24 heures : 1

7 derniers jours : 5

30 derniers jours : 17

Total : 949