Aller au contenu principal
Pour réparer ensemble - Je crée un compte

HP Mini 210-1199DX RAM Replacement

Ce dont vous avez besoin

    1. HP Mini 210-1199DX RAM Replacement, Battery: étape 1, image 1 de 2 HP Mini 210-1199DX RAM Replacement, Battery: étape 1, image 2 de 2
      • Unplug the netbook.

      • Secure the netbook in a upright position.

      • Slide the plastic battery latch that secures it into the netbook.

      • Keep thumb secure on the right tab as you begin to remove the battery.

      Demander à FixBot

      Ajouter un commentaire

    2. HP Mini 210-1199DX RAM Replacement: étape 2, image 1 de 1
      • Remove the battery from the device.

      Demander à FixBot

      Ajouter un commentaire

    1. HP Mini 210-1199DX RAM Replacement, Bottom Cover: étape 3, image 1 de 1
      • Press down on the two orange buttons to release.

      • If the case does not pop off, begin to use Spudger to pry the case off the back.

      Demander à FixBot

      Ajouter un commentaire

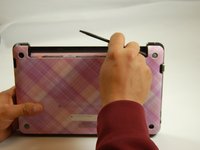
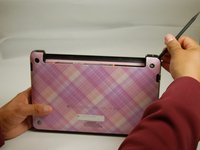
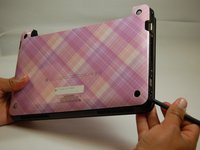
    2. HP Mini 210-1199DX RAM Replacement: étape 4, image 1 de 3 HP Mini 210-1199DX RAM Replacement: étape 4, image 2 de 3 HP Mini 210-1199DX RAM Replacement: étape 4, image 3 de 3
      • Place the spudger on corners and openings in order to begin removal of the back.

      • Continue this on all corner until the case comes fully off of the back.

      Demander à FixBot

      Ajouter un commentaire

    3. HP Mini 210-1199DX RAM Replacement: étape 5, image 1 de 1
      • Pull the case off of the device

      Demander à FixBot

      Ajouter un commentaire

    1. HP Mini 210-1199DX RAM Replacement, RAM: étape 6, image 1 de 1
      • Locate RAM systems.

      Demander à FixBot

      Ajouter un commentaire

    2. HP Mini 210-1199DX RAM Replacement: étape 7, image 1 de 1
      • Use spudger to carefully pull the holding devices back.

      • RAM should pop out once this is completed.

      Demander à FixBot

      Ajouter un commentaire

    3. HP Mini 210-1199DX RAM Replacement: étape 8, image 1 de 1
      • Carefully pull the RAM card out.

      Demander à FixBot

      Ajouter un commentaire

Conclusion

To reassemble your device, follow these instructions in reverse order.

Annulation : je n'ai pas terminé ce tutoriel.

Une autre personne a terminé cette réparation.

Phillip Winston

Membre depuis le 03/21/17

655 Réputation

6 tutoriels rédigés

Équipe

Texas Tech, Team S46-G3, Bennett Spring 2017 Membre de l'équipe Texas Tech, Team S46-G3, Bennett Spring 2017

TTU-BENNETT-S17S46G3

3 membres

12 tutoriels rédigés

0 commentaires de tutoriel

Ajouter un commentaire

Nombre de vues :

Dernières 24 heures : 0

7 derniers jours : 5

30 derniers jours : 17

Total : 622