Aller au contenu principal

HP Pavilion G60-120US Keyboard Replacement

Ce dont vous avez besoin

  1. HP Pavilion G60-120US Keyboard Replacement, Battery: étape 1, image 1 de 1
    • Make sure the laptop is turned off.

    • Turn the laptop over to reveal the battery.

  2. HP Pavilion G60-120US Keyboard Replacement: étape 2, image 1 de 2 HP Pavilion G60-120US Keyboard Replacement: étape 2, image 2 de 2
    • Slide and hold the battery release switch to the left to release the battery from the device.

  3. HP Pavilion G60-120US Keyboard Replacement: étape 3, image 1 de 2 HP Pavilion G60-120US Keyboard Replacement: étape 3, image 2 de 2
    • While holding the battery release switch, grab the battery and pull it upward gently.

  4. HP Pavilion G60-120US Keyboard Replacement, Keyboard: étape 4, image 1 de 1
    • Using the Phillips #0 screwdriver, remove the seven 4.0mm screws on the battery compartment of the laptop.

  5. HP Pavilion G60-120US Keyboard Replacement: étape 5, image 1 de 2 HP Pavilion G60-120US Keyboard Replacement: étape 5, image 2 de 2
    • Using the Phillips #0 screwdriver, remove two 4.0mm screws from the hard disk cover.

    • Remove the hard disk cover.

  6. HP Pavilion G60-120US Keyboard Replacement: étape 6, image 1 de 2 HP Pavilion G60-120US Keyboard Replacement: étape 6, image 2 de 2
    • Remove the hard drive by pulling gently and disconnecting the hard drive from the laptop.

    • Gently pull on the black and red wiring on the bottom left to separate the wire from the component.

  7. HP Pavilion G60-120US Keyboard Replacement: étape 7, image 1 de 1
    • Remove the two 4.0 mm Phillips #0 screws from the hard disk compartment.

  8. HP Pavilion G60-120US Keyboard Replacement: étape 8, image 1 de 3 HP Pavilion G60-120US Keyboard Replacement: étape 8, image 2 de 3 HP Pavilion G60-120US Keyboard Replacement: étape 8, image 3 de 3
    • Using the Phillips #0 screwdriver, remove the two 4.0 mm screws from the memory card cover.

    • Remove the memory disk cover.

  9. HP Pavilion G60-120US Keyboard Replacement: étape 9, image 1 de 3 HP Pavilion G60-120US Keyboard Replacement: étape 9, image 2 de 3 HP Pavilion G60-120US Keyboard Replacement: étape 9, image 3 de 3
    • Using the Phillips #0 screwdriver, remove the 4.0 mm screw from the Wi-Fi chip cover.

    • Remove the Wi-Fi chip cover.

  10. HP Pavilion G60-120US Keyboard Replacement: étape 10, image 1 de 2 HP Pavilion G60-120US Keyboard Replacement: étape 10, image 2 de 2
    • Using the Phillips #0 screwdriver, remove the two 3.0 mm screws securing the Wi-Fi chip in place.

    • Grab the Wi-Fi chip and pull up gently to the left to disconnect it from the laptop.

  11. HP Pavilion G60-120US Keyboard Replacement: étape 11, image 1 de 2 HP Pavilion G60-120US Keyboard Replacement: étape 11, image 2 de 2
    • Disconnect the two wires connecting the chip's base.

    • Remove the Wi-Fi chip.

  12. HP Pavilion G60-120US Keyboard Replacement: étape 12, image 1 de 1
    • Using the Phillips #0 screwdriver, remove the seven 4.0 mm screws on the bottom of the laptop.

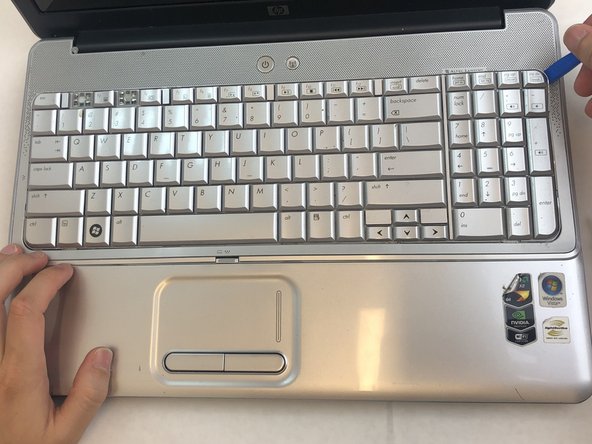
  13. HP Pavilion G60-120US Keyboard Replacement: étape 13, image 1 de 3 HP Pavilion G60-120US Keyboard Replacement: étape 13, image 2 de 3 HP Pavilion G60-120US Keyboard Replacement: étape 13, image 3 de 3
    • Turn the laptop back to its upright state.

    • Insert an opening tool into the upper right corner of the keyboard and gently lift it to separate it from the laptop.

    • Be sure not to apply excessive pressure to prevent the bending and breaking of the keyboard.

    • Do not pull the keyboard all the way out because there is a wiring connection under the keyboard.

  14. HP Pavilion G60-120US Keyboard Replacement: étape 14, image 1 de 3 HP Pavilion G60-120US Keyboard Replacement: étape 14, image 2 de 3 HP Pavilion G60-120US Keyboard Replacement: étape 14, image 3 de 3
    • Grab the wiring and gently pull it out to disconnect it from the laptop.

    • Don't use excessive force.

    • Remove the keyboard.

Conclusion

To reassemble your device, follow these instructions in reverse order.

Kristen Gismondi

Membre depuis le 11/12/14

84 853 Réputation

215 tutoriels rédigés

Équipe

iFixit Membre de l'équipe iFixit

Staff

141 membres

17 895 tutoriels rédigés

0 commentaires

Ajouter un commentaire

Nombre de vues :

Dernières 24 heures : 2

7 derniers jours : 3

30 derniers jours : 4

Total : 155