Introduction
Mettez à niveau votre disque dur pour disposer d'une plus grande capacité de stockage.
Ce dont vous avez besoin
-
-
Desserrez les deux vis Phillips par lesquelles la trappe d'accès est fixée à votre iMac.
-
Retirez la trappe d'accès.
-
-
-
Retirez les vis suivantes le long du bord inférieur de votre iMac :
-
Trois vis Torx T8 6 mm
-
Une vis Torx T8 8 mm (côté droit de l'emplacement de la RAM sur le 2015)
-
-
-
Insérez une carte plastique dans l'angle de la zone de ventilation, dans la partie supérieure du boîtier arrière.
-
Poussez la carte vers le haut de l'iMac pour déverrouiller le loquet du cadre avant.
-
Sortez le cadre avant du boîtier arrière.
-
Répétez l'opération pour l'autre côté du cadre avant.
-
Si vous ne parvenez pas à déverrouiller l'écran avant, essayez de soulever légèrement le bord inférieur du cadre avant hors du boîtier arrière (la procédure est décrite en détail dans les étapes suivantes) et répétez l'opération de déverrouillage des loquets.
-
-
-
Posez l'iMac à l'envers sur une surface plane.
-
Pour soulever le cadre avant hors de l'iMac, effectuez les opérations suivantes simultanément :
-
À l'aide de vos pouces, enfoncez les clips de fixation de la RAM et maintenez l'iMac vers le bas.
-
À l'aide de vos index, soulevez le bord supérieur du cadre avant, situé au dessus des emplacements de la RAM.
-
Soulevez le cadre avant avec vos deux index.
-
Après avoir dégagé les clips de fixation de la RAM, soulevez le bord inférieur du cadre avant suffisamment pour libérer le bas du boîtier arrière.
-
-
-
Décollez le blindage EMI inférieur du boîtier arrière.
-
-
-
-
Retirez les deux vis Torx T6 5 mm par lesquelles le câble de données de l'écran est fixé à la carte mère.
-
Tirez sur la languette d'extraction noire du connecteur du câble de données de l'écran pour le débrancher de la carte mère.
-
-
-
Débranchez le capteur thermique du disque dur du bord supérieur de la carte mère.
-
-
-
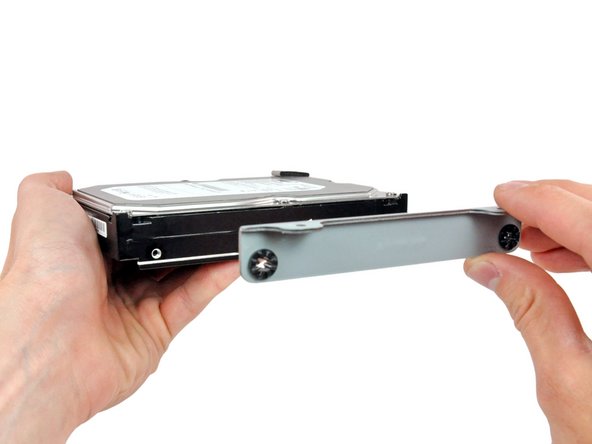
Retirez les deux vis à épaulement Torx T8 12 mm par lesquelles le support du disque dur est fixé à ce dernier, du côté des connecteurs.
-


Pour remonter votre appareil, suivez les mêmes instructions dans l'ordre inverse.
Pour remonter votre appareil, suivez les mêmes instructions dans l'ordre inverse.
Annulation : je n'ai pas terminé ce tutoriel.
343 autres ont terminé cette réparation.
Merci à ces traducteurs :
100%

Fabienne Detoc nous aide à réparer le monde ! Vous voulez contribuer ?
Commencez à traduire ›

19 commentaires
I used this guide in conjunction with this video for reference that was really helpful: http://www.youtube.com/watch?v=ShY8zuT-w... (and part 2). Repair went really easy (just take it slow). Hardest part for me was pulling out the screen. The torx screws are pretty far in and the 26 piece kit I bought from here wasn't long enough to reach (the extension has a large round magnet on it that will not insert far enough because of limited space). Thankfully I had a torx at home that was longer for that specific size, so I was able to unscrew just enough with MY torx and use the magnetic one to grab the screw (absolutely necessary to have a magnetic version). Bought the Western Digital drive and found out that it would not format with the original OS Tiger disk. Only OS Snow Leopard's Disk Utility would read the HD properly and format for Mac. If buying the Western Digital, make sure you have a newer OS to install than Tiger. I read about possible problems with OS Leopard's Disk Utility and WD drives as well, but I cannot speak specifically for that.
Great guide! I can't think of anything to add. Read it over several times to take in all for the tips, they are helpful. I replaced my dead HD with a 120GB SSD (OCZ Vertex 3 VTX3-25SAT3-120G). It is working great with Snow Leopard. I had to use Trim Enabler but that seems to be working fine. The 2.5 to 3.5 drive adapter was too small to fit the apple attachment be the two sided tape mount seems very secure.
A small feedback from my iman. (Late 2006, early 2007 20" display 2.16 intel core 2 duo):
Just changed my hdd and everything worked out fine. Two things are important as I found out that they differed from this guide:
1. In order to release the front bezel latches the card must be not be inserted vertically as shown in the pictures but with a slight angle using the direction from inside towards the upper corner of the bezel. I saw this in the following youtube video:
2. The torx requested to release the display screws is not a No 6 but a smaller one. Probably a No. 4, Ι am not sure exactly as I did not have one so I used a normal small screwdriver instead.
I hope I helped, the rest of the guide was very accurate and quite easy to follow.