Il est possible que cette traduction ne reflète pas les dernières mises à jour du tutoriel source. Aidez à mettre à jour la traduction ou bien consultez le tutoriel source.
Introduction
Retirez et/ou remplacez le ventilateur avant du Mac Pro de première génération.
Ce dont vous avez besoin
-
Cette étape n’est pas traduite. Aidez à la traduire
-
Type: Serial Attached SCSI (SAS) or Serial ATA (SATA) 3 Gb/s
-
Width: 3.9 inches (102 mm)
-
Depth: 5.7 inches (147 mm)
-
Height: 1.0 inch
-
-
Cette étape n’est pas traduite. Aidez à la traduire
-
Before you begin, open the computer, and lay it on its side with the access side facing up.
-
-
Cette étape n’est pas traduite. Aidez à la traduire
-
Make sure the latch on the back panel is up, so that the drives and carriers are unlocked.
-
Pull the hard drive out of the drive bay.
-
-
Cette étape n’est pas traduite. Aidez à la traduire
-
If you are replacing the hard drive with a new drive, remove the four screws that mount the 3. drive to the carrier and mount the new drive in the carrier.
-
-
Cette étape n’est pas traduite. Aidez à la traduire
-
This procedure explains how to remove a standard card and a card that includes a booster cable. Before you can remove either type of card, however, you must first loosen the two captive screws that secure the PCI bracket to the enclosure and remove the bracket.
-
-
-
Cette étape n’est pas traduite. Aidez à la traduire
-
1) Release the small locking clip at the front of the card’s logic board connector by pushing the clip up toward the media shelf.
-
2) Holding the card by the top corners, pull up the card and remove it from its expansion slot.
-
-
Cette étape n’est pas traduite. Aidez à la traduire
-
Disconnect the booster cable(s) from the logic board.
-
Release the small locking clip at the front of the card’s logic board connector by pushing the clip up toward the media shelf.
-
Holding the card by the top corners, gently pull up the card and remove it from its expansion slot.
-
-
Cette étape n’est pas traduite. Aidez à la traduire
-
Place the fingers of one hand under the lip of the heatsink cover nearest the logic board. Lift the lip slightly toward the media shelf to release the tabs and magnets under the top face of the cover.
-
With your fingers still under the cover’s bottom lip, lift the cover straight up to release the remaining tabs and magnets under the front face of the cover
-
Remove the cover from the enclosure.
-
-
Cette étape n’est pas traduite. Aidez à la traduire
-
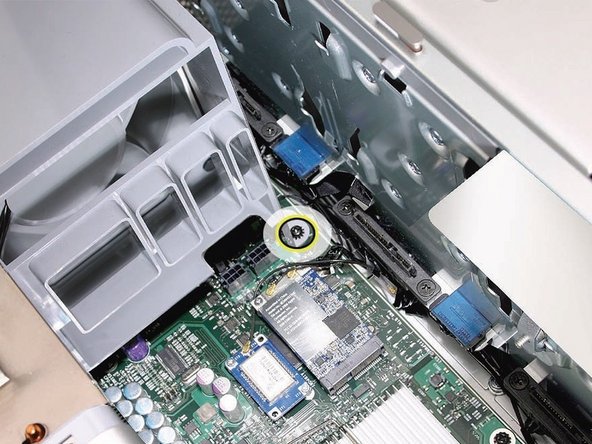
Using a long-handled, magnetized #1 Phillips screwdriver, remove the screw at the top rear of the front fan assembly that mounts the assembly to the logic board.
-
-
Cette étape n’est pas traduite. Aidez à la traduire
-
Remove the second Phillips screw at the bottom front of the assembly.
-
-
Cette étape n’est pas traduite. Aidez à la traduire
-
Place one hand on each end of the fan, lift straight up, and remove the fan from the enclosure.
-
-
Cette étape n’est pas traduite. Aidez à la traduire
-
Replacement Note: Also make sure the latch on the inside top left edge of the fan assembly engages with the slot on the inside lip of the enclosure
-


Pour réassembler votre appareil suivez les instructions dans le sens inverse.
Pour réassembler votre appareil suivez les instructions dans le sens inverse.
Annulation : je n'ai pas terminé ce tutoriel.
27 autres ont terminé cette réparation.
Merci à ces traducteurs :
44%


Ces traducteurs nous aident réparer le monde ! Vous voulez contribuer ?
Commencez à traduire ›
