Introduction
This motherboard includes all ports on the left side.
Ce dont vous avez besoin
-
-
Use a coin or spudger to rotate the battery-locking screw 90 degrees clockwise.
-
-
-
Lift the battery out of the computer.
I just replaced the battery as indicated (with a iFixit part), but the computer says there is no battery connected, even after letting the power plug in for more than one hour.
I think I found the way to have the new battery to charge!!!!!
See: https://www.youtube.com/watch?v=jRYIMDQx....
Essentially, you have to follow a very precise order: 1/shut down the computer, 2/take off the magsafe connector, 3/remove the old battery, 4/put back the magsafe connector, 5/put the new battery, 6/power on, each time leaving a few seconds in between.
-
-
-
Unscrew the three evenly-spaced Phillips screws from along the rear wall of the battery compartment.
Lay the screws out in a ”timeline” like a circle, Then when you reassemble just start from the end of the “timeline”
The screws have to unscrewing positions, first they unscrew from the whole body BUT if you move the lid without entirely removing the screws, they will remain attached to the lid. This I find much more recomendable!
What size screwdriver
Edward: Philips 000
-
-
-
Grasp the right end of the L-shaped memory cover, then pull it towards you so it clears the battery compartment opening.
-
Lift the memory cover up and out of the computer.
-
-
-
Remove the following 3 screws:
-
One 11 mm Phillips#00 in the middle of the lower case. (Head: 5mm dia. x .75mm thick)
-
Two 14.5 mm Phillips #00 (Head: 5mm dia. x .75mm thick)
Citation de ryan64 :
I couldn't get the top two 11mm screws to come out, even with a magnetized driver. When I tried to keep unscrewing them, they clicked like they were spring mounted, and I didn't have any trouble leaving them in and continuing on.
I use a strong magnet to pull the screws out of their socket.
You need to replace the shorter middle screw first, otherwise it won't tighten later since it won't quite reach the bottom.
for me this was the hardest part especially the two 14.5mm that dint want to come out. keep turning the screw and slightly pressing the case down, once the screw is a little use try using finger, screw and a non metallic point to try to push them out. they arent tight but they are very hard to unscrew i almost gave up, but believe me they come out with patience
-
-
-
Remove the following 3 screws from the rear wall of the battery compartment:
-
One 3 mm Phillips #0. (Head: 2.75 mm. dia.)
-
Two 4 mm Phillips #0 on the either side. (Head: 2.75mm dia.)
On this step, I encountered a problem. The middle screw was screwed in very very tightly. As a result, I ended up stripping the screw despite being very careful. I tried to use a wire cutter to remove the screw, but that did not work. I actually ended up using the wirecutter to cut the bracket off, leaving the screw screwed in. This did not affect anything. I am typing off of my replace macbook top case right now.
The point is, BE CAREFUL! but if something does go wrong, don't fret. There are solutions.
On a Macbook I just tore down, I found that in this step, the 4mm screw was on the left, not the right. I thought maybe someone else had it apart before and accidentally switched them so in staying true to these instructions I tried to reassemble with the 4mm screw on the right. I found it would not go all the way in. I ended up putting it back together with the 2-3mm screws on the right and the 1-4mm screw on the left.
I didn't look closely at these screws when I took it apart, but when I went to put it back together (two weeks later) I found I had two longer (4mm?) screws, and one short one. So I put the longer ones in the two end spots, the short one in the middle; they all seemed to go in okay. (Maybe the screws got changed around the last time the cracked top case was replaced, when the MB was in the Apple shop under warranty last year.)
Me too. I had two longer 4mm screws here, and one 3mm screw. And I didn't pay attention to what holes each screw came out of. I put them back in a random order and it seems fine.
Thomas -
My early 2008 MacBook was the same. 2 x 4mm in the outer and 1 x 3mm in the centre.
Ernie K -
You need to replace the shorter middle screw first, otherwise it won't tighten later.
I needed a tweezers here. These screws are tiny!
If you lose one you may have to remove the RAM (by pulling the appropriate lever) and gently slide out the screw.
oh thanks I thought the screw was lost forever
To confirm what HandyMac and colmcostelloe found, some MacBooks have one 3mm and two 4mm screws in the rear wall of the battery compartment. On the one I worked on, the shorter 3mm screw came from the middle hole.
Citation de BeatJunkie :
To confirm what HandyMac and colmcostelloe found, some MacBooks have one 3mm and two 4mm screws in the rear wall of the battery compartment. On the one I worked on, the shorter 3mm screw came from the middle hole.
Thanks Beat Junkie, this was the situation with my Mac 2.13ghz Mid 2009 that I was putting back together. Thanks for the confirmation! (For the 6th step)
For me (A1181), there were two shorter screws and one longer. The longer went on the left (a shorter screw wouldn't catch). (Not the middle that is currently in the instruction. But that could be model difference.) The middle screw started to strip the head but using a slightly larger phillips allowed me to get it out.
In my late 2006 macbook the central screw was longer than the side screws..
Mine was A1181 model, Core 2 Duo 2.16 GHz. Of course I did not keep track of the screws and ended up with two shorter ones and one longer. Replaced them with the longer one to the right of the three. Got it done with a Wiha PH00 screwdriver. Had better hold than the bit from the precision screwdriver kit.
me too. Got it done with a iFixIt PH00 screwdriver.
Yeah, same for me, #00 worked; #0 suggested in the guide was too big. I didn’t even try #000. For 2.2GHz A1181. My screw config matched the guide, 3mm in middle, 4mm on the sides.
-
-
-
Remove the two Phillips screws from either side of the right wall of the battery compartment (not the ones closest to the battery connector).
-
Two 6.25 mm Phillips #000. (Head: 4 mm. dia. x .5mm thick)
The steps do not tell you what length screw that is needed to be here. What I can tell you that is the screw needs to be 5mm or 6mm, NOT 7.5 or 8mm or 9mm.
Screwdriver PH0
For black 2.2GHz A1181, I used PH #000 as suggested by guide. My screws are both 6mm.
-
-
-
Remove the four indicated Phillips screws from the front wall of the battery compartment. When working from the left, remove the 2nd, 4th, 7th and 9th screws.
-
Four 3.25 mm Phillips #000. (Head: 4 mm. dia. x 4mm thick)
It's recommended to use a PH00 screwdriver instead of the PH000.
The PH000 is too small and you can damage the screwheads.
Yeah, I found PH #00 better too. (For black 2.2Ghz A1181.)
I used PH0 for this
Is there a way I can cut the bracket off? I completely stripped one of the screws?
I’ve done this often enough that I marked the screws to remove with red marker.
-
-
-
Remove the following 4 screws from the back of the computer:
-
Two 11 mm Phillips #00, with Shank (2.2mm dia. x 2 mm len.) (Head: 3.2 mm. dia. x .5mm thick)
-
Two 7.25 mm Phillips #00, with Shank (2mm dia. x 3.75 mm len.) (Head: 3.2 mm. dia. x .5mm thick)
I cannot get the two outer screws out for the life of me- and afraid of stripping them. Already see I'm doing some damage. Help? What can I do?
Are you sure you have a proper screwdriver? From my experience you really need to use the correct size and not just something that seems to fit.
Olivia, you can screw back the longer screws that go on the inside. In the photo marked with orange. Then open and close the lid of the MacBook a few times. This will fit the 4 screws more properly in the steel inner-frame and they can come a little bit loose.
Close the lid again. Leave the inner screws untouched and begin with the outer screws (marked with red) with indeed a perfect matching screwdriver head (with a big and long grip for your hand). This worked for me perfectly without damage. Success!
-
-
-
Remove the two Phillips screws from the optical drive (right) side of the computer:
-
Two 5.2 mm Phillips #00, with shank (2.3mm dia. x 3.25 mm len.) (Head: 3.2 mm. dia. x .5mm thick)
The screw farthest from the optical drive would not come out, all other screws came out fine with my screw driver and the screw looks ok, any tips on how to get the screw out?
With some of the screws that can happen. I had it too. This did it for the MacBook I was repairing: 1. Open the MacBook. Then press firm but gentle on the upper case with your hand or fingers while trying to loosen the screw with your screwdriver. 2. I used a different screwdriver from the same size diameter but with a much larger hand-grip. Success!
-
-
-
Use a plastic opening tool, an expired plastic credit, or a similarly-thick card to pry up on the upper case, starting in the upper-left corner and working around to the front of the computer.
As is reported above, there a 4 friction tabs that connect to the keyboard. If they do not stay in place and stick to the keyboard, the keyboard will not go back on. Just remove them and put them in the clips, with the solid clip wall to the outside of the unit, and put the keyboard back on. Do this before reconnecting the keyboard.
The front left had an annoying little metal strip between the outside of the case and the tab. It's very easily bent, so the tab was caught on it. I spent a good deal of time trying to push and pull various things (and even just yank the @$!^ thing off), but eventually I found that if you undo the two screws you are told not to in step 7, the battery connector can be pulled up and out, leaving enough horizontal room to pull out the metal strip (with a little bit of coercion). I left it out when I put everything back together.
Thanks for the tip. Saved me!
Joe -
Because this step requires some force, make sure to double check that you got all your screws out. I finally got my gumption up to apply the necessary force required to pull up the upper case, and after 5 minutes of pulling, I look and see that the reason it wasn't coming up because I missed one screw. Ugh.
Also, before you just shove your hands under the upper case, prying about, think twice: I cut my finger pretty bad on a sharp piece of metal.
When reassembling, take some care to align the tabs on the right hand side next to the optical drive. Rock and slide these tabs into position. Then work from right to left, as the rest of the case is quite easy to put back together.
I took my mac apart yesterday to clean out the trackpad properly and after getting some 'help' from my grandfather (he lost 2 screws and snapped off a bit of the uppercase but i didn't have the heart to ask him to leave it alone) i tried putting the uppercase back on. it fits perfectly but the middle section closest to the screen appears slightly raised and when i go to screw in the four screws on the exterior of the laptop i can't because the hole is not at all aligned (and two of those four screws are very long). anyone know why this might be? can it be fixed/is it a common problem?
If the upper case sticks above the optical drive, don't pull straight up, but up and to the left at the same time.
Wow, pulling both up and to the left made all the difference for me, to unstick the keyboard around the optical drive.
I think it is a mistake to separate the keyboard from the clips at the right side (above the optical drive) at all! Instead, after freeing the other three sides, just slide the keyboard slightly to the left, and leave the clips attached to the keyboard. For reassembly, just put the keyboard in its approximate place and slide it to the right to get those clips into position. Be sure the keyboard is really snug against the machine’s case. Then press the other three edges of the keyboard down.
jeh -
On the right side above the optical drive there are little plastic braces that latch the upper case to the main body. This is the reason why the upper case might stick here. If the above step is not working, also try to gently push the upper case sideways away from the optical drive after freeing all other sides. When reassembling make sure the braces are in their slots of the main body and not attached to the upper case. If you cannot fit the upper case evenly over the optical drive, that's probably why. In this case carefully remove them and slide them back into their slots before lowering the upper case.
this guide was awesome. this step was easy for the broken macbook i salvaged and noticed because i got a factory replacement keyboard quite recently on my macbook in use, the 4 clips above the optical drive were TIGHT - it took quite a bit of pulling up before it came loose!
-
-
-
While holding up the upper case, pull up the black tab on the connector end of the silver ribbon cable away from the connector's socket on the logic board.
I tried to remove the blacktab from the logic board, however, the black tab tore apart. The logic board is okay but the keyboard connector is torn. It has some silver wires passing through a whit plastic housing. It is the first generation of MacBook Core Duo. Do you think it can be repaired?
After a sucessful install of the keyboard, the select (mouse buttun equivalent) was found to not operate consistently. I called support and they are shipping a new one out to me. THIS is why I buy from ifixit - sure I can get a part for less elsewhere - but I would not get the service I get with ifixit - THANKS guys!!!
Note - I agree, this was VERY easy - great pictures, perfect explanations...
Citation de carlos :
not sure if this is the place to ask but my mac. doesn't start properly now it turns on and the little light on the right side turns on but keyboard leds don't and display doesn't either any ideas please?
Did you ever find an answer for this question? My computer is doing the same thing. Thanks.
Citation de E Chambliss :
Did you ever find an answer for this question? My computer is doing the same thing. Thanks.
no i never did couldn't get help it blows to hear someone else had the same problem...im using a windows(yuk) but im getting a new mac next paycheck. if you figure it out let me know so i can fix my other one and maybe give it to my parents
Citation de carlos :
no i never did couldn't get help it blows to hear someone else had the same problem...im using a windows(yuk) but im getting a new mac next paycheck. if you figure it out let me know so i can fix my other one and maybe give it to my parents
Hello, I'm following this procedure because my MacBook isn't turning on due to a failure in the MagSafe DC In board, it was not charging the battery and therefore no power going in. The case was broken duirng warranty and also the MagSafe power adapter was replaced. Now it is failing again. This is an old late 2006 MacBook. Does your Mac powers on, do you hear the chime sound? or you are stuck with a hardware failure?
Citation de Francisco :
Hello, I'm following this procedure because my MacBook isn't turning on due to a failure in the MagSafe DC In board, it was not charging the battery and therefore no power going in. The case was broken duirng warranty and also the MagSafe power adapter was replaced. Now it is failing again. This is an old late 2006 MacBook. Does your Mac powers on, do you hear the chime sound? or you are stuck with a hardware failure?
my MacBook charges the battery and powers on i dont hear a chime and it turns on but never starts
Citation de spi :
When changing the topcase remember to change the sticker with the serial also! This might be important when further service or bigger repairs by apples service are needed. The serial also helps you with identifying your MacBook!
How do you do it? I can't get it out
Superb guide thank you guys
This takes some nerves if there is no tab, but be confident and just prise the connector straight up.
Clips removal: its hard with finger to pull. It's better and easy off with a pry tool (I used a flat twiser) to pry from the bottom gently for each clips. It was so smooth and easy.
After I clean everything nice… put the cable back and DO NOT TURN ON. What the !&&* happens!? Ideias my friends? :(
Sorry my bad english!
Getting the upper-case/keyboard off was a bit nerve-wracking. Just work away at it carefully, bit by bit.
A small torch (flashlight for our American friends) was handy to see what was happening underneath the upper-case. Otherwise too dark.
I used a photographic lens-cleaning blower (with the rubber squeeze bulb, just the blower, no brush) to get away the dust. Probably not as effective as canned air, but it worked well enough. I’d recommend avoiding touching anything with the tip of the blower. Keep it a few mm away.
After removing the keyboard I noticed that the side clips were not attached to the body but rather to the keyboard still. Easily removed but something to note.
-
-
-
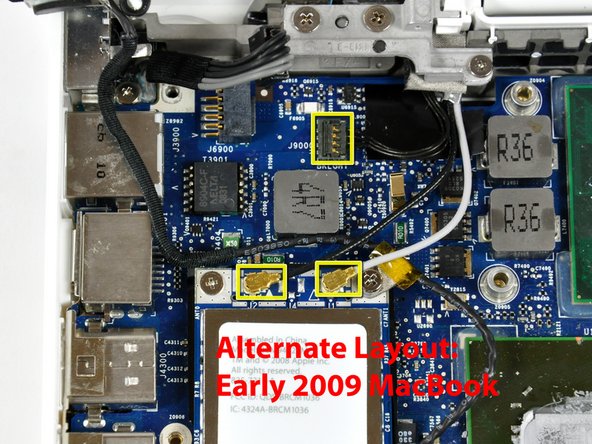
Disconnect the MagSafe board cable from the logic board by pulling the snap-in connector out (to the right).
On the 2.13ghz MacBooks, there is a 3mm screw holding down the Magsafe connector, when putting it back together make sure this is secured after connecting the magsafe connector to the board, otherwise you'll have a wobbly Magsafe connector.
The Mag Safe connector was not budging so finally I used a 1/8 inch flat screwdriver and twisted it against the ridge on the connector alternating sides. That loosen it to allow me to pull it out to the right.
-
-
-
-
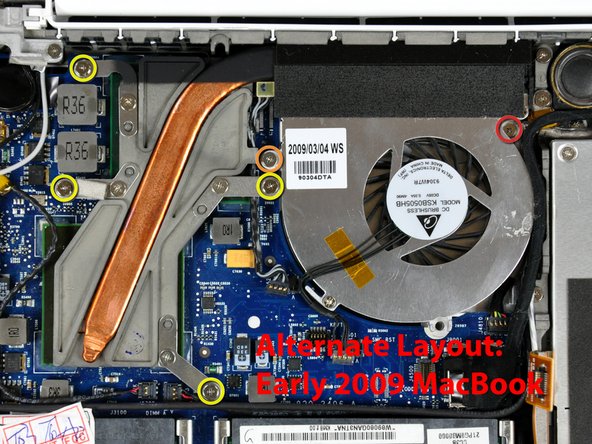
Remove the following 3 screws:
-
Two 7.5 mm Phillips from either end of the left I/O frame.
-
One 9 mm Phillips from the middle of the left I/O frame.
-
Remove the small black plastic spacer at the bottom of the left I/O frame.
Effectivly, the 7.5 mm is near the speaker and the two 9.5mm next.
On my late 2007 A1181 2.2 G Santa Rosa machine all three screws are 7.5 mm PH00. There is no black plastic spacer as mentioned in the first comment.
-
-
-
Peel up the small black rubber cover from the right side of the heat sink.
My late 2007 A1181 2.2 ghz Santa Rosa machine has only one heat sensor as shown in step 21 and the rubber spacer was attached on top of that connector closer to the fan.
-
-
-
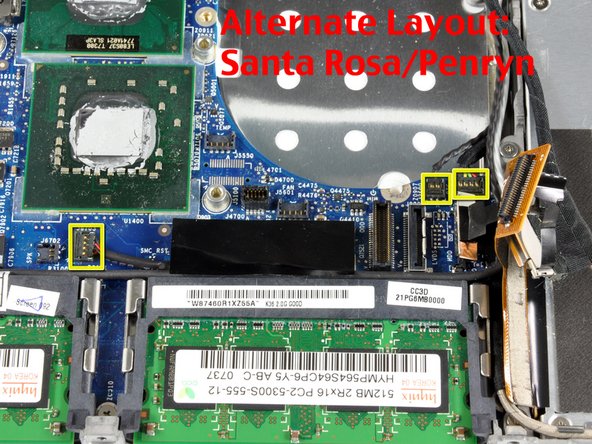
Disconnect the black fan connector and two temperature sensor connectors from the logic board by pulling/prying them directly up.
I have come across different types of temperature sensor connectors! Please help!!
Citation de onechrisjones :
I have come across different types of temperature sensor connectors! Please help!!
help i was trying to desconect the heat sensor and i accidently pull the whole thing off. Can i solder it back or would i need a whole new logic board? Someone please help me with this! thanks
How do the fan connectors on Step 21 work? It appears that the connector has to come up away from the board but the base of the connector isn't attached well to the board so it is very easy to destroy this connector. I've found its not required to disconnect the fans if all you are doing is removing the system board.
I'm removing the logic board from a MacBook (13-inch, mid-2009) i.e. Penryn, and at this step there does not seem to be a temperature sensor at all as the photo on this page show for Alternate Layout: Santa Rosa and Penryn. The connector is there on the logic board but there is no cable and not sensor to speak of between the heat sink and the fan, as in other models.
The illustration shows what is referred to as a 3 wall logic board model 820-1889-A with flat temperature connectors. Be aware that there are 4 wall square block connectors on other models and the two types are not interchangeable even though they both come from model 1181A's. This model (shown) accepts 3 boards. A 1.86 GHZ , a 2.0 GHZ , and a 2.16 GHZ one. The early 2006 model can be different from the late 2006 , early 2007 model so check your board part number and actual image of your replacement if you don't have the serial number.
I am confirming from experience and also a discussion in the ifixit answers section (MacBook 5.1 temperature sensor missing?) that not all (few in my experience) 2009 macbook 5.2s have anything connected to the TEMP J5550 connector at the seven oclock position in relation to the fan. It is simply empty.
-
-
-
Use a spudger to disconnect the left speaker connector from the logic board.
-
Lift the left speaker out of the computer.
Even with a spudger I had a hard time getting this little connector loose. I ended up popping the red wire out of the connector. I hope I can repair it
Update. after accidentally pulling the red wire out of the left speaker connector I repaired it by reinserting it into the connector and repairing the back of the connector with a very tiny amount of JB Weld adhesive.
-
-
-
Disconnect the display data cable by pulling up on the black plastic pull-tab. If there is no pull-tab on the top of the connector, it may be helpful to use a spudger to disconnect this connector.
This was a tough one. I was able to catch the edge on the side nearest the RAM with a pointed spudger, popping that side up.
-
-
-
Use a spudger to carefully pry the battery connector up and disconnect it from the logic board.
The picture shows prying from the end, which is OK to loosen it, but the connector pulls straight up.
-
-
-
Lift the logic board up from the right side, and slide it up and out of the computer.
On this step beware of the way the three antena cables are when you remove the board. I had a minor problem after having reinstalled my new logic board : the black cable was too short to be pluged back. I assumed that the original order had to be respected but that the antena could work with only two cables out of three. It worked properly.
thanks axel..your instructions helped...
-
-
-
Turn the logic board over.
-
Peel the PRAM battery up from its location on the logic board, removing tape as necessary.
-


To reassemble your device, follow these instructions in reverse order.
To reassemble your device, follow these instructions in reverse order.
Annulation : je n'ai pas terminé ce tutoriel.
170 autres ont terminé cette réparation.

12 commentaires
Thanks so much for this guide! My mac wouldn't turn on after spilling some wine on it a few days before. After I followed these steps and let the parts lay out to dry overnight (after cleaning everything with rubbing alcohol), I put it back together and it turned on!! Thank you a million times!
The shop wanted over $700 ($600 for parts, $90+ for labor) to fix it, which I definitely wasn't going to pay, so I decided to fix it myself. I spent right at $150 for a new logic board, magsafe board, and RAM upgrades and delved into the depths of the Macbook. I followed every step of the guide closely and she started right up after reassembly. Great guide, thanks!
Great Guide - i used zip-lock bags for screws and wrote the step numbers on each.
I've managed to replace a macbook 1,1 logic board with a macbook 2,1 (2GHz) one, and replaced a 4,1 on another machine (which looks interchangeable with older ones)
It is NOT possible to replace these older boards with a newer macbook 5.2 board because ALL the connectors are different, and the screw-holes are in different places.
Managed to revive my years old dead Macbook! Glad I found this guide and helped me diagnose and fix the problem. (Only wish I would have found this BEFORE I started disassembling my Macbook. Half the beginning screws don't have a home now. Whoops) Overall great guide. The alternate pictures were great since they were more in-line with mine. Easy to follow, and everything turned out great. Thanks!
When I replace the logic board on a MacBook, to I have to worry about serial numbers? I am replacing a logic board on my MacBook that has cooling issues due to a logic board temperature sensor failure.
One solution for a Quick fix
First pre-heat your oven at 375celcius, get out the Logic board, remove all plastic parts you can.
Make 4 small ball with alluminium foil, put the ball on a cooking plate.
The ball must match aera of screw, they need to clear all composant soldered on the board.
The board need to be aproximatively 1/2 inch from Plate, when you are ready, set your phone timmer to 7min wait for the heating light come on and out the Plate in oven, DONT PANIC IF SMELL lets its full 7min, not 5min, not 9min, really important they are 7min.
When timer end turn off oven, Fully open the door, DONT TOUCH IT!! Wait 10min to make sure solder get hard
Put all back case, make sure the board are properly seated clean colling fan etc
press power button, if you get a black screen, reset pram and nvram and voilà
I do the procedure 4-5 Time on my old 2011 MacBook Pro and each time its make it work again
The procedure reflow the gpu on the board
I had a problem with the screen on my A1181 going off for no reason for a long time. The macbook sat unused for a long time and last weekend, by chance, I tried it again. Screen came on for a short time but went off again. I did some research and it talked about reset PRAM and SMC (I think Ive got that right?) But when I did this the computer then started showing no OS available and then suddenly the screen now only flashes when I turn it on, I get the chime but nothing else. I can hear fan whirring also. If I shine light though the back I can see the flashing folder sign. Is it likely I somehow fried the logic board? I replaced the inverter and cable and it still wont do anything.
Great guide!
I found a difference in the step 6. I have on my macbook 2 screws of 3 mm and 1 of 4 mm. The 4 mm one is in the middle.
Moreover I solved the problem of the black or gray screen. The mac is on but all the peripherals, except the superdrive, turned off. Not being able to reset pram, smc from the keyboard for obvious reasons, I removed the motherboard and disconnected the physical pram plug. I reassembled and everything works again with new.
I hope this experience is useful to others.
David
Does anybody know if I could upgrade my late 2006 black MacBook to a mid 2009 logicboard?
I used this guide plus the Thermal Paste guide to resolve my MacBook RRS (Random Restart Syndrome) issue. My MacBook would randomly restart after the fan kicked into high speed. When I removed the heatsink I discovered an an irregular patch completely free of thermal compound of about 15-20% of the area on one of the processors. I removed and re-applied the thermal paste. I ran a memory test utility overnight that previously caused a restart after a couple of hours, and the probelm seems to be solved. TIme will tell.
ServiceDocs - Réponse
This guide was seriously helpful, so thanks for putting this together. I found a thick ribbon of dust/muck whatever between the fan outlet and the exhaust port that was almost as dense as felt. My fan must have been fighting like crazy trying to pass air through that blockage, which explains the high temps and excessive fan noise. Wish I'd done this sooner...
Thanks again!
skraggle - Réponse
Just R&R'ed the fan in my black MacBook Core 2 Duo tonight. Took me 30 minutes tops and I was taking my time. These instructions are SPOT ON! Great job ifixit.com! Two thumbs up!
Follow the instructions exactly as you see and have a piece of paper taped to the table next to you that you can outline all the screws you took out so you know where they go back in. I expected this to be a LOT harder, but it was one of the simplest repairs I've ever done to ANY computer!
mikeutter - Réponse
Piece of cake--or should I say gum. If you don't have a magnetized screwdriver, load up a stick of gum and chomp on it until it's needed then use a bit to retain screw on the driver. And if you should tear the black tape, or if the silver tape won't stick any more, just bubblegum it together. The instructions were clear and correct, which made for a very simple repair.
Mike Woodruff - Réponse
My battery does not pop out when after step 1. Any idea why, and how do fix it?
Calvin - Réponse
Will not drop out even if you turn it upside down?
skraggle - Réponse
Somehow, now my isight camera doesn't work and the light is always on. Cannot figure out what I did wrong.
josefsalyer - Réponse
Somehow the plastic disc with the slot for a coin got dislodged from the case, and I can't seem to get it open now. Any tips/links on how to open this without the aid of the plastic disc?
Peter Wood - Réponse
i broke my disc off as well. I used two toothpicks to rotate the thing. hi tech.
howard bederman -
Outstanding guide - thank you!
owen bullock - Réponse
My computer will not charge when plugged in. It will stay on as ling as the plug is in the wall however if the power source gets disconnected it will shut down immediately. I removed the battery and put it back in that did not help. It worked and charged fine 2 days ago. I have a backpack with a laptop storage area. I went to hang the backpack up and it fell and ever since the battery is not functioning. Is there some fix I can try or is my only solution to replace it? I would have thought that dropping it would affect more than the battery?
Beth Tomasek - Réponse
Better leave the back pack where it cannot fall. Hindsight is so much better than foresight . I learned the hard way too!
Loy Lum - Réponse
Many of the tiny screws in this project were quite sticky. I found some blue Loctite residue that must have been when the Apple repair shop worked on the laptop years ago. I have found that it is important to hold the correct driver firmly down in the screw and then just tweak the driver in short bursts to loosen it before unscrewing it with a smooth turn.
Patrick Langvardt - Réponse
Be really careful while doing this to not use too much force while doing this step, because the plastic disc can break off and it can be a cosmetic issue along with functionality issue. This happened to me first hand so please take my word for it…
[deleted] - Réponse
Probably worth mentioning at this stage that the caddy you propose to use should not have lugs on the front corners, like those used in unibody 1278 and onwards.
harwood - Réponse
Hehe, still my mac os running! After, already bit more than 10 years of use!
I put new heat paste now for the second time. Maybe this helped for staying young so long.
Thanx for all the repair guides!!!
Fabien - Réponse