Aller au contenu principal

MacBook Pro 14" 2021 Screen Replacement

Ce dont vous avez besoin

  1. MacBook Pro 14" 2021 Screen Replacement, Unfasten the lower case: étape 1, image 1 de 2 MacBook Pro 14" 2021 Screen Replacement, Unfasten the lower case: étape 1, image 2 de 2
    Outil utilisé dans cette étape :
    FixMat
    $36.95
    J'achète
    • Completely power off and unplug your MacBook Pro before you start. Close the screen and flip the entire laptop upside-down.

    • Use a P5 Pentalobe driver to remove eight screws securing the lower case:

    • Four 9.3 mm screws

    • Four 5 mm screws

    • Throughout this repair, keep track of each screw and make sure it goes back exactly where it came from to avoid damaging your device.

  2. MacBook Pro 14" 2021 Screen Replacement, Unclip the lower case: étape 2, image 1 de 2 MacBook Pro 14" 2021 Screen Replacement, Unclip the lower case: étape 2, image 2 de 2
    • Press a suction handle into place near the front edge of the lower case, between the screw holes.

    • Pull up on the suction handle to create a small gap under the lower case.

  3. MacBook Pro 14" 2021 Screen Replacement, Release the right clips: étape 3, image 1 de 3 MacBook Pro 14" 2021 Screen Replacement, Release the right clips: étape 3, image 2 de 3 MacBook Pro 14" 2021 Screen Replacement, Release the right clips: étape 3, image 3 de 3
    • Insert an opening pick into the gap you just created.

    • Slide the opening pick around the nearest corner and then halfway up the side of the MacBook Pro.

    • This releases the first of the hidden clips securing the lower case. You should feel and hear the clip pop free.

  4. MacBook Pro 14" 2021 Screen Replacement, Release the left clips: étape 4, image 1 de 3 MacBook Pro 14" 2021 Screen Replacement, Release the left clips: étape 4, image 2 de 3 MacBook Pro 14" 2021 Screen Replacement, Release the left clips: étape 4, image 3 de 3
    • Repeat the previous step on the other side, using an opening pick to to release the second clip.

  5. MacBook Pro 14" 2021 Screen Replacement, Release the sliding clips: étape 5, image 1 de 3 MacBook Pro 14" 2021 Screen Replacement, Release the sliding clips: étape 5, image 2 de 3 MacBook Pro 14" 2021 Screen Replacement, Release the sliding clips: étape 5, image 3 de 3
    • Sliding clips along the back edge of the MacBook further secure the lower case. Separating these clips may require a lot of force—consider using gloves to protect your hands from the sharp edges of the lower case.

    • Firmly pull the lower case away from the back edge, one corner at a time, to disengage the sliding clips.

    • Keep the lower case flat to the MacBook. Don't pull upward until it's completely separated.

  6. MacBook Pro 14" 2021 Screen Replacement, Remove the lower case: étape 6, image 1 de 3 MacBook Pro 14" 2021 Screen Replacement, Remove the lower case: étape 6, image 2 de 3 MacBook Pro 14" 2021 Screen Replacement, Remove the lower case: étape 6, image 3 de 3
    • Remove the lower case.

    • To reinstall the lower case:

    • Lay it down and align the sliding clips with the back edge of the MacBook. Press down on the lower case and slide it toward the back edge to engage the clips.

    • When one side is engaged, it may push the other out of alignment. Check both sides as you push.

    • Once the back corners of the lower case are secured and flush with the frame, press down along the middle of the lower case to engage the four remaining clips.

    • You'll hear and feel each clip snap into place.

  7. MacBook Pro 14" 2021 Screen Replacement, Disconnect the battery board: étape 7, image 1 de 3 MacBook Pro 14" 2021 Screen Replacement, Disconnect the battery board: étape 7, image 2 de 3 MacBook Pro 14" 2021 Screen Replacement, Disconnect the battery board: étape 7, image 3 de 3
    • Peel back any tape covering the battery board data cable connector on the logic board.

    Not strictly necessary to remove this end of the cable, as the other end is also disconnected later. However, it does get it out of the way.

    Patrick - Réponse

  8. MacBook Pro 14" 2021 Screen Replacement: étape 8, image 1 de 2 MacBook Pro 14" 2021 Screen Replacement: étape 8, image 2 de 2
    • Use a spudger to gently pry up the locking flap on the ZIF connector for the battery board data cable.

  9. MacBook Pro 14" 2021 Screen Replacement: étape 9, image 1 de 2 MacBook Pro 14" 2021 Screen Replacement: étape 9, image 2 de 2
    • Disconnect the battery board data cable by sliding it out from its socket on the logic board.

  10. MacBook Pro 14" 2021 Screen Replacement, Unfasten the trackpad cable bracket: étape 10, image 1 de 1
    • While your MacBook uses some Torx Plus screws, standard Torx bits work. Make sure to apply constant, downward force to avoid stripping.

    • Use a T3 Torx driver to remove the two 2.1 mm‑long 3IP Torx Plus screws securing the trackpad cable bracket to the logic board.

    Sorry but this is not correct Apple procedure.

    There is power running through the device still whilst you are unscrewing this plate/bracket and disconnecting the trackpad if you do it this way. This is why Apple put the small flex cable next to this, free to reach before touching anything else.

    You must disconnect the battery flex cable next to the trackpad connector before you touch anything else.

    Thanks

    Brendan Roberts - Réponse

    Is that not what steps 7-9 are doing? You cannot actually access the battery connector until you remove this cable as it's underneath. Which battery flex cable are you referring to?

    maccentric -

  11. MacBook Pro 14" 2021 Screen Replacement, Remove the trackpad cable bracket: étape 11, image 1 de 2 MacBook Pro 14" 2021 Screen Replacement, Remove the trackpad cable bracket: étape 11, image 2 de 2
    • Use tweezers, or your fingers, to remove the trackpad cable bracket.

  12. MacBook Pro 14" 2021 Screen Replacement, Disconnect the trackpad cable: étape 12, image 1 de 2 MacBook Pro 14" 2021 Screen Replacement, Disconnect the trackpad cable: étape 12, image 2 de 2
    • Use the flat end of a spudger to pry up and disconnect the trackpad cable's press connector secured to the logic board.

    • To re-attach press connectors like this one, carefully align and press down on one side until it clicks into place, then repeat on the other side. Don't press down on the middle. If the connector is misaligned, the pins can bend, causing permanent damage.

  13. MacBook Pro 14" 2021 Screen Replacement, Reposition the trackpad cable: étape 13, image 1 de 2 MacBook Pro 14" 2021 Screen Replacement, Reposition the trackpad cable: étape 13, image 2 de 2
    • The trackpad cable is lightly adhered to the frame.

    • Peel the trackpad cable away from the device, making sure to separate the adhesive.

  14. MacBook Pro 14" 2021 Screen Replacement, Disconnect the battery board: étape 14, image 1 de 2 MacBook Pro 14" 2021 Screen Replacement, Disconnect the battery board: étape 14, image 2 de 2
    • Peel back any tape covering the battery board data cable connector under the large pancake screw.

  15. MacBook Pro 14" 2021 Screen Replacement: étape 15, image 1 de 2 MacBook Pro 14" 2021 Screen Replacement: étape 15, image 2 de 2
    • Use a spudger to gently pry up the locking flap on the ZIF connector for the battery board data cable.

  16. MacBook Pro 14" 2021 Screen Replacement: étape 16, image 1 de 2 MacBook Pro 14" 2021 Screen Replacement: étape 16, image 2 de 2
    • Disconnect the battery board data cable by sliding it out from its socket on the battery board.

    Ich hab dieses Datenkabel zerstört. Ist das der Grund warum es nicht mehr lädt?
    Welches Kabel bräuchte ich denn? Das hier Item # IF464-018-1?
    MacBook Pro 14" (A2442, A2779) and 16" (2021 A2485) Battery Daughter Board Cable

    Ray - Réponse

  17. MacBook Pro 14" 2021 Screen Replacement, Remove the data cable: étape 17, image 1 de 2 MacBook Pro 14" 2021 Screen Replacement, Remove the data cable: étape 17, image 2 de 2
    • The battery board data cable is lightly adhered to the device.

    • Slide blunt nose tweezers under areas with adhesive to separate the cable from the device.

    • Remove the battery board data cable.

    Removing is easy. We cant reinsert the battery data cable connector. It wont push in properly. Any helpful solution???

    Paul Smith - Réponse

  18. MacBook Pro 14" 2021 Screen Replacement, Unfasten the battery connector: étape 18, image 1 de 1
    • Use a T5 Torx driver to remove the 3.8 mm 5IP Torx Plus wide-head screw securing the battery power connector.

  19. MacBook Pro 14" 2021 Screen Replacement, Disconnect the battery connector: étape 19, image 1 de 3 MacBook Pro 14" 2021 Screen Replacement, Disconnect the battery connector: étape 19, image 2 de 3 MacBook Pro 14" 2021 Screen Replacement, Disconnect the battery connector: étape 19, image 3 de 3
    • Use the flat end of your spudger to lift the battery connector away from the battery board, disconnecting the battery.

    • Lift the connector high enough that it doesn't accidentally make contact during the repair, but no more than 45 degrees to prevent damaging its hinge.

    • For added safety, place a barrier, such as a piece of a playing card, between the connector and board.

    I would place a piece of card stock (business card) taped to the battery cells so the contact can’t be made.

    Dan - Réponse

  20. MacBook Pro 14" 2021 Screen Replacement, Unfasten the antenna bar's connector bracket: étape 20, image 1 de 2 MacBook Pro 14" 2021 Screen Replacement, Unfasten the antenna bar's connector bracket: étape 20, image 2 de 2
    • Use your T3 Torx driver to remove the three 2.1 mm-long 3IP Torx Plus screws securing the antenna connector cover and bracket.

  21. MacBook Pro 14" 2021 Screen Replacement: étape 21, image 1 de 2 MacBook Pro 14" 2021 Screen Replacement: étape 21, image 2 de 2
    • Use tweezers, or your fingers, to remove the cover on top of the antenna bar's coaxial cables.

  22. MacBook Pro 14" 2021 Screen Replacement, Disconnect the antenna bar: étape 22, image 1 de 2 MacBook Pro 14" 2021 Screen Replacement, Disconnect the antenna bar: étape 22, image 2 de 2
    • Use the tip of a spudger to pry up and disconnect the antenna bar's coaxial cable.

    • Repeat for the two other cables.

    • During reassembly, these can be tricky to reconnect. One at a time, hold each connector in place over its socket and press down with the flat end of a spudger. The connector should snap into place.

  23. MacBook Pro 14" 2021 Screen Replacement, Unfasten the antenna bar: étape 23, image 1 de 2 MacBook Pro 14" 2021 Screen Replacement, Unfasten the antenna bar: étape 23, image 2 de 2
    • Use a T5 Torx screwdriver to remove the six 5IP Torx Plus screws securing the antenna bar to the frame:

    • Two 7.5 mm screws

    • Four 3.2 mm screws

    • Use a P2 Pentalobe driver to remove the nine 1.5 mm screws securing the antenna bar to the frame.

    • These screws strip very easily; use constant downward pressure and work slowly when you loosen these.

  24. MacBook Pro 14" 2021 Screen Replacement, Remove the antenna bar: étape 24, image 1 de 2 MacBook Pro 14" 2021 Screen Replacement, Remove the antenna bar: étape 24, image 2 de 2
    • Insert the tip of a spudger between the antenna bar and the frame.

    • Pry up with the spudger to separate the antenna bar from the frame.

  25. MacBook Pro 14" 2021 Screen Replacement: étape 25, image 1 de 2 MacBook Pro 14" 2021 Screen Replacement: étape 25, image 2 de 2
    • Pull the antenna bar straight up and out of the frame to remove it.

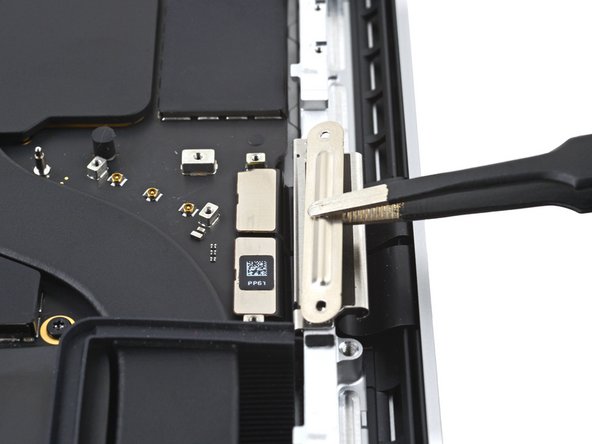
  26. MacBook Pro 14" 2021 Screen Replacement, Unfasten the screen cable covers: étape 26, image 1 de 2 MacBook Pro 14" 2021 Screen Replacement, Unfasten the screen cable covers: étape 26, image 2 de 2
    • Use a T3 Torx driver to remove the four 2.1 mm 3IP Torx Plus screws securing the screen cable covers.

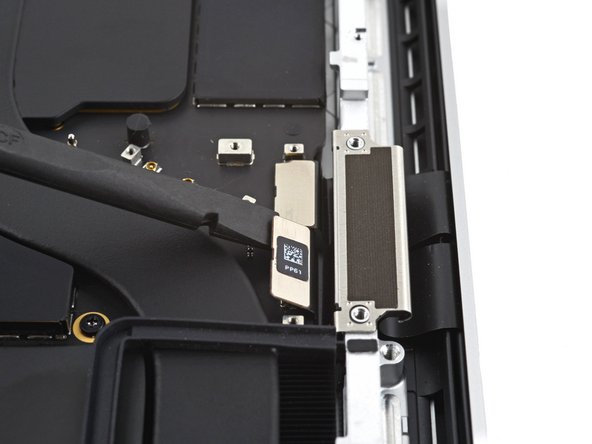
  27. MacBook Pro 14" 2021 Screen Replacement, Remove the screen cable covers: étape 27, image 1 de 2 MacBook Pro 14" 2021 Screen Replacement, Remove the screen cable covers: étape 27, image 2 de 2
    • Use tweezers, or your fingers, to remove the two screen cable covers from the logic board.

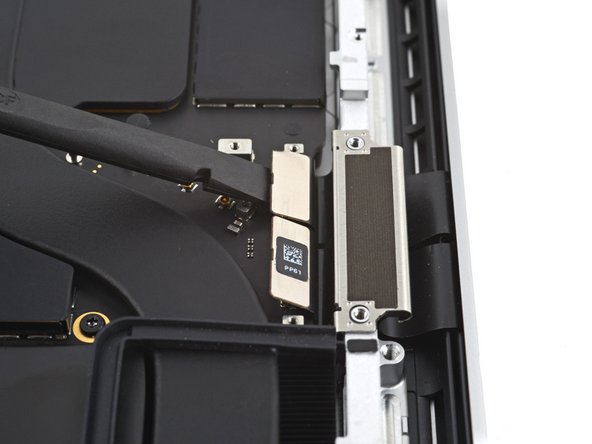
  28. MacBook Pro 14" 2021 Screen Replacement, Disconnect the screen cables: étape 28, image 1 de 3 MacBook Pro 14" 2021 Screen Replacement, Disconnect the screen cables: étape 28, image 2 de 3 MacBook Pro 14" 2021 Screen Replacement, Disconnect the screen cables: étape 28, image 3 de 3
    • Use the flat end of a spudger to pry up and disconnect the two right-most screen cable press connectors secured to the logic board.

  29. MacBook Pro 14" 2021 Screen Replacement: étape 29, image 1 de 2 MacBook Pro 14" 2021 Screen Replacement: étape 29, image 2 de 2
    • Repeat the previous step for the left-most press connector.

  30. MacBook Pro 14" 2021 Screen Replacement, Remove the screen cable brackets: étape 30, image 1 de 3 MacBook Pro 14" 2021 Screen Replacement, Remove the screen cable brackets: étape 30, image 2 de 3 MacBook Pro 14" 2021 Screen Replacement, Remove the screen cable brackets: étape 30, image 3 de 3
    • Pull up on the back of the screen cable bracket to release the clips securing it to the frame.

    • Remove the screen cable bracket.

    • Repeat for the other screen cable bracket.

    During disassembly, I found it easiest to disengage the bottom/connector side of the cable bracket clips first, then pivot up and pull away from the frame of the laptop.
    If reassembling with a new display, the ribbon cables can be very stiff on the connector end. I found it easiest to first install the press connectors (step 28), then use the flat end of a spudger to gently coax the ribbon cables around the curve on the top edge of the screen cable bracket buffers until I could engage the top clips of the cable bracket. While holding the top edge of the cable bracket, I used the flat end of a spudger to gently push the connector end of the ribbon cables down into the gap, then engaged the clips on the bottom edge of the cable bracket.

    Patrick - Réponse

  31. MacBook Pro 14" 2021 Screen Replacement: étape 31, image 1 de 2 MacBook Pro 14" 2021 Screen Replacement: étape 31, image 2 de 2
    • If the two screen cable bracket buffers are removed alongside the brackets, then skip this step.

    • Pull the two screen cable bracket buffers straight up and out of the frame to remove them.

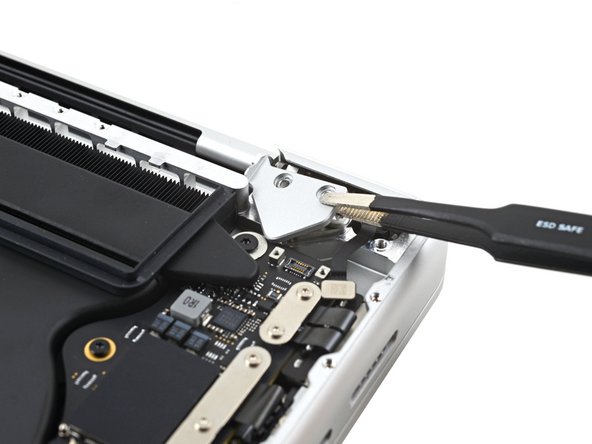
  32. MacBook Pro 14" 2021 Screen Replacement, Unfasten the lid angle sensor cover: étape 32, image 1 de 2 MacBook Pro 14" 2021 Screen Replacement, Unfasten the lid angle sensor cover: étape 32, image 2 de 2
    • Use a T3 Torx driver to remove the two 2.1 mm 3IP Torx Plus screws securing the lid angle sensor cover near the right hinge.

  33. MacBook Pro 14" 2021 Screen Replacement, Remove the lid angle sensor cover: étape 33, image 1 de 1
    • Use tweezers, or your fingers, to remove the lid angle sensor cover.

  34. MacBook Pro 14" 2021 Screen Replacement, Disconnect the lid angle sensor cable: étape 34, image 1 de 2 MacBook Pro 14" 2021 Screen Replacement, Disconnect the lid angle sensor cable: étape 34, image 2 de 2
    • Use the flat of a spudger to pry up and disconnect the lid angle sensor's press connector.

  35. MacBook Pro 14" 2021 Screen Replacement, Unfasten the hinge covers: étape 35, image 1 de 2 MacBook Pro 14" 2021 Screen Replacement, Unfasten the hinge covers: étape 35, image 2 de 2
    • Use your T5 Torx driver to remove the two 2.5 mm‑long 5IP Torx Plus screws securing each hinge cover (four screws in total).

  36. MacBook Pro 14" 2021 Screen Replacement, Remove the hinge covers: étape 36, image 1 de 3 MacBook Pro 14" 2021 Screen Replacement, Remove the hinge covers: étape 36, image 2 de 3 MacBook Pro 14" 2021 Screen Replacement, Remove the hinge covers: étape 36, image 3 de 3
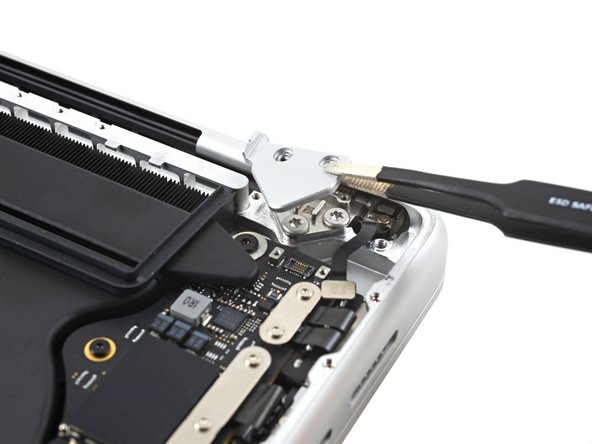
    • Use tweezers to pull the hinge covers horizontally away from the hinge to separate it from the frame.

    • Remove the hinge covers.

  37. MacBook Pro 14" 2021 Screen Replacement, Remove some of the hinge screws: étape 37, image 1 de 2 MacBook Pro 14" 2021 Screen Replacement, Remove some of the hinge screws: étape 37, image 2 de 2
    • Use a T8 Torx driver to remove two 5.2 mm screws from each hinge (four screws total).

    • Each hinge has a third screw, which you should leave in place for now.

    I found that these were very, very tight, and a T9 worked better for me than the T8.

    ischmal001 - Réponse

    The official repair guide recommends opening the lid of the laptop and setting the laptop keyboard side down on the edge of a table with the display hanging over the edge, then removing these screws.

    Patrick - Réponse

  38. MacBook Pro 14" 2021 Screen Replacement, Protect the MacBook: étape 38, image 1 de 2 MacBook Pro 14" 2021 Screen Replacement, Protect the MacBook: étape 38, image 2 de 2
    • If you plan to re-use your screen, open it and apply a piece of tape to the glass directly above each hinge. This helps protect the glass from getting scratched in the following three steps.

    • Fully open the screen and stand your MacBook Pro up on one side.

  39. MacBook Pro 14" 2021 Screen Replacement, Remove the remaining screws: étape 39, image 1 de 3 MacBook Pro 14" 2021 Screen Replacement, Remove the remaining screws: étape 39, image 2 de 3 MacBook Pro 14" 2021 Screen Replacement, Remove the remaining screws: étape 39, image 3 de 3
    • Use a T8 Torx driver to remove the two remaining 5.2 mm screws (one from each hinge).

    • Remove the topmost screw last, using one hand to steady both halves of the MacBook Pro to make sure they don't separate and fall over unexpectedly.

    Loosening these two final screws while the computer was flat made this step much easier. When I initially got to the last screw, I literally couldn't get it to budge while the machine was on its side.

    ischmal001 - Réponse

  40. MacBook Pro 14" 2021 Screen Replacement, Remove the screen: étape 40, image 1 de 3 MacBook Pro 14" 2021 Screen Replacement, Remove the screen: étape 40, image 2 de 3 MacBook Pro 14" 2021 Screen Replacement, Remove the screen: étape 40, image 3 de 3
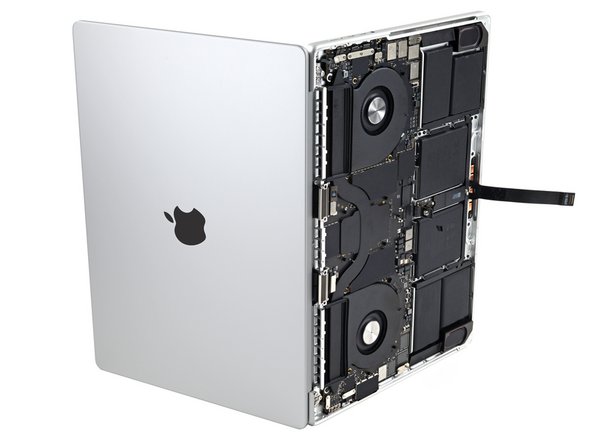
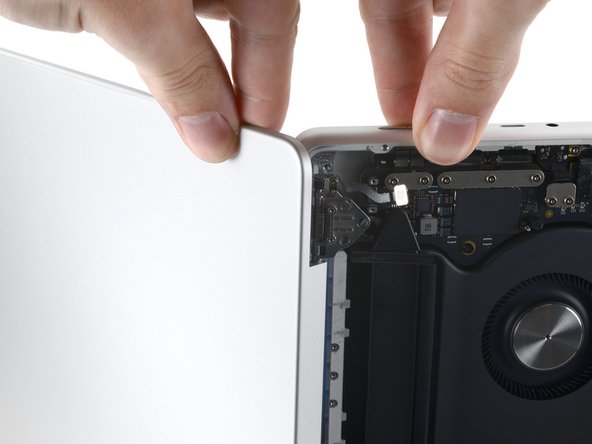
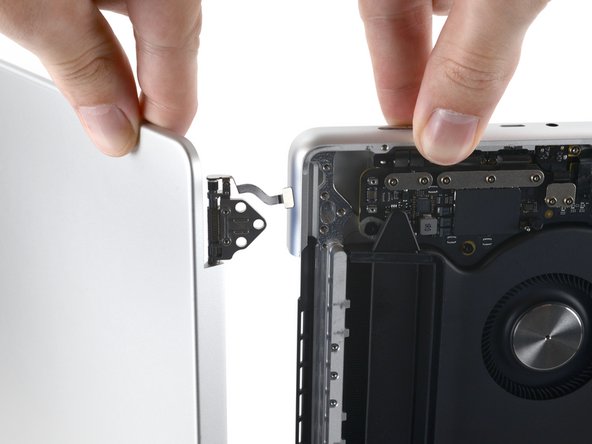
    • Keep a firm grip on both the screen and main body of the MacBook Pro. Either half can fall unexpectedly during this step.

    • Push both halves of the MacBook Pro together so that the hinges can be lifted clear of their recesses in the chassis.

    • Push the main body of the MacBook Pro away from you while pulling the screen toward you to separate it.

  41. MacBook Pro 14" 2021 Screen Replacement: étape 41, image 1 de 1
    • Remove the screen.

  42. MacBook Pro 14" 2021 Screen Replacement: étape 42, image 1 de 2 MacBook Pro 14" 2021 Screen Replacement: étape 42, image 2 de 2
    • During reassembly, follow these instructions to align your screen hinges:

    • If you have blue threadlocker, apply a drop to each screw's threads to prevent them from loosening over time.

    • Install the hinge screws without fully tightening them. Center the hinges and check for gaps or rubbing on either side.

    • Fully tighten the hinge screws.

    • If your screen clicks or snaps when it's opened or closed, loosen the screws and realign the screen.

    Hallo,

    ist jemanden bekannt dass nach Display Austausch oberhalb des Display Karos zu sehen ist?

    Muss dieser Display nach Tausch programmiert werden?

    Vielen Dank für Beiträge!

    Senol Biyikli - Réponse

    ja, ohne alte MCU oder Apple Software funktioniert es nicht wirklich sauber, nur mit Pixelfehlern. Ich mag solche "anleitungen" - nie wirklich selbst probiert, aber so viele schöne Bilder, yay.

    RipperDoc -

Conclusion

To reassemble your device, follow these instructions in reverse order.

Compare your new replacement part to the original part—you may need to transfer remaining components or remove adhesive backings from the new part before you install it.

Repair didn’t go as planned? Try some basic troubleshooting, or ask our MacBook Pro 14" 2021 Answers community for help.

10 autres ont terminé cette réparation.

Alex Diaz-Kokaisl

Membre depuis le 01/16/22

119 368 Réputation

549 tutoriels rédigés

Équipe

iFixit Membre de l'équipe iFixit

Staff

135 membres

16 817 tutoriels rédigés

17 commentaires

Hi where can I buy a replacement screen?

Ryan Li - Réponse

Hi Ryan.

We actually sell the screen, a.ka. "display assembly" here. I apologize that the part wasn't linked in the parts section at the top of the page. I will update that for future repairers.

Alex Diaz-Kokaisl -

Thanks! Unfortunately it is out of stock :(

Ryan Li - Réponse

Did you completely remove the hinge? Just wondering since I may do a hinge replacement in the future.

Jacko Salakian - Réponse

Hi Jacko.

We don't completely remove the hinge with this guide, as it's already attached to the replacement screen.

Alex Diaz-Kokaisl -

Does this require programming to enable True Tone?

Tim Woodie - Réponse

Doesn't Apple record all of the components' IDs/fingerprints to a chip and use that list to reject the replacement display?

Ryan Johnson - Réponse

Did you really try it? You CANT replace screen on 2021+ models without authorized software to fix distorted image issue. This is misleading and useless.
If you want to replace the screen, either do it by apple or transfer MCU chip from old screen to a new one which is a bit harder than your 0 repairability score.

RipperDoc - Réponse

So you can't use a M2 Pro MacBook Pro display on a M1 Pro/Max display just by swapping them?

Jimmy Applessed -

When is this coming back instock?

Chris Aydat - Réponse

but it from apple its 579 from them and there are no artifact issues

Daniel Pasten Candia -

Has anyone tested the QianLi iphone display programmers on the Apple M1 14 inch display replacement?

The fundamental problem (as I understand), is that the replacement screen has a serial number which does not match what the Apple logic board is expecting. So we must recode the replacement screen serial number with the original screen serial number. Then everything should be fine.

Teaching Bees - Réponse

Hi for all looking to purchase a display. It actually seems wiser to buy the part from apple:

They sell it for

$672.32

and give a rebate on the returned damaged part

$579.04 Price after credit

Daniel Pasten Candia - Réponse

Can the battery connector be "broken off" if it's moved to different angles multiple times? I noticed it is not like the other ribbon cables and very stiff.

Ciprian - Réponse

Hello bro, is the screen already programmed? And don't shadows come out in your notch?

Andres Rodriguez - Réponse

Hi. I got a quote for doing this in MacOnline in Chile. They want a lot more than $2000 USD for the job, including replacing the motherboard. I think I am getting very ripped off. If I use HDMI with my TV, everything works perfectly. So why do I need to replace the motherboard?? Thieves and liars. I am used to it here.

William Brooks - Réponse

hello , can a tutorial also be added on how to do the soldering and transferring of the chips to avoid the visual effects

Chris Aydat - Réponse

Ajouter un commentaire

Nombre de vues :

Dernières 24 heures : 50

7 derniers jours : 462

30 derniers jours : 2,676

Total : 46,265