Aller au contenu principal
Pour réparer ensemble - Je crée un compte

Ninja Master Prep QB900B button replacement

Ce dont vous avez besoin

    1. Ninja Master Prep QB900B button replacement, The Ninja Master Prep QB900B: étape 1, image 1 de 1
      • Place the blender to the side.

      Demander à FixBot

      Ajouter un commentaire

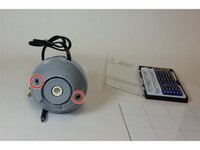
    2. Ninja Master Prep QB900B button replacement: étape 2, image 1 de 2 Ninja Master Prep QB900B button replacement: étape 2, image 2 de 2
      • Remove the two highlighted screws with a Phillips #2 Screw Driver

      • Gently pull off the top.

      Demander à FixBot

      Ajouter un commentaire

    1. Ninja Master Prep QB900B button replacement, Button: étape 3, image 1 de 1
      • Remove the highlighted screws.

      Demander à FixBot

      Ajouter un commentaire

    2. Ninja Master Prep QB900B button replacement: étape 4, image 1 de 1
      • Pull out the highlighted spring.

      • Now wash the button with soap and water, and follow the guide backwards to reassemble.

      Demander à FixBot

      Ajouter un commentaire

Conclusion

To reassemble your device, follow these instructions in reverse order.

Annulation : je n'ai pas terminé ce tutoriel.

2 autres ont terminé cette réparation.

Kamal Taha

Membre depuis le 08/27/15

679 Réputation

5 tutoriels rédigés

Équipe

USF Tampa, Team 1-3, Sullivan Fall 2015 Membre de l'équipe USF Tampa, Team 1-3, Sullivan Fall 2015

USFT-SULLIVAN-F15S1G3

3 membres

25 tutoriels rédigés

2 commentaires de tutoriel

mine has different screws and they won’t come out easily. looks like it might have a star head. thought it was hex and now the screws are stripped :(

Stephen Filippone - Réponse Partager

turns out it was a security torx. how annoying.

Stephen Filippone - Réponse Partager

Ajouter un commentaire

Nombre de vues :

Dernières 24 heures : 2

7 derniers jours : 5

30 derniers jours : 28

Total : 2,385