Il est possible que cette traduction ne reflète pas les dernières mises à jour du tutoriel source. Aidez à mettre à jour la traduction ou bien consultez le tutoriel source.
Introduction
Après avoir suivi ce guide, les boutons A,B,X,Y et Start/Select auront pu être remplacés indépendamment les uns des autres. La batterie doit être retirée avant de commencer ce guide.
Ce dont vous avez besoin
-
-
Placez la 3DS à l'envers. Enlevez la cartouche de jeu, écouteurs, chargeur, stylet et tout ce qui pourrait être connecté à la console.
-
-
-
A l'aide d'un tournevis JIS #0, dévissez les deux vis sur l'arrière.
My experience indicates that a JIS #1 is more appropriate here.
Same here, much more appropriate.
-
-
-
La batterie est localisée sur la partie gauche de la console - pour l'enlever, utilisez la petite encoche en haut et au milieu puis soulevez la avec un outil pointu non métallique.
Also you should remove any SD card at this point
Does this battery work on a NEW 3DS XL model?
This guide is for the New 3DS XL, which is called the 2015 3DS XL here on iFixit. If you're asking about the 3DS replacement battery advertised in the iFixit store, I believe it works for both new and old models.
-
-
-
-
Retirez les six vis de 6 mm sur le panneau secondaire à l'aide d'un tournevis JIS #000.
the heck. on step 5 im using the 000 screwdriver from the kit and i am destroying the screw, yes going counter clockwise.
the j000 and 000 don't work. im using the toolkit from your site and i don't see a JIS #000 just J000 and 000
edit: so the j00 works.
-
-
-
Retirez les deux supports supérieurs en caoutchouc situés de chaque côté du port de chargement.
-
À l'aide d'un tournevis JIS #00, retirez soigneusement les deux vis de 6 mm qui sont maintenant exposées.
-
-
-
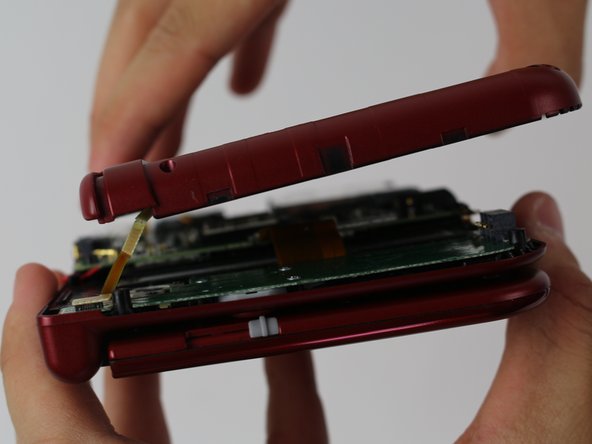
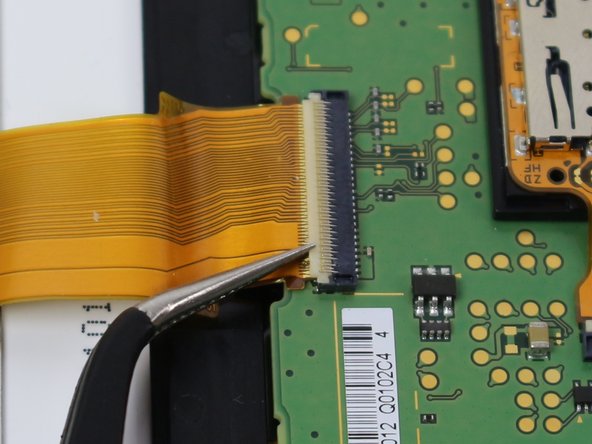
Localisez le connecteur ruban entre la carte mère et le circuit imprimé gauche (il doit être le plus large) et utilisez une pince à épiler pour faire pivoter le fermoir ZIF vers le haut.
-
Le ruban peut être retiré à l'aide d'une pince à épiler non conductrice en le tirant parallèlement à la carte.
-
-
-
Retournez délicatement le tableau et utilisez une pince à épiler pour retirer le ruban bleu-noir situé en dessous.
Closely examine the connection before removing the ribbon from the board!
The C-stick ribbon is secured to the action board at the socket by a black tab that must be unlocked (swiveled up) before the ribbon is free to be removed. Yanking the ribbon from the locked connector may break off the lock and you'll be forced to replace the entire board.
The easier way to do this is to leave this ribbon connected. Go back to Step 10 and remove the three black screws securing the C-stick unit to the frame. Remove the C-stick unit along with the board and move onto Step 12.
-
-
-
Retirez le diamant en caoutchouc gris pour révéler les boutons A/B/X/Y et/ou le rectangle en caoutchouc pour révéler le bouton Start/Select.
-
Retirez les boutons à l'aide d'une pince à épiler.
-


Pour réassembler votre console, suivez ces instructions dans l'ordre inverse.
Pour réassembler votre console, suivez ces instructions dans l'ordre inverse.
Annulation : je n'ai pas terminé ce tutoriel.
25 autres ont terminé cette réparation.
Merci à ces traducteurs :
91%

Wiwok nous aide à réparer le monde ! Vous voulez contribuer ?
Commencez à traduire ›
Équipe

Cal Poly, Team 24-4, Lancaster Spring 2015 Membre de l'équipe Cal Poly, Team 24-4, Lancaster Spring 2015
CPSU-LANCASTER-S15S24G4
4 membres
25 tutoriels rédigés
10 commentaires
It will work, since the only difference between them is the size of screen and shell, but size of buttons and other pieces should be of the same.
If anyone else comes on this, I can confirm the small 3ds buttons do not quite work right they are slightly smaller and the cut outs that keep the buttons from spinning around are not the same
Can someone provide further information about replacement of the entire C stick?
Or is it just as simple as pull the ribbon carefully, take the old one out and put the new one in?
The set of screws on the secondary panel are giving me trouble. I think I might be stripping them... Is it normal for them to be screwed on so tight? I don't want to pay 85 bucks just because I need to press my B button harder to make it work...
One of the screw of the second set was also giving me trouble. Just press firmly and turn very slowly. As they are not supposed to be touched by the consumer, I suspect they put a kind of sealant to make them harder to unscrew.
One thing to note is that the kit that I received from ifixit had the c-stick nub attached to the board. As such, you'll want to remove the c-stick instead of disconnecting the ribbon.
Would be cool to provide in every section a place where users can offer a paid service to repair devices other users are afraid to repair.
Does annyone know what is wrong with my new 3ds xl... So all buttons work fine BUT the a button needs alot of pressure to work. Tried to clean it but idk still needs way more pressure than the rest…
I had the same problem, the A button especially was very temperamental and had to push it very hard to trigger. I watched a video yesterday which showed carefully peeling the transparent membrane off with tweezers to get inside the metal domes (it's very sticky so was difficult to get it to start peeling, but comes away carefully once you manage to get it started, just don't peel too hard that it rips). This is what holds the 4 metal domes in place. I then cleaned them as there was slight corrosion in there. I then pushed the membrane down and reassembled where it now works perfectly. I then did the same with the D-pad which worked but didn't always trigger when it clicked but would it you pushed them slightly harder and they are working perfectly.
One tip, if possible, don't completely remove the transparent membrane. just peel it enough to gain access, so you can push back down .if you peel it completely you'll have to realign it perfectly, and if it doesn't line up they won't work. The tolerance is tight!
Andrew -