Cette version peut contenir des modifications incorrectes. Passez au dernier aperçu vérifié.
Ce dont vous avez besoin
-
-
Utilisez un sèche-cheveux pour chauffer lentement et uniformément les bords de la coque arrière.
-
Pendant que vous chauffez l'arrière, utilisez un petit couteau non tranchant (comme le Jimmy) pour voir si l'adhésif a suffisamment ramolli et que la coque peut être sortie du téléphone.
-
Détachez soigneusement la coque arrière de téléphone en utilisant des médiators pour les séparer.
-
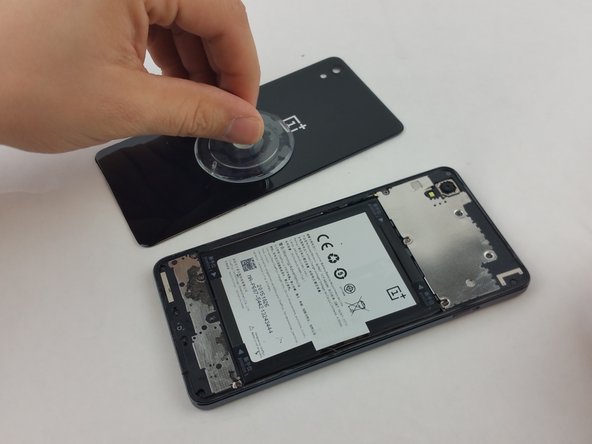
Une fois que les coins sont séparés de l'appareil, posez une ventouse sur la coque.
-
-
Cette étape n’est pas traduite. Aidez à la traduire
-
Press the suction cup to the back panel to secure it.
-
With the help of the suction cup, pull up on the panel to completely detach it from the device.
-
-
-
-
À l'aide d'un tournevis PH000, retirez les sept vis suivantes :
-
Quatre vis cruciformes 000 (longues)
-
Trois vis cruciformes 000 (courtes)
-
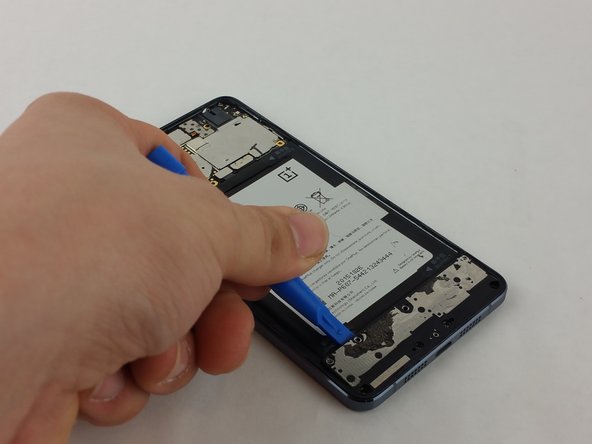
Une fois toutes les vis retirées, continuez en soulevant la plaque métallique avec une spatule (spudger) en plastique.
-
Il y a deux clips près du bas, juste au-dessus de la batterie, donc commencez par soulever le bord inférieur de la plaque.
-
-
Cette étape n’est pas traduite. Aidez à la traduire
-
Once the metal cover is removed, locate the battery connector wire, which clips into the motherboard.
-
Using a plastic spudger, gently pry on the clip to release it.
-
-
Cette étape n’est pas traduite. Aidez à la traduire
-
On the battery, locate a clear tab. This will be used to pull the battery out.
-
Firmly grasp the clear tab and pull up and away from the phone to remove the battery.
-
Continue to pull slowly on the battery, until it is completely free from the phone.
-
-
Cette étape n’est pas traduite. Aidez à la traduire
-
Using a PH #000 screwdriver, remove the 8 screws from the motherboard, circled red in the diagram.
-
Once all the screws have been removed, use the plastic spudger to pry the metal cover off.
-
-
Cette étape n’est pas traduite. Aidez à la traduire
-
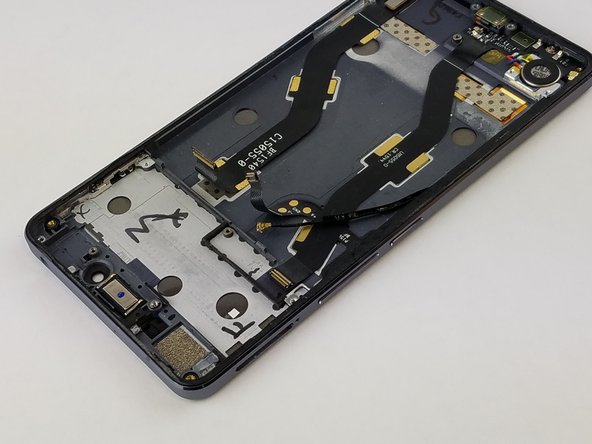
With the battery removed and the metal covers off, disassembly can continue.
-
Using the plastic spudger, locate the rear-facing camera and unclip it. Once unclipped, set the camera aside.
-
Using the spudger, pull off the wire connector, circled red in the diagram, and push it away.
-
-
Cette étape n’est pas traduite. Aidez à la traduire
-
Using the plastic opening tool pry the upper motherboard. Carefully pry it up until you can safely remove the upper motherboard completely.
-
On the bottom left hand side of the phone, you will see a small screw. Use the PH #000 to remove that screw.
-
-
Cette étape n’est pas traduite. Aidez à la traduire
-
After removing the Phillips head screw, you will need to remove a black wire. Use a spudger to unclip the cable first.
-
Pull back on the ribbon-cable as shown in the image. This is connected to both the charging port and the vibration module (which is similar to a small watch battery).
-
Gently pry the vibration module out with a plastic opening tool. Be gentle, for it is adhered to the phone.
-
-
Cette étape n’est pas traduite. Aidez à la traduire
-
Once the vibration module is out, pull up carefully on the cable as the charging port is attached with adhesive.
-
After carefully pulling the port and vibration module, it should now be free from the phone and can be replaced.
-


Annulation : je n'ai pas terminé ce tutoriel.
15 autres ont terminé cette réparation.
Équipe

USF Tampa, Team 3-6, Wollert Spring 2016 Membre de l'équipe USF Tampa, Team 3-6, Wollert Spring 2016
USFT-WOLLERT-S16S3G6
2 membres
10 tutoriels rédigés
7 commentaires
I had to reuse the vibration motor de- and solder it back on, because it is not included in the spare part.
Watch for the silence switch when you reasamble the phone. I had to unscrew the upper bord again because i didn't payed atention to it and it was locked. Also the mic is covered on the replacement part. Don't forget to remove the yellow "flag" there.
I replaced USB flex port, now working, but now phone dont recognize SIM card..what i must check? Thanks for any help
What is the price of charging port with vibrator module
Good Instructions
In the upper right Corner is one more Screw
where the Logic-board is screwed directly.
That was not mentioned!
Also, you should pay attention that you do not pry where the PCP goes around the Camera.
I break off the Corner, fortunately it's only connected to the Status-LED.
Otherwise everything works.