Introduction
Ce guide est destiné à aider les personnes dont la tablette reMarkable n'est plus garantie par le fabricant. Ne commencez donc cette réparation que si vous avez épuisé tous les autres moyens possibles de faire réparer l'appareil par le fabricant d'origine !
La plaque arrière en aluminium de l'appareil étant collée au cadre en plastique, il est très difficile de l'enlever et de la remettre en place. Je ne recommanderais pas de commencer la réparation sans les outils appropriés et une certaine expérience de la réparation.
Je n'assume aucune responsabilité pour les dommages causés en suivant ce guide et comme je l'ai dit plus haut, essayez d'abord de vous connecter à l'assistance officielle de reMarkable !
Ce dont vous avez besoin
-
-
Tout d'abord, assurez-vous que votre reMarkable est complètement éteint avant de commencer la réparation.
-
Avertissement : Ne laissez pas l'écran entrer en contact avec de l'alcool ou tout autre solvant contenant de l'alcool, car cela pourrait endommager l'appareil.
-
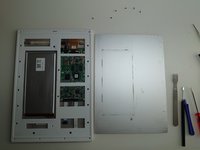
Retirez les bandes de caoutchouc en haut et en bas. Vous verrez alors apparaître vis petites vis à tête cruciforme en dessous.
-
Retirez les six vis.
-
-
-
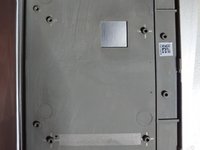
La plaque arrière en aluminium est collée à l'appareil et vous aurez besoin d'un bon outil pour séparer la plaque arrière du support en plastique.
-
La colle maintient les quatre côtés ensemble, la colle est présente aussi verticalement et au milieu.
-
Le plus difficile est de trouver un endroit sur la plaque arrière où il y a un espace suffisamment grand (entre la plaque arrière et l'appareil) pour y introduire un outil sans plier l'aluminium.
-
Commencez par l'un des coins supérieurs. Retirez lentement et délicatement la plaque arrière en aluminium à l'aide d'un outil suffisamment résistant pour passer entre la plaque arrière et l'appareil.
The gap between the aluminium plate and the plastic is quite snug. What sort of spudger did you use?
I have used the tools that are on the picture. To start, I have probably used the black handle pointy tool and then with the metal flat headed to go around... At least that is how I would do today ;-). Those tools were the time available for me, so I am not sure if you have any similar looking and similar strength of tools in iFixit store. They do improve their tools set time-to-time, so I kinda think they must have something...
What's the point of removing the aluminum backplate? Can we not skip to removing the plastic frame and keep the aluminum backplate attached to the plastic frame with no reduction in access to the internals?
I only see 6 screws in the picture which aligns with the six holes that aren't covered by the aluminum backplate. So if none of the other holes that are beneath the aluminum backplate have screws, it might seem like a good opportunity to leave it attached.
But I may be missing something. Please let me know, thanks.
If you do not remove the aluminium backplate then you have no access to any internals at all.
You see that I started with the 6 screws but than I get nowhere. Nothing was lose or removable. Only option was left to continue with the backplate. (Which in a sense makes step1 and step2 to be possibly done in any order you wish)
In step 3 you can also see that there are 15 more screws to be able to separate the plastic frame from the magnesium base.
If you do not belive then just try it yourself :-)
I understand now. Thank you for clarifying this for me Visegradi.
I cut away part of the frame that connects to the metal back plate by gouging gently with a sharp knife until an edge of the frame was visible and the knife could go between. I then extended the blade and ran it under the plate all the way around several times. I suggest gouging on the bottom left corner, as it'll be noticeable.
When replacing-I recommend bending the plate slightly concave (so the edges touch the frame first), then the glued centre part of the frame will hold the edges down rather than them peeling up slightly.
-
-
-
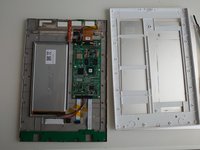
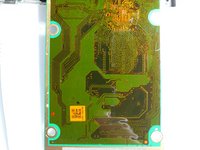
Il y a six vis de chaque côtés et trois au milieu de la partie supérieure. Retirez toutes les (6+6+3) 15 vis. (Les deux vis du bas n'ont pas besoin d'être retirées).
-
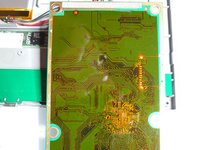
Une fois les vis retirées, le cadre en plastique peut être séparé du cadre de maintien de la carte mère. IL Y A ÉGALEMENT DE LA COLLE/DU MASTIC ENTRE LES DEUX PARTIES ! Il faut donc faire attention lorsque l'on sépare les deux pièces.
-
-
-
-
Tirez sur le connecteur de la batterie vers le haut pour le détacher de la carte mère.
-
-
-
Utilisez une batterie similaire pour remplacer la batterie d'origine.
-
La batterie est maintenue en place par de la colle. Utilisez un outil solide pour retirer la batterie de son emplacement.
-
-
-
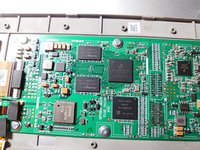
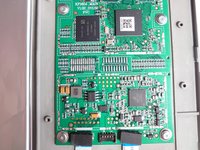
Retirez tous les connecteurs si vous souhaitez remplacer la carte mère. Tous les connecteurs fonctionnent de la même façon: vous devez relever la partie noire du connecteur et retirer les câbles. Les deux exceptions sont le connecteur de la batterie, qu'il suffit de tirer ou de pousser vers le haut. Il en va de même pour le connecteur coaxial WiFi.
-
Il y a six vis avec des rondelles spéciales qui maintiennent la carte mère sur le cadre.
-
-
-
Il est intéressant de noter que même l'autre côté de la carte mère contient des éléments près du CPU qui nécessitent un trou en demi-cercle découpé dans le cadre... une décision de conception intéressante.
-
-
-
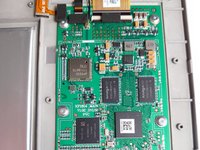
Retirez les deux vis qui maintiennent le panneau des boutons/USB en place.
-
Déconnectez la nappe du panneau en tirant vers le haut la partie noire/arrière du connecteur (voir l'image).
-
-
-
La photo montre la façon dont le bouton d'alimentation et le module WiFi sont connectés à la partie supérieure de la carte mère.
-


Pour remonter votre appareil, suivez ce guide en sens inverse.
Pour remonter votre appareil, suivez ce guide en sens inverse.
Annulation : je n'ai pas terminé ce tutoriel.
7 autres ont terminé cette réparation.
Merci à ces traducteurs :
100%

Guillaume Malecha nous aide à réparer le monde ! Vous voulez contribuer ?
Commencez à traduire ›

11 commentaires
The one thing I’m having difficulty with is simply identifying the proper battery. Suggestions/source would be greatly appreciated. Unfortunately “similar to” doesn’t give much guidance.
@crawfordlong, Unfortunately, it looks like Remarkable isn’t too keen on the end user replacing their own battery so they don’t provide the specific battery you would need. I did find this on their website. You could probably contact them directly and ask about battery specs? They’ll probably warn you about it voiding your warranty, but it’s worth a shot.
They have been awful. Completely ghosting any request for technical information after I rebuffed their attempt to turn a tech support request into an upsell opportunity (for a new tablet). I’m unlikely to support them in the future at this point, given the way they’ve handled this. I would have been fine with almost any answer, up to and including “I’m sorry, we do not recommend and do not assist with out of warranty self-repairs.” But losing all interest in communicating after I declined to spend several hundred dollars to replace a device that might simply need a battery? Horrendous.
I had a broken tablet, so I got it from there… but as far as I see from these old pictures a 3.7V 3000mAh battery with size 2867144 what was installed here. If you unable to find exact same size then I would go with any fitting size which is closely matching.
Obviously, if you do not know what you are doing then please DO NOT play with the battery! It can cause fire or other type of damages!!!
R,
PS: quick search gave me this (I have not tried to install it or buy it - this is only a search result)
The issue I’m running into is the connector + number and nature of wires (everything I’m finding has a single +/- wire pair, not 2 pair + yellow). Frustrating. (And your warning is both appreciated and received, but I’m comfortable with the attempt.)
Hello and thank you so much for you guide
I find a battery online on a “BIG BAY “
But according to this vendor the dimensions are essential
But 3,7volts are standard exactly like apple 🍏 battery inside … are all the same different dimensions….
Are extremely cheap considering giving new juice to your device 👍🏻 And new life !
Thank again cheers
I was able to purchase this battery.
https://www.aliexpress.us
It fits perfectly in the thin design of the remarkable 1 tablet and works; however, once the battery was drained, I could not get it to charge. I checked the ports with a multimeter the voltage reads 3.5 V when the battery is disconnected and the tablet is connected to a charger. When I connect the battery, it reads 3.7 V. The old battery I had it was also reading at 3.7 V.
Please if you have any suggestions to make this work, let me know.
I am not an expert, but I know my way around this kind of stuff.
I also tried this battery and had the same issue. The plug on this battery didn't fit the port on the back of the tablet, so I cut the plug off of this battery, cut the plug off of the old battery, and one-by-one reconnected the wires (red to red, red to red, white to yellow, black to black, black to black).
The tablet started up fine and worked until it needed to charge. It won't charge.
I found a unrelated battery-mod post elsewhere, involving a Wii U gamepad. Instead of swapping at the wire level, that user disconnected the old battery at the PCB, and swapped the lithium cells themselves, stating it was necessary step "In order for the new battery to work properly and not run into issues like not being able to power up the console..."
https://old.reddit.com/r/WiiUHacks/comme...
Screenshot of text:
https://cdn.discordapp.com/attachments/9...
I threw out my old battery so I'm out of luck.
Hi, do you have any idea where to buy a similar battery? What I find on aliexpress and ebay is only has three or two wires and the original has five.
Hello, i dismounted mine and it finally worked after taking out the battery and placing it back again, but there is an issue with charging it. There seems to be overheating the component called: AG 9K126. Do you now if we can replace it or how can we charge the battery without the usb connector?
Thanks!