Introduction
Ce guide explique comment remplacer le SSD dans le Dell XPS 13. Si votre ancien SSD fonctionne toujours, assurez-vous de créer une sauvegarde complète ou de cloner le disque avant de commencer. Vous pouvez utiliser ce tutoriel à la fois pour remplacer le disque par un autre de plus grande capacité, ou pour remplacer un disque défaillant. Si vous installez un SSD vierge, vous devrez réinstaller Windows (ou le système d'exploitation de votre choix) une fois la réparation terminée.
Ce dont vous avez besoin
-
-
Utilisez un outil d'ouverture plastique pour ouvrir la trappe 'XPS' au milieu.
No flap or screw on the XPS 9370, just a press-fit latch at the centre of the cover. This can be gently prised off.
-
-
-
-
Utilisez des médiators ou un outil en plastique pour faire levier pour détacher les clips du boîtier en commençant par le bord arrière.
It’s not that easy to lift actually, cause there are latches. Had t release them gently all around beforehand.
Also there’s one additional screw under that plate on the bottom!
Maybe the later models are different, since it should be from the front: https://www.youtube.com/watch?v=xFIE2SKs...
Very difficult step, Proceed very carefull
If you are replacing the battery of a 9360 or latter (2016 onward) make sure to do the FRONT first. There are latches on the back that you may break if you try to force it open that way. After prying up the front and the sides, just lift up the front like you would open a hinged box. You shouldn’t feel that much resistance as the back hinges off towards you after you’ve lifted it around 30-40 degrees.
-
-
-
Retirez le couvercle inférieur.
good evening, is there a site that sells the back part because it's broken
good evening, is there a site that sells the
back part because it's broken
-
-
-
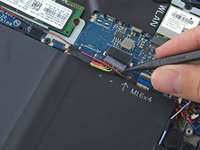
Tirer doucement le connecteur de la nappe de la batterie en direction de la batterie pour le débrancher de sa prise.
-
Si le connecteur est résiste, poussez-le d'un côté puis de l'autre pour le faire sortir de la prise.
-
Si vous rencontrez des difficultés pour faire sortir le connecteur de sa prise, utilisez la pointe d'une spatule (spudger) pour pousser délicatement sur l'encoche du connecteur afin de le faire glisser.
-
Dépliez l'écran et appuyez sur le bouton de marche pendant 5 secondes pour vider toute charge latente du système.
DO NOT OPEN THE DISPLAY!!! When I did, on my Dell XPS 13 9360, I cracked something in the top right corner where the power button is, and the plastic part of the button came out. I can still press it, but there is now a gap there and dust can get it.
I opened they display, very carefull. No problem. Open just enough to press they button.
Agree with Asher Grossman, open at your peril!
First put the bottom cover back, with 4 screws, one at each corner. Then you can safely open the display and press the button. Then close the display and take the bottom cover off again.
I did not do the open display and drain the battery because I did not understand this part and I know my battery was essentially dead, hence why I ordered one. Did everything else and voila! Works perfectly!
Opening the display worked fine for me, but when I closed it again, something definitely didn’t quite go right – I think it was trying to push against the missing back cover. I managed to carefully close the display by pushing against the metal corner thingy that was meant to push against the cover, and so far the laptop still seems to work, but I concur with Asher and James, be careful at least. Patrick’s suggestion sounds great if I’d seen it in time :)
Ich konnte den Stecker schliesslich mit Hilfe einer Plektren sehr gut entfernen. Das Display habe ich nicht geöffnet.
Much better to ensure the old battery is fully depleted (unplug from mains & switch on & let it expire) before you begin replacement.
This allows you to leave the unit face down whilst you work on replacing the battery.
-


Pour remonter votre appareil, suivez ces instructions dans l'ordre inverse.
Pour remonter votre appareil, suivez ces instructions dans l'ordre inverse.
Annulation : je n'ai pas terminé ce tutoriel.
28 autres ont terminé cette réparation.
Merci à ces traducteurs :
100%


Ces traducteurs nous aident réparer le monde ! Vous voulez contribuer ?
Commencez à traduire ›
14 commentaires
I’m kinda new on pc upgrading. So once I install a new m.2 I’ll need to install a new window 10 right
Yes, you have to install windows again. or you can clone your existing ssd onto the new one using some adapters easily found online
You will have to reinstall unless you are buying a samsung m.2 which comes with a disk duplicator utility. The xps 13 cames with a samsung early life evo disk (128GB) and transferring from 1 evo to another is very easy with the app. I believe its the same with every disk though I havent tried the latter.
Dell has some nice recovery tools:
https://www.dell.com/support/kbdoc/en-us...
I downloaded a recovery image to use from a USB drive. I am using it to reinstall the Windows that came with the PC. You don't have to be the original owner but you do need to have the Dell asset number usually stored in the bios
https://www.laptopmag.com/articles/upgra...
helpful resource
My screws were a T6 not T5 and it took about 20 minutes not 15. I suspect different versions of the XPS 13 have different screws etc. mines a 9370.
it would have been helpful if the guide title or preamble mentioned the specific model these instructions were written against.
The process was the same though and the guide helpful, thanks!
I viewed another video before this one and was surprised to learn how easily the back snapped off after removing all of the screws and following the instructions to start near the back. Nice
Back up your data: Before you begin, make sure you have backed up all your important data to an external hard drive or cloud storage.
Shut down your laptop and unplug it from the power source.
Open the laptop: Use a Torx screwdriver to remove the screws on the bottom of the laptop. You may need to use a plastic spudger tool to pry open the bottom cover.
Locate the SSD: The SSD is a small rectangular chip connected to the motherboard. It may be covered by a metal shield or tape.
Remove the SSD: Unscrew any screws holding the metal shield or tape in place. Gently lift the SSD out of its socket, being careful not to bend any pins.
Install the new SSD: Carefully insert the new SSD into the socket, making sure it's properly aligned. Tighten any screws or clips to secure the SSD in place.
Close the laptop: Replace the bottom cover and secure it with screws.
Power on the laptop: Plug in the power source and turn on the laptop. Check to make sure the new SSD is detected in the BIOS.
check this here: Back up your data: Before you begin, make sure you have backed up all your important data to an external hard drive or cloud storage.
Shut down your laptop and unplug it from the power source.
Open the laptop: Use a Torx screwdriver to remove the screws on the bottom of the laptop. You may need to use a plastic spudger tool to pry open the bottom cover.
Locate the SSD: The SSD is a small rectangular chip connected to the motherboard. It may be covered by a metal shield or tape.
Remove the SSD: Unscrew any screws holding the metal shield or tape in place. Gently lift the SSD out of its socket, being careful not to bend any pins.
Install the new SSD: Carefully insert the new SSD into the socket, making sure it's properly aligned. Tighten any screws or clips to secure the SSD in place.
Close the laptop: Replace the bottom cover and secure it with screws.
Power on the laptop: Plug in the power source and turn on the laptop. Check to make sure the new SSD is detected in the BIOS.
check here: https://www.lenovo.com/ca/en/faqs/pc-lif...
Hey, thanks for the help. What's the max SSD capacity allowed on this XPS model ?
Is it true this doesn't work for the 9315 because the SSD is soldered to the motherboard?
I heard about that too. I opened mine (ie.9315) but the SSD seems to be covered by a "black part". I was too frightened to go on.
Can I put in a larger NVME? 1tb -4tb?
Missing a step about removing the tiny Phillips head screw under the XPS flip up cover in the middle. Also, there are hooks all the way around the cover so it doesn’t simply lift off.
curtis_p_brown - Réponse
What about step 3???
Peter Hecht -
Please dont hurry , take your Time to follow this procedure. It takes 20 min (not 5) and step 4 requires half of this Time. Good luck.
Peter Hecht - Réponse
+1 Peter Hecht is right - getting the little clips the back is snapped on with is time consuming and a bit fiddly for people not used to “spudging” off covers. Starting from the back is the key those come loose much easier and help with the rest
Doug Steinschneider - Réponse
Great guide. It took me 20 minutes and there were no surprises. Battery installed. :)
dhenniga - Réponse