Introduction
Guide pré-requis pour remplacer le bouton Home de votre iPhone 5s.
Veuillez noter que la fonction Touch ID pourra être utilisée uniquement par les téléphones avec le bouton Home original. Un nouveau bouton Home inclura seulement les fonctions ordinaires Home, mais pas la Touch ID.
Ce dont vous avez besoin
-
-
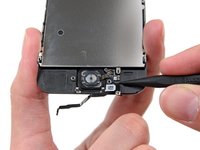
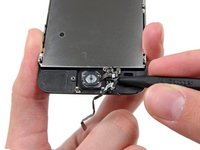
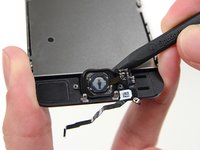
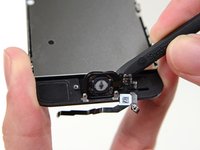
Dévissez l'unique vis captive Phillips #000 qui fixe le câble du bouton home.
-
-
-
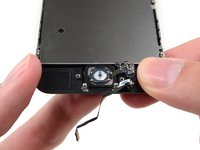
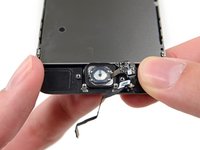
Pliez le câble du bouton Home en dehors du cache du bouton Home.
Aiuto, ho sostituito il touch screen e non mi funziona più il riconoscimento dell’impronta digitale (touch id). Chi può aiutarmi. Grazie
-
-
-
Enlevez les deux vis Phillips #000 du cache du bouton Home.
Screws are stuck...! no way that I can unscrew them :-(
I had this issue, screws were so tight my screwdriver was starting to strip them. I managed to get one side off by applying massive pressure. I then wiggled the plate around to loosen the other side.
Hi every body! I would know much pressure the iphone 5s 's lcd can resist approximately !!? Have you ever stand on it?this happend for me , and in some positions under the direct sun light when the screen is ON , it seems that there is some pits on lcd ! ;-( please help ! If you had the same case! Help Thank You***
Use the #00 Philips on these screws
Went and bought a #00 when the #000 didnt work. Still no luck. About to lose my mind with frustration.
I could not get the 000 or the 00 to work, therefore I tried a #1 flat head from the kit and it worked like a charm.
Sometimes just switching to another screwdriver might help. I noticed that the screwdrivers you often get with displays assemblies are just crap. Invest in a good one.
I was successful by using a 1.5 Phillips screwdriver head from a Stronger toolkit TK-LA40-38PCS
Glad I’m not the only one I guess. Using insane pressure for such small parts I was able to get the one not originally covered by the cable out. Then the trick of wiggling the bracket loosened the other one which was somewhat stripped by my earlier attempts with 00 and 000 Phillips. What a scare
I had success using the J000 screw from the iFixit Pro kit
Both of the screws have blue loc-tite on them. Best to make sure you have the right screw driver for the job. Also, if you have the “iopener”, you can apply a little “heat”. That will loosen up the loc-tite.
these screws are impossible to get out…
I had issue with the brand of the screwdriver. A cheap “iphone compatible micro crosspoint” screwdriver removed the outer screws with grace, but it started stripping the home button screws. Same happened for some other Chinese brand precision driver collection with PH 00 and PH 000. With one last hopeless try, I found another PH 00 in the shed (it says Japan, but no clue what the brand is), and the stripped screw unscrewed at the lightest touch. I believe it's not tightened hard but we've been using a poor screw driver without a snug fit. It's extremely difficult to tell if the driver is any good until you try it. Visually comparing the good and the bad driver I can't tell any difference at all.
Ich bekomme die schraube nicht auf gibt es da einen Trick ?
-
-
-
-
Enlevez le cache du bouton Home du boîtier.
For those having problems transferring their home button to the new display assembly: When installing the home button into the new display assembly I had the problem that the bracket kept the button "pressed down" because the button did not sink into the front panel completely. After removing the home button and reassuring that there was no dust or similar particles preventing the home button from sitting correctly, I still had to push gently to get the home button into the correct position.
-
-
-
Calez le bout d'un spudger en dessous du câble du bouton Home.
-
Insérez légèrement le spudger en dessous du câble pour séparer le câble du bouton Home de l'écran.
It can be easier to come in from the other way than shown in the image, near the home button.
I confirm, for me it was way easier from the home button. But you must be careful as it’s easy to pull the cable more strongly from that side (more effective, but less control)
I think this is easier to do with the blue ifixit opening tool (this guy: iFixit Opening Tool) than the spludger. It gets underneath the cable more easily.
Totally agreed
The flat end of a halberd spudger worked well for me.
-
-
-
Éloignez légèrement le côté haut gauche du bouton Home, de l'écran.
I used UNDU adhesive remover on the membrane. It swelled and distorted and came and recovered to original shape when the UNDU dried out. Problem is getting more adhesive to replace the existing thin adhesive.
Without the adhesive , the home button protrudes from the glass and wobbles round a lot. I used a relatively wide piece of 3M 5908 VHB tape cut out to fit, which stuck to the metal base of the home button. This is not ideal, as it makes the button harder to press, but it does seal the home button from dust and water. Some thin strips to just adhere to the membrane would be OK, but not be environmentally sealed. Next time I would use the VHB strips and tiny dots of silicone in the corners. (Syringe is good for precise silicone and the VHB tape holds everything flat and level while the silicone sets.)
Transplanting the touch ID sensor is extremely tricky, but it did work. Buying the front screen including a home button might leave the adhesive to stick the old touchID sensor to the new screen.
-
-
-
Retirez le bouton Home de l'écran en le décollant délicatement avec un spudger.
DO NOT skip this step, or you will damage the very gentle rubber hold around the home button, and that may result in a broken home button.
-
-
-
Enlevez le bouton Home de l'écran.
-


Pour remonter votre appareil, suivez ce tutoriel dans le sens inverse.
Pour remonter votre appareil, suivez ce tutoriel dans le sens inverse.
Annulation : je n'ai pas terminé ce tutoriel.
35 autres ont terminé cette réparation.
Merci à ces traducteurs :
100%


Ces traducteurs nous aident réparer le monde ! Vous voulez contribuer ?
Commencez à traduire ›


6 commentaires
Unfortunately this will never work, the sensor is paired to the logic board. If you want to replace the defective tactile switch, remove all the plastic/rubber parts on the flex cable and resolder a new switch or disassemble the switch and clean/replace the metal dome switch. If you want to repair fingerprint function, just give up.
I purchased a full iphone 5S home button replacement assembly (comes with the home button attached to the flex cable) And now the fingerprint function does not show up at all. Where it's supposed to show in settings as "Touch ID and Passcode" It only says passcode. Restored as new to 7.1, still doing the same thing.. Anybody have ideas?
Only the home button that came with the phone has Touch ID function. In order to replace it and still have Touch ID, you would need to get it replaced at an Apple Store.
p3rs0nn -
I think you can easily break the Touch ID sensor
The tiny "captive spring" came off of the back of the screw and I struggled to get it to go back on. I ended up placing the spring over the hole where the screw goes in, with the holes lined up then putting the screw through both.
Also, the replacement screen I received from ifixit.com was slightly different than the original. The small metal tab where this screw goes in was not slightly bent downward like the original. It didnt make any difference. The screw went back in as normal.
Nathan - Réponse
Hi,
The home button doesn't work ?
Help
Sultan - Réponse
Home button not working (but touch ID still works) is a symptom of the metal backing plate rotated by 180°. Home button will appear to work when phone is open but will stop working when screen is clicked into phone shell.
Father Ted -
BE CAREFUL HERE.
This so called 'captive' screw is not very captive at all and I have nearly lost it twice now.
If it does fall out, look closely at the pictures to figure out the orientation of the grounding finger.
Ben - Réponse
Two things - As mentioned, the replacement screen is a bit different. Mine had a screw where an empty hole should have been for the "captive screw".. a bit confusing at first. Just remove it and carry on.
Second, if you're an occasional nunce like me, you might be confused by the little tab/prong/raised guy next to the screw. After you've screwed the "captive screw" in, that thing should be hovering above it/the metal plate of the screen, and should look just like the removal picture.
easleyjs - Réponse
Hi Help !!! The home buton doesn't work anymore !
Chris91177 - Réponse
what if you lose the spring contact. does the phone work without it? if not, where can I find a spring contact?
Andreas Kouroupis - Réponse
I have this same problem. I lost mine but found the screw where can I order one from?
kristlewomack -
I also have this problem, do any home buttons come with this piece?
fdsajky675 -
Hello. I lost the little 'spring clip'. My phone is working erratically. Could that be anything to do with the cip not being in place? Thanks
ggough60 - Réponse
I am pretty sure I had replaced the captive spring wrong (didn't see the second image until I have completed the project). But the phone seems to have a perfectly working home button now.
Alan Kang - Réponse
This screw/spring combo fell off right before reassembling. Good luck and found the screw again. So my advice: Put a tape around the screw/spring or dismount them from the cable and put them in a safe place. The spare screw delivered with the display was too short.
Tom Vee - Réponse
I thought I lost the spring contact, but it actually just got rotated under the section of cable that the captive screw is attached to. The spring contact should be "captive" at the same place the screw is so it should'nt get lost too easily.
Anand Varma - Réponse
On the phone I worked on, the screw wouldn’t separate from the “captive spring.” LEAVE IT! It’s more trouble than it’s worth to remove it, Just reuse the screw it will make the re-install on the new screw much easier. Also use the tweezers to hold the spring in the correct orientation as you screw it back on.
Benjamin Finley - Réponse
During reassembly, I wasn’t sure wether the spring contact backing was beneath or above the cable. It is hard to see in the 2nd image in step 23.
But in step 24 the 2nd image shows that the spring contact backing is right under the cable.
So the spring contact backing goes first, then the cable and then of course the screw.
Wolfgang Bauer - Réponse
For the life of me, I cannot get this screw out. I have been using the same screw driver and nothing has been working.
Warren Binder - Réponse
I think there is one step missing here which shows a picture with the correct position of the ‘spring contact backing’. Consider the part which has a hole in the middle: the flat part is sided to top, making the round part sided to bottom. This is a clear picture of the ‘spring contact backing’: http://www.icellulartech.com/iphone-5s-h... (if the link is broken by the time you see it, type the name in Google).
Andre Silva - Réponse
I had a problem when reassembling, I removed this little screw and the spring contact from my original screen to put them in the new one, but the new one had already its own screw, soI just removed it and tried to put the screw from my original screen into the new one but it didn’t work, and the worst thing of all is that I lost the screw that came with the new screen and that’s the only one that works.
Elías Eduardo Reyes Vázquez - Réponse
May seem silly to say this…. however it might prevent some confusion for others.
my replacement screen had a screw that needed to be removed in order for the captive screw and home button cable to be secured.
Dean Allan Land - Réponse
When I unscrewed it, the spring contact part moved too & the little prong rotated under the cable. I thought (mistakenly) that this was its intended position. The screw also came loose, which made reassembly difficult until I saw that 2nd photo above and realized what the orientation was supposed to be.
The order is screw -> cable hole -> spring contact -> screw hole.
The rounded edge of the spring contact should face the bottom of the phone to match up with the hole’s rounded edge. The perpendicular ‘lip’ should sit flush against the metal plate. The prong should stick up toward where the screen will be. Really, there’s only 1 possible way to put it on correctly, but without seeing the correct orientation first, or if the screw detaches from the cable, it’s kind of a pain to get them back together.
seijihuzz01 - Réponse
With my phone I needed to use a PH0000 screwdriver. The provided PH000 (and my own from another screwdriver set) was too large. Indeed, every Phillips head screw in my phone needed the PH0000 and not the PH000 driver.
rhowehmd - Réponse
It is MUCH EASIER if you leave the screw ATTACHED TO THE CABLE. Just gently unscrew until you are able to detach the cable. The screw will stay attached to the cable unless you pull it out, which will help a lot in reassembly. Just make sure, as you handle the cable in the next steps, that the screw doesn’t fall off!
Athanasius Pernath - Réponse
Hello my home button only works sometimes, touch id works perfectly.
Can you give me some hint, I already opened it to see if everything seemed okay, and it does. But it doesn’t work.
I wonder were does the cable or contact of the home button are connected to. How does it work?
(usually to be able to fix smt you need to know how it should be working)
thanks for advices
qiplayer - Réponse
CAPTIVE SCREW “SPRING” POSITIONING:
1) Line up the round part with the bracket on the back of the screen.
2) (On my SE model, at least) there’s a small lip that sits on the -left- side of the bracket.
3) With the screen laying flat, the display facing your work mat, the “spring”/little raised lever should point up towards you.
Order from bottom (closest to desk) to top (closest to you):
screen bracket > spring > home button cable > screw.
This was the hardest part of the repair for myself, using only the tools from the SE screen repair bundle.
Good luck!
Jordon B - Réponse
My home button sticks up ‘proud’ of the glass which leaves a sharp edge on the outside rim of the button. Is there a fix for this?
Robert Stroud - Réponse
Help me It dosent Work
Doktor Crimson - Réponse
The screw and clip came un done and i don’t know how any of you managed to get that laughably small clip and screw back together. After hours of trying, I gave up. It’s not worth this much hassle just to fix up an old iphone. You’d have to be a &&^&^$^ robot to be able to put a screw that tiny through a loop, force it into a clip, then line it up with a screw hole. All without using your fingers because your fingers are 500x the size of the head of the screw. I wish I didn’t just waste money buying a new screen and battery for this old phone.
John M - Réponse
For the love of god, is it REALLY necessary to have that super small clip on the screwdriver to be there? It popped out when i unscrewed that piece and it’s been a good hour since I’m trying to put it back its position, it is impossible, i cannot do it, somebody please respond, is it vital for it to be there? I’m getting very annoyed!
Juan Jimenez - Réponse
The little tab/clip that goes onto the screw must stick UP. See the extra pics. I suspect it needs to make contact with the back of the phone.
If the clip comes off the screw, put it back on the screw first. The hole in this clip has little tabs that require you to screw the screw into this clip; it will catch on the threads. THEN put them both in the hole through the plastic strip and into the phone chassis. PITA!
Gavin Stokes - Réponse