Introduction
Utilisez ce tutoriel pour remplacer ou upgrader votre disque dur iMac.
Ce dont vous avez besoin
-
Outil utilisé dans cette étape :iMac Intel 21.5" Cardboard Service Wedge$4.99
-
Si vous utilisez la cale de maintien en carton iFixit, vous pouvez utiliser ces instructions de montage pour l'assembler.
-
-
Outil utilisé dans cette étape :Plastic Cards$2.99
-
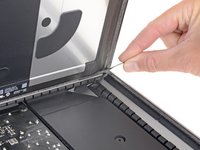
En partant de l'angle supérieur droit de l'iMac, insérez une carte en plastique entre l'écran et le cadre.
-
-
-
-
Attrapez la petite languette au bout de l'une des bandes adhésives du bord inférieur de l'écran, et tirez la bande vers le haut de l'iMac pour l'enlever.
-
Répétez cette étape pour l'autre bande adhésive et enlevez-la.
-
Si l'une des bandes adhésives casse avant d'être enlevée, utilisez une carte en plastique pour couper l'adhésif restant.
-
-
-
Soulevez l'écran pour le séparer du cadre et sortez-le de l'iMac.
-
Vous devrez peut-être soulever lentement l'écran d'un côté pour le décoller complètement.
-
Au moment de remonter l'écran, consultez ce tutoriel pour installer les nouvelles bandes adhésives.
-
-
-
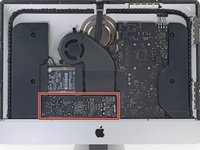
Retirez les vis suivantes par lesquelles le support du disque dur est fixé au boîtier arrière :
-
Deux vis Torx T10 21 mm du support gauche du disque dur.
-
Une vis Torx T10 9 mm.
-
Une vis Torx T10 27 mm.
-
-
-
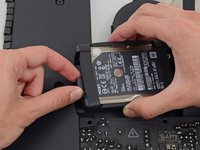
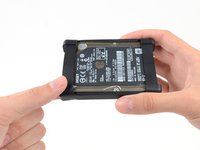
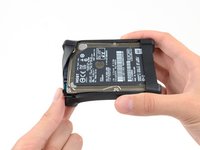
Soulevez le disque dur par le bord le plus proche du ventilateur et tirez-le légèrement hors de son emplacement.
-
-
-
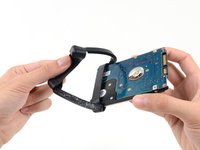
Décollez le manchon du disque dur souple dans le coin supérieur gauche du disque dur.
-


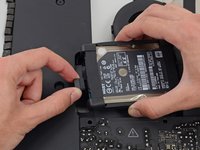


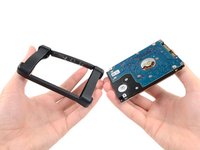
Pour remonter votre appareil, suivez ces instructions en sens inverse et utilisez notre tutoriel des bandes adhésives pour recoller la vitre de l'écran iMac.
Annulation : je n'ai pas terminé ce tutoriel.
360 autres ont terminé cette réparation.
Merci à ces traducteurs :
100%

Ces traducteurs nous aident réparer le monde ! Vous voulez contribuer ?
Commencez à traduire ›


43 commentaires de tutoriel
I used the iMac Opening Tool just as shown in this guide to separate the tape. DISASTER! The screen cracked! I used the tool slowly and carefully and despite this, the screen cracked. I should have simply used a guitar pick. That said, while I was inside my iMac replacing the Harddisk with a SSD, which was pretty easy to do, I decided to also see if I could replaced the 8GB RAM with 16GB RAM WITHOUT removing the logic board, as shown in other instructions on this site. I found that by simply removing the fan assembly, this makes enough room to reach behind the logic board and unclip the 2 memory modules. I installed 2 8GB modules (1600MHz DDR3L SO-DIMM PC12800 204 Pin) without much trouble. I used a plastic stick to reach behind the logic board and unclip the existing memory modules, then carefully inserted the new ones and clipped them into place. This is much easier than removing the power supply and logic board and all of the associated connectors and screws.
I had to replace the HD as it failed after less than two years. It was a good opportunity to increase the RAM from 8 to 16 GB. So I ordered the RAM chips from Kingston and a 256 GB SSD from Angelbird.
The repair went smoothly: to anyone trying this, please carefully follow the iFixit step-by-step guide. I recommend reading at least twice the whole procedure *before* beginning. Check all the photos. During the operation itself, I had the guide open before my eyes on my iPad and followed it step by step. The opening tool is a bit fragile, the wheel got damaged after the operation, but I guess it was designed to be used only once. After all, the adhesive strips can also be used only once!
For those replacing the hard-disk with an SSD: I highly recommend the Angelbird model "SSD wrk for Mac" (http://www.angelbird.com/en/prod/ssd-wrk...), for several dollars more you spare yourself the need to use additional software to enable TRIM or persuade the fans of your Mac that the HD's temperature is Ok.
Thanks for the tip on the Angelbird, working smoothly so far!
Elling -
Hi! Thanks for the tip! Do you know if can I put an SSD on an imac 21.5 in late 2012 ?