Introduction
Consultez ce tutoriel pour retirer et remplacer le module de la caméra arrière du Galaxy S10. Celui-ci comprend les trois caméras arrière ainsi que le support sur lequel elles sont montées.
Selon le lieu d'achat de votre S10, le module de la caméra risque de différer. Vérifiez votre téléphone et votre pièce avant de vous lancer dans la réparation.
Cette procédure nécessite d'enlever au préalable la carte mère. La partie la plus difficile est le retrait de la coque arrière.
Ce dont vous avez besoin
-
-
Insérez un outil, un embout éjecteur de carte SIM ou bien un trombone déplié dans le trou du tiroir SIM, qui se trouve sur le bord supérieur du téléphone, à côté de la bande en plastique de l'antenne.
-
Appuyez fermement pour éjecter le tiroir.
-
Retirez le tiroir de carte SIM.
-
-
-
Débranchez et éteignez votre téléphone avant de commencer.
-
Chauffez un iOpener et posez-le sur le bord droit de la coque arrière pendant deux minutes.
-
Pendant ce temps, observez l'image de la coque arrière démontée et prenez note de la répartition de l'adhésif.
I think we should mention that the glass needs to be barely too hot to touch to determine when it's hot enough that a pick can be slid underneath.
Or we can mention a thermometer temperature, but most diy people probably don't have a thermometer to check.
A lot of people seem to have issues using the iopener to unglue phone parts like back glass (can Google it), likely because the glue didn't get hot enough, so mentioning the desired touch temperature can be helpful for DIYers to ensure that their glue is sufficiently weakened and they can begin working off the part.
(Just being hot isn't enough for glue to weaken, as you can probably attest to if you've ever had your phone get really hot but the back cover never came loose)
-
-
-
Posez le bord droit chaud du téléphone sur un objet haut d'environ 12 mm (0,5 pouce). Il est plus facile de manipuler l'outil d'ouverture sous cet angle.
-
Calez le bord gauche du téléphone avec vos doigts pour que celui-ce ne glisse pas. Posez la ventouse en appuyant fermement.
-
Insérez l'extrémité d'un outil d'ouverture dans la fissure entre la coque arrière et le châssis.
-
Parcourez plusieurs fois la fissure avec l'outil, dans un sens puis dans l'autre, pour faire faire jouer la coque arrière.
Might be hard with the suction cup on a cracked back. I'd rather break it off and buy a new back (it's super cheap, around 10$ online).
Guenter -
Yes! Apply a layer of packing tape to the cracked back cover first, and the suction cup will adhere to the smooth tape surface.
I will open the one that I am taking out of the computer now and then I will follow where it is
Am besten 2 mal gut erwährmen. Danach geht das öfnen top.
-
-
-
Faites chauffer l'iOpener et reposez-le sur le même bord du téléphone pendant deux minutes.
-
Appliquez une ventouse au dos du téléphone, aussi proche que possible du milieu du bord droit (là où la bande d'adhésif est plus étroite).
-
Tirez fortement et constamment sur la ventouse pour ouvrir un espace entre la coque arrière et le châssis.
-
Insérez la pointe d'un médiator dans l'espace.
-
Si vous avez du mal à ouvrir un espace, nous vous conseillons de refaire chauffer le bord et de recommencer à l'étape précédente. Le verre est assez chaud lorsqu'il est presque trop chaud pour pouvoir être touché.
-
Vous pouvez essayer de poser quelques gouttes d'alcool isopropylique à haute concentration (au moins 90 %) dans la fissure pour faire ramollir l'adhésif.
I had trouble lifting up to create a gap. What I did is watch Jerry rig everything's teardown and he said the back glass must be barely too hot to touch in order for the adhesive to weaken.
So I heated the iOpener till it was too hot to touch, but not so long that it would burst. Put on right edge for a few minutes. Then I lift with the suction cup, using my middle finger and thumb to grip the sides of the phone and my pointer finger to pull up on the suction cup .
I cleaned the glass with an alcohol wipe beforehand to make the suction cup stick better, though I'm sure any cleaning method that removes fingerprints will help.
I couldn't make as big a gap as shown in the picture, but I was able to stick my metal jimmy tool carefully into the crack between the glass and the metal frame and it was just enough to slide the tool a little. And I was very careful since it's a metal tool. After that I could stick the plastic pick in and slice the adhesive and then that gets you started removing the back cover. Reheat often to weaken and slice adhesive. STOP and reheat if it even gets a little harder to slice. DON'T risk cracking the glass.
I think we should add that they should treat the back glass as gently as a raw eggshell. That's because I thought I wasn't applying excessive force and caused the glass to crack, but I didn't understand what counts as "excessive force." (A bit vague)
What excessive force actually means is as soon as you feel any resistance at all when slicing glue with the pick, stop and apply more heat before continuing. The glass can crack very very easily, when pressure is applied in only a small section.
See for me it was weird, the glass was weirdly weak. I just put the iOpener in the microwave and put it on there until it was almost too hot to touch and went around, the gap was like 0.5cm already, so I just went around and it came all off in like 10 seconds, I was kind of happy how easy it was, but sadly I went around too fast and now there's a line crack at the top left of my back glass, it's not sharp so it doesn't bother me.
-
-
-
Faites glisser le médiator le long du bord du téléphone pour trancher l'adhésif.
-
Laissez un médiator dans la fissure pour empêcher que l'adhésif colle de nouveau.
-
-
-
Posez l'iOpener chauffé sur le bord inférieur du téléphone pendant deux minutes.
-
Insérez un médiator dans le bord droit, à côté du coin inférieur droit.
-
Faites délicatement glisser le médiator le long du coin. Continuez le long du bord inférieur et du coin inférieur gauche.
-
Laissez un médiator dans la fissure pour éviter qu'elle adhère de nouveau.
-
-
-
Une fois que vous avez fait le tour du téléphone, faites pivoter un médiator dans un des bords pour amorcer la séparation de la coque arrière du châssis.
-
Soulevez lentement la coque arrière. Servez-vous des médiators pour trancher tout résidu d'adhésif.
-
Ôtez la coque arrière.
-
-
-
Dévissez les huit vis cruciformes de 4 mm qui fixent le châssis central supérieur au téléphone.
-
-
-
-
Le châssis est encore maintenu en place par quelques clips en plastique le long du bord.
-
Insérez la pointe d'une spatule (spudger) dans l'encoche sur la droite du châssis central, à côté du bouton Bixby.
-
Faites levier pour détacher le châssis central du téléphone.
Bei mir war die Kerbe durch den Klebstoff komplett verdeckt. Am bestern den Kleber vorher entfernen. Dann geht es einfacher.
-
-
-
Saisissez le châssis central par les coins supérieurs et retirez-le du téléphone.
-
Pour remonter la coque arrière :
-
Alignez le bord supérieur du châssis central avec le téléphone et posez le châssis sur le téléphone.
-
Appuyez avec vos doigts le long du périmètre du châssis central pour encastrer les clips. Les bords du châssis et du téléphone doivent se toucher.
-
-
-
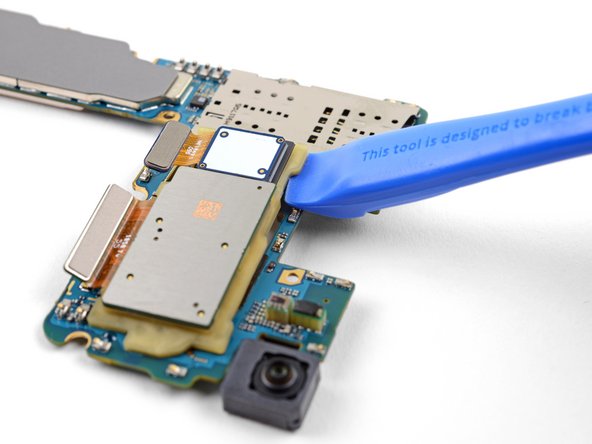
Insérez l'extrémité plate d'une spatule sous le connecteur de la batterie, qui se trouve sur la carte mère, en dessous de la caméra arrière.
-
Faites levier vers le haut pour débrancher le connecteur de sa prise.
-
Repliez délicatement la nappe de la batterie pour l'éloigner de sa prise sur la carte mère et éviter tout contact accidentel.
-
-
-
Retirez les sept vis cruciformes de 4 mm qui fixent le châssis inférieur.
-
-
-
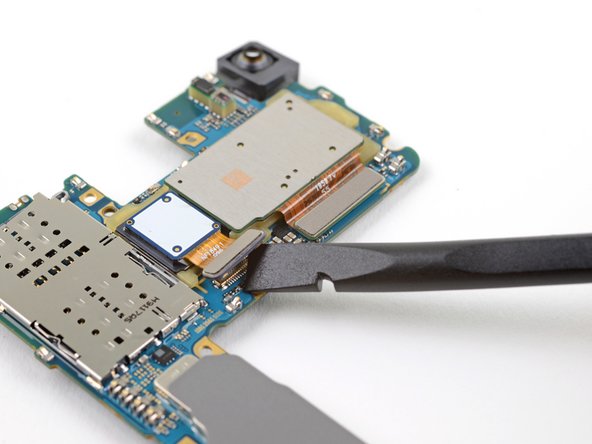
Utilisez l'extrémité plate d'une spatule (spudger) pour soulever et débrancher le connecteur de l'écran de sa prise sur la carte mère, située dans le coin inférieur droit du téléphone.
-
-
-
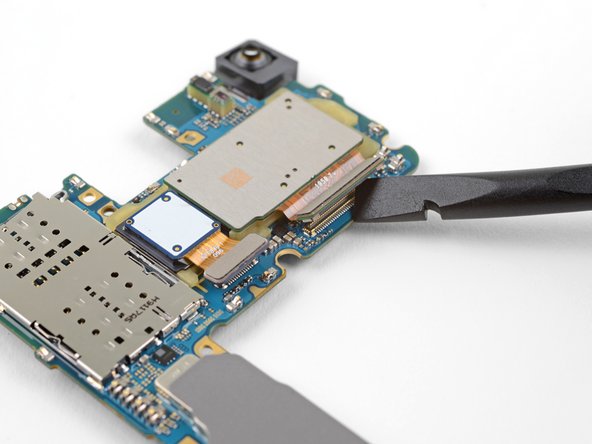
Utilisez la pointe d'une spatule pour soulever et débrancher le connecteur de la prise jack de sa prise sur la carte mère.
It's a good idea to take out the headphone jack at this point.
It eases the process of taking out the motherboard.
When reinstalling a new motherboard, the advantage of pushing in the jack AFTER sitting the motherboard is even greater -
-
-
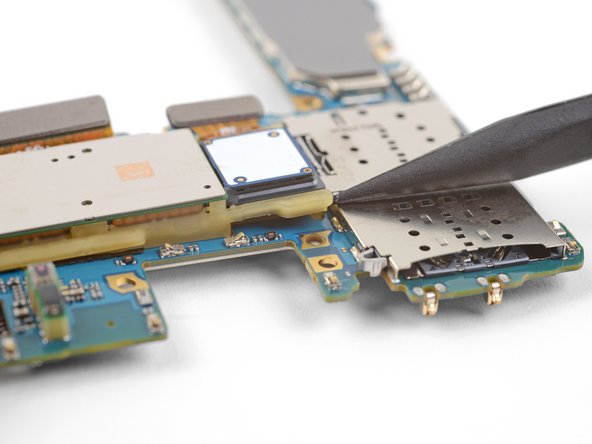
Saisissez la carte mère par ses coins supérieurs.
-
Faites légèrement pivoter la carte mère hors de son logement. Veillez à ce qu'aucune nappe ne reste accrochée en cours de route.
-
Tirez la carte mère vers le bord supérieur du téléphone tout en la remuant légèrement. Cela dégagera le port de charge de sa prise.
-
Une fois le port de charge détaché, retirez la carte mère.
-
Alignez le port de charge de la carte mère avec le bord inférieur du téléphone.
-
Poussez doucement la carte mère contre le bord inférieur du téléphone jusqu'à ce que le port de charge soit entièrement réinséré.
-
Abaissez la carte mère et mettez-la en place. Veillez à ne coincer aucune nappe sous la carte mère. La carte doit être bien encastrée contre le châssis.
It's a better idea to take out the headphone jack before taking out the motherboard and reattaching the jack after you sit the new motherboard in
Trust me...
where can you get replacement motherboard?
-
-
-
Retournez la carte mère.
-
Faites levier sur les deux connecteurs de la caméra avec l'extrémité plate d'une spatule pour les débrancher de leur prise sur la carte mère.
-


Pour remonter votre appareil, suivez ces instructions en sens inverse.
Une fois la réparation Samsung Galaxy S10 terminée, suivez ce tutoriel pour tester votre réparation.
Pour remonter votre appareil, suivez ces instructions en sens inverse.
Une fois la réparation Samsung Galaxy S10 terminée, suivez ce tutoriel pour tester votre réparation.
Annulation : je n'ai pas terminé ce tutoriel.
11 autres ont terminé cette réparation.
Merci à ces traducteurs :
100%


Ces traducteurs nous aident réparer le monde ! Vous voulez contribuer ?
Commencez à traduire ›


8 commentaires
I only wanted to know, what cameras are used in Galaxy S10/e, are they from Sony or Samsung used its own?
I’m sure I could combine info and figure it out on my own, but is there anywhere I can find instructions on only replacing the camera lens glass? I’m not the best at figuring this stuff out and getting it right. Any help is appreciated.
Hi, I had to replace the cover on my lens, and now the only one that focuses clear is .5. The rest are blurry. IF I replace this, will it fix that?
i having camera issue, camera failed . Even check with *#0*# camera still unable. Changing the camera module will solve this?
hello, if you have an authorized Samsung dealer around you they can diagnose the problem at a very affordable fee
The tools list includes Tesa tape. But I don’t see where tape is used in this guide. Do we actually need to buy this to replace the camera module?
Hi Benjamin! I added Tesa tape in the tools list as the adhesive to reattach the back cover. If you have replacement back cover adhesive on-hand, you don’t need Tesa tape.
No but you may need it to stick the rear glass back on
Mais dans quel compartiment faut-il mettre la carte sim ? Le petit ou le grand ? Je ne sais pas si “Nano” c’est le plus petit format. Merci.
Bernard LEROY - Réponse
Bonjour Bernard,
La carte SIM doit aller dans le petit compartiment.
Arthur Shi -
Be very careful to ensure that the SIM card does not fall out of the carrier while you are sliding it into the phone.
If it does fall out of the carrier while being inserted, you will find it nearly impossible to retrieve without damaging the phone circuitry.
You've been warned.
Patsy Hetzel - Réponse