Introduction
Remplacer un ventilateur défectueux est assez simple et évitera à votre ordinateur de surchauffer. Dans ce tutoriel, il s'agit du ventilateur du côté gauche du MacBook en mode de travail. Pendant la procédure de remplacement, ce ventilateur sera à votre droite.
Ce dont vous avez besoin
-
-
Boîtier fermé, placez l'Unibody à l'envers sur une surface plane.
-
Appuyez sur le côté rainuré du loquet de déverrouillage de la trappe d'accès de manière à saisir l'extrémité libre du loquet. Soulevez le loquet de déverrouillage à la verticale.
-
-
-
Tirez sur la languette et retirez la batterie de votre MacBook.
-
Si la languette n'est pas bien positionnée, elle empêchera la batterie de sortir.
Do I need to wait for the battery to charge completely before using the computer (while plugged in)?
No. You do not need to charge it completely before removing it.
-
-
-
-
Retirez les huit vis suivantes par lesquelles le boîtier inférieur est fixé au châssis :
-
Une vis Phillips 5,4 mm.
-
Trois vis Phillips 14 mm.
-
Quatre vis Phillips 3,5 mm.
Hi, My name is Jess I need help asap I accidentally dropped my macbook Pro and i cant find the silver screw for the top left back side, Does any one know if I can replace it with an eye glass screw?? If you can help at all Please e-mail me at Chambliss_jess@yahoo.com thx please help me my bf is going off... ;(
The fixit PH00 is the wrong screw driver for this entire job. It did not fit in the screws, it was too pointy and caused screws to be rounded off.
-
-
-
En vous servant des deux mains, soulevez le boîtier inférieur et retirez-le du boîtier supérieur.
About midway along each edge is a snap. To release each snap, gently slide the flat edge of a Spudger under the lower case, then lift the lower case away.
-
-
-
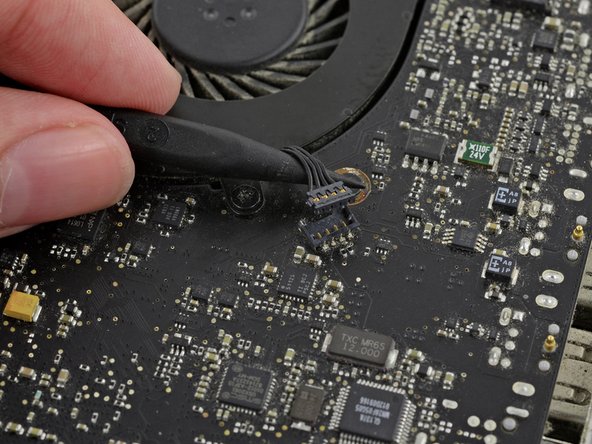
Avec une spatule (spudger), soulevez le connecteur du ventilateur pour le débrancher de la carte mère.
Be very careful prying this connector off. I got the spudger in the wrong spot and popped the little connector right off the circuit board. Now I either need to replace the board, or find a trained flea with a soldering iron.
Have you found any places that can solder the socket back on, I'm in the same predicament.
Dino -
-
-
-
Dévissez les trois vis cruciformes de 3,5 mm fixant le ventilateur gauche au boîtier supérieur et à la carte mère.
Could not get the screws to release. Stripped two screw drivers, not the screw heads.
Used a good heavy screwdriver and it worked fine. Still was very tight first, but the right tool made all the difference.
Same problem, but I stripped one of the screws. Still cannot get out.
Stripped two of the three screws trying to swap the fan. Ordered several types of extractors online. The first one I got was a small set of extraction pliers: www.vampiretools.com/shop/products/pliers/vampliers-mini-5-screw-extraction-pliers-2 . These worked well: got both screws out in 10 seconds. (No affiliation with that company, just a surprised and satisfied user.)
-


Pour remonter votre ordinateur, suivez les instructions dans le sens inverse.
Pour remonter votre ordinateur, suivez les instructions dans le sens inverse.
Annulation : je n'ai pas terminé ce tutoriel.
94 autres ont terminé cette réparation.
Merci à ces traducteurs :
100%


Ces traducteurs nous aident réparer le monde ! Vous voulez contribuer ?
Commencez à traduire ›

The A1286 has no Access Door.!!
I actually can see no sign of the battery!...
aguib - Réponse
I assume you have the newer model, with the built-in battery. It's still removable with tools, but these are the wrong instructions for that model.
lgc90 - Réponse
when will there be a guide for the other unibody macbook pro. that does not have an access door?
irishking - Réponse
Is there a manual to show, how disasembly the display, i mean, after step 5, to check the display between lcd and aluminiun back case?
Max
Max - Réponse
On other guides you state the height of the HD that can be supported, e.g. Remplacement du disque dur du MacBook Pro 15" Core 2 Duo modèle A1211 , I have read ( but have not confirmed ) that the uni-body MacBook Pro can be fitted with the 750GB and 1TB 12mm drive from Western Digital.
Can you confirm this?
Many thanks in advance.
ahothabeth - Réponse
My display and aluminum casing has separated.
I don't know if it just snaps back together or does it need to be glued.
I dropped mine on the carpeted stairs and the display still works.
I'm hoping I can just snap it back together and that no plastic pieces or teeth of the snapping
portion have been broken........
SHerwood Ball - Réponse
When you say "left fan" is this "left when looking at the logic board after turning the computer over and looking it up opening it up" or "left when sitting at the computer keyboard and typing on it"?
thvv - Réponse
We always use left and right in reference to the computer when you're using it.
Andrew Optimus Goldheart -
Directions were great and the worn dc in board was replaced. The hardest part of the procedure is disconnecting the data display cable. A better description of step 21 is to slide the connector parallel to the circuit board towards the outside corner. Reconnecting correctly took several tries.
I used the tip of the spudger to nudge the corners a little at a time to seat the connector.
The ribbon connector for the keyboard has to be inserted all the way before seating the retaining cap. It took me three tries . First try power button did not work second try numbers keys did not work.
Thanks for the directions ...could not have done it with out them!!!
landryd - Réponse
Hola. Poseo un MacBook Pro Late 2008 y debo cambiarle las cornetas. Me sirve unas cornetas de un MBP Late 2011?
jegonzalez80 - Réponse
Please read the instructions about removing the bluetooth cable - you CAN work around it, and NOT take off the plug.
kenneth krabat - Réponse