Introduction
Use this technique to “revive”, “awaken”, “boost”, or “recover” a GeoBlade’s battery that goes into sleep mode and will no longer charge using the intended charger. Symptoms of sleep mode consists of the GeoBlade displaying a single red bar when plugged in, the GeoBlade immediately powering off when pressing the power button, and an overall inability to increase the number of green bars when using the intended charger.
Disclaimer: Perform this technique at your own risk and understand this will void any warranties you have with the GeoBlade 500. Improperly handling Lithium batteries may cause fires or blasts, which may involve harm or injury. Reviving the battery pack consists of bypassing safety circuitry. The author discovered this technique on their own and has no affiliation with the GeoBlade 500 product. The technique will fail if one or more of your battery cells are out of balance. The user is responsible for any damage to the device or injuries incurred, the author is not legally liable.
The GeoBlade 500’s user manual does inform the user to maintain the voltage level of the device: “The GeoBlade must be topped-off about every 90 days. The internal safety-circuitry puts a small drain on the battery and can pull it down if left un-charged indefinitely.”
This technique involves disassembling the battery pack, bypassing the Battery Management System (BMS), and slowly ratcheting the lithium batteries up to 30V at 2A using a power supply. This method is hit-or-miss because it assumes the battery pack is equally low, i.e. the battery pack must be balanced.
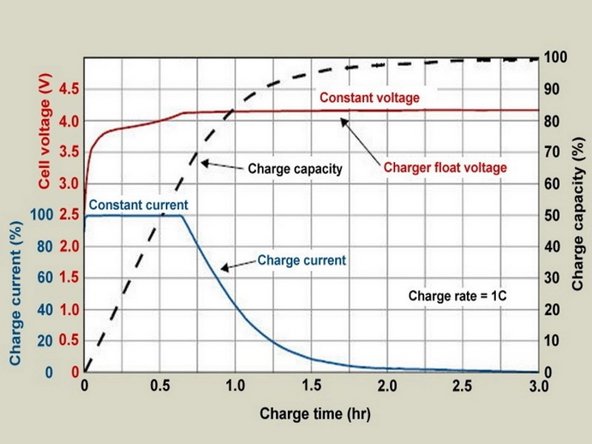
Lithium Ion batteries have a specific charging characteristic relevant to the guided steps to follow in this guide. Considering a single cell, the nominal voltage is 3.7V with a maximum of 4.2V and a minimum of 3.2V. Special care must be given to not exceed the maximum or fall below the minimum, otherwise the battery chemistry will change. Typical charging uses constant current, constant voltage with a ~100mA cut off. This guide is mostly interested in the recovery charging suggestions by the manufacturer.
The GeoBlade battery pack has 20 individual cells and complex safety circuitry to prevent unsafe charging. We are going to have to manually charge the batteries all together, where the voltage is slowly increased. Only proceed to the next voltage when the amperage decreases to a plateau of ~100mA and there are no causes for concern. Be sure to follow what the battery manufacturer recommends for charging. Our objective is to raise the voltage of the battery pack to the minimum value so the intended charger can be used to safely charge it completely.
More information about Lithium Ion battery charging can be found at Battery University. Generic charging curves used in this guide are cited here: https://batteryuniversity.com/learn/arti...
Ce dont vous avez besoin
-
-
Press down on the power button annotated in the red circle. Ensure to do this when the GeoBlade is on level ground, on its side. A blue light on the power button will show if it the GeoBlade is on, make sure this is not showing.
-
-
-
Lay the board down in a way that you can easily access the battery packs. Push in on the battery pack clip annotated in the red rectangle.
-
Use your thumb to leverage the battery pack out of the board
-
Remove the pack completely.
-
-
-
Use an Electrostatic Discharge mat to prevent damage to the electronics because we will be opening up the battery pack case.
-
Properly ground yourself by plugging the snap connector to the ground of your outlet and placing the wristband around your wrist.
-
Be sure to use proper protective equipment for handling Lithium batteries, for example rubber insulated gloves and a face shield are recommended.
-
Ensure to do the following steps in an area where you are prepared to handle a battery fire if it occurs.
-
-
-
Remove the four screws annotated by red circles using a phillips screw driver.
-
Remove the top cover.
-
Carefully pull the battery cells and circuitry outside the case as one unit.
-
-
-
-
Flip the battery unit over, taking special care to not lose the insulators that will come loose (annotated with red boxes).
-
Rotate the battery unit 180 degrees so the main leads are closer to you. These can be found as shown in red circles.
-
Use a multi-meter to probe the voltage across the two large solder pads to see just how low voltage your pack is at. The positive lead is on your right and the negative lead is on your left when looking at the pictures with red circles
-
I initially read 6.85V on my battery pack. Take note of this voltage for the next step.
-
-
-
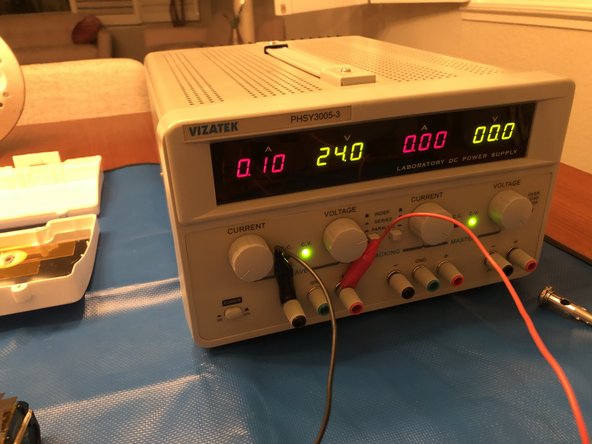
With the Power Supply disconnected from the battery pack main leads, set the voltage to 12V Constant Voltage (CV) and a maximum of 2A Constant Current (CC). You can ensure this is set correctly if you touch the Power Supply leads together. It should go into Constant Current mode where the maximum amperage is set and the voltage will drop.
-
I chose 12V here because my pack read 6.85V. Ensure to set a Power Supply voltage higher than your battery pack, otherwise sparks will fly due to the battery pack filling the capacitor of the Power Supply.
-
Connect the negative terminal of the Power Supply to the negative pad of the battery pack.
-
Connect the positive terminal of the power supply to the positive pad of the battery pack
-
Be sure to STOP if the battery cells expand, temperatures increase, or if a fire breaks out.
-
-
-
Witness the Power Supply amperage displaying the maximum of 2A initially, but then slowly plateau to ~ 100mA.
-
When the amperage reaches ~100mA, it is safe to increase the voltage described in the next step.
-
-
-
Witness the Power Supply amperage displaying the maximum of 2A initially, but then slowly plateau to ~ 100mA.
-
When the amperage reaches ~100mA, it is safe to increase the voltage described in the next step.
-
-
-
When the amperage reaches ~100mA, it is safe to increase the voltage described in the next step.
-
Increase the voltage of the pack to ~30V, but not to exceed 35V
-
Remove the negative and positive terminals from the battery pack and turn off the power supply
-


The process of ratcheting up to 30V should take approximately 10 minutes depending on how low your pack was initially. Careful steps were suggested to slowly ratchet up the voltage considering the potential danger with Lithium batteries. Due to the batteries being below the threshold already, it should be known that the battery chemistry has a probability of already being altered.
This technique should work for you assuming your battery cells were equally low, i.e. balanced. If not, then unfortunately trying to revive your lithium batteries may require bringing individual cell voltages up to balance or obtaining a new battery pack.
Be sure to follow the user manual’s advice in charging every 90 days to maintain the minimum voltage to ensure this does not happen again.