Aller au contenu principal

Roccat Vulcan II Mini Air Switch Replacement

Ce dont vous avez besoin

  1. Roccat Vulcan II Mini Air Switch Replacement, Backplate: étape 1, image 1 de 3 Roccat Vulcan II Mini Air Switch Replacement, Backplate: étape 1, image 2 de 3 Roccat Vulcan II Mini Air Switch Replacement, Backplate: étape 1, image 3 de 3
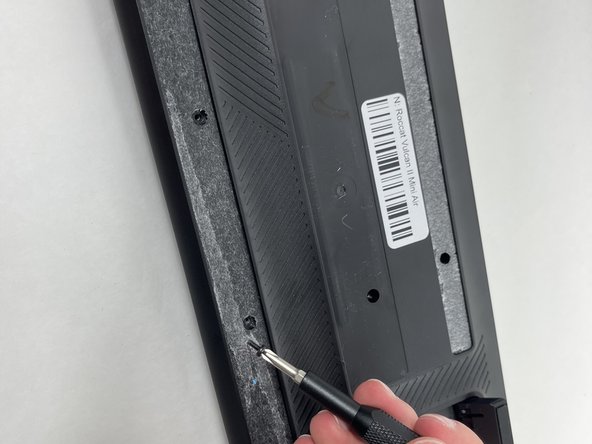
    • Flip your keyboard over so the bottom is facing up.

    • Before you begin, gently peel the sticker in the center and rubber strip that runs along the bottom and top to expose all the screws.

    • Be sure to save the rubber screw covers for reinstallation when you're finished.

    • Use a Phillips #0 screwdriver to remove all of the screws from the back plate.

    • Keep the screws for the replacement.

  2. Roccat Vulcan II Mini Air Switch Replacement: étape 2, image 1 de 3 Roccat Vulcan II Mini Air Switch Replacement: étape 2, image 2 de 3 Roccat Vulcan II Mini Air Switch Replacement: étape 2, image 3 de 3
    • With the screws removed the backplate will be loose and can be removed. Be careful, as it is still attached to the switch plate with ribbon cables so don't pull it.

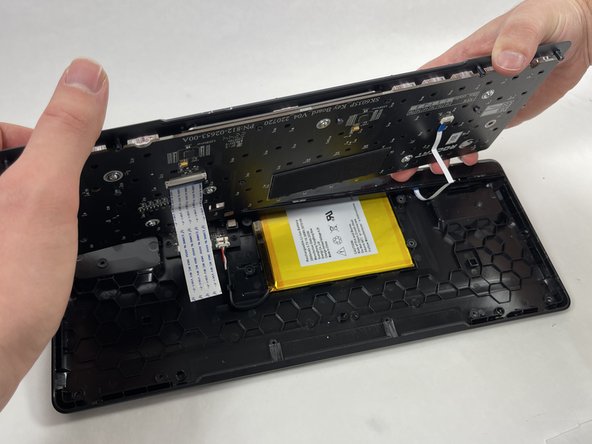
    • Gently lift the switch plate from the backplate, setting them next to each other with the ribbon cables facing upwards.

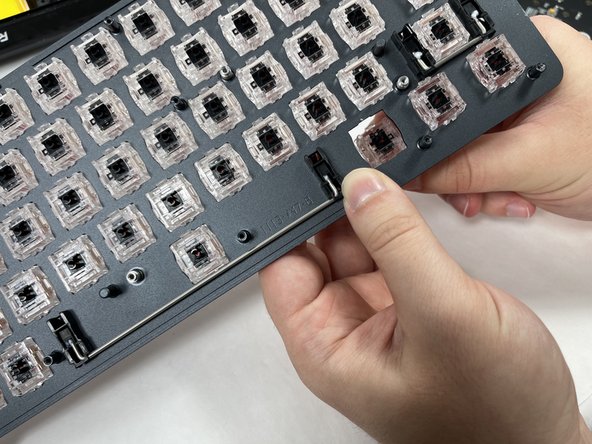
    • Use a spudger or a clean fingernail to flip up the locking flaps of the two ZIF connectors using the widest tool possible to avoid damaging the delicate hinge pins.

    • This is the unlocked position.

    • Use tweezers or your fingers to gently pull the cable out of its socket by the pull tab.

    • You could damage the cable by gripping it directly.

  3. Roccat Vulcan II Mini Air Switch Replacement, Keycap: étape 3, image 1 de 2 Roccat Vulcan II Mini Air Switch Replacement, Keycap: étape 3, image 2 de 2
    • Use a keycap puller or your fingers to gently pull off the keycap.

    • Avoid using excessive force to avoid damaging the switch.

    • Lift the keycap evenly and straight up from the keyboard.

    • If you are not using a keycap puller you may need to wiggle the cap slightly to loosen it.

    • Clean the keyboard using an air blower and a soft brush to remove any debris or dust between the switches.

    • Align the new keycap with the switch stem, ensuring the small cross-shaped hole at the bottom of the keycap matches the stem. Once aligned, gently press down on the keycap until it snaps securely into place.

    • You'll hear a soft "click" sound or feel resistance when it’s properly seated.

    • Be careful with larger keys (like the spacebar or enter key) as they might have additional stabilizer clips.

  4. Roccat Vulcan II Mini Air Switch Replacement, Switch: étape 4, image 1 de 2 Roccat Vulcan II Mini Air Switch Replacement, Switch: étape 4, image 2 de 2
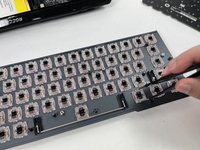
    • Use a switch puller to grip the top and bottom tabs of the switch firmly and pull upward to remove it.

    • Repeat this process for every switch that requires replacement.

Conclusion

To reassemble your device, follow these instructions in reverse order. Take your e-waste to an R2 or e-Stewards certified recycler.

Colby Paradiso

Membre depuis le 10/24/24

145 Réputation

2 tutoriels rédigés

Équipe

UMass Dartmouth, Team 3-3, Santin Fall 2024 Membre de l'équipe UMass Dartmouth, Team 3-3, Santin Fall 2024

UMASSD-SANTIN-F24S3G3

4 membres

4 tutoriels rédigés

0 commentaires

Ajouter un commentaire

Nombre de vues :

Dernières 24 heures : 2

7 derniers jours : 14

30 derniers jours : 28

Total : 99