Aller au contenu principal
Pour réparer ensemble - Je crée un compte

Roku 4 Remote Control Motherboard Replacement

Ce dont vous avez besoin

    1. Roku 4 Remote Control Motherboard Replacement, Remote Control Motherboard: étape 1, image 1 de 1
      • Place the remote control facing down on the table, so that the buttons are facing downwards.

      Demander à FixBot

      Ajouter un commentaire

    2. Roku 4 Remote Control Motherboard Replacement: étape 2, image 1 de 2 Roku 4 Remote Control Motherboard Replacement: étape 2, image 2 de 2
      • Remove the battery compartment cover from the back of the remote by sliding it outwards. This should reveal the batteries.

      Demander à FixBot

      Ajouter un commentaire

    3. Roku 4 Remote Control Motherboard Replacement: étape 3, image 1 de 2 Roku 4 Remote Control Motherboard Replacement: étape 3, image 2 de 2
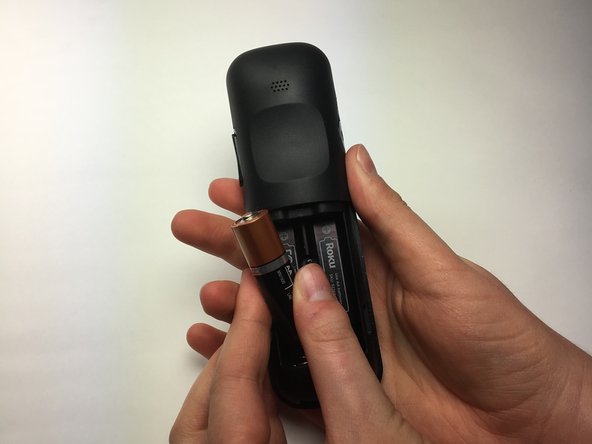
      • Remove the batteries from the battery compartment.

      Demander à FixBot

      Ajouter un commentaire

    4. Roku 4 Remote Control Motherboard Replacement: étape 4, image 1 de 1
      • Turn the Phillips PH0 screwdriver counterclockwise to carefully remove the 6.9 mm screw located between both battery compartments .

      Demander à FixBot

      Ajouter un commentaire

    5. Roku 4 Remote Control Motherboard Replacement: étape 5, image 1 de 1
      • Wedge a plastic opening tool into the seam between the top cover and bottom casing of the device to create a gap.

      • Prying open the remote is quite difficult and requires a large amount of force. Use caution to avoid breaking the device or hurting yourself.

      • Once you have created a gap large enough for your fingers to fit between, separate the top cover from the bottom plastic casing by pulling them apart gently.

      Demander à FixBot

      Ajouter un commentaire

    6. Roku 4 Remote Control Motherboard Replacement: étape 6, image 1 de 3 Roku 4 Remote Control Motherboard Replacement: étape 6, image 2 de 3 Roku 4 Remote Control Motherboard Replacement: étape 6, image 3 de 3
      • Using your right thumb, lift up on the left side of the motherboard to remove it from the bottom plastic casing.

      Demander à FixBot

      Ajouter un commentaire

Conclusion

To reassemble your device, follow these instructions in reverse order.

Annulation : je n'ai pas terminé ce tutoriel.

2 autres ont terminé cette réparation.

Hank Harrison

Membre depuis le 03/26/17

476 Réputation

3 tutoriels rédigés

Équipe

Baylor, Team S5-G4, Williams Spring 2017 Membre de l'équipe Baylor, Team S5-G4, Williams Spring 2017

BU-WILLIAMS-S17S5G4

3 membres

12 tutoriels rédigés

0 commentaires de tutoriel

Ajouter un commentaire

Nombre de vues :

Dernières 24 heures : 0

7 derniers jours : 10

30 derniers jours : 48

Total : 2,134