Aller au contenu principal

Samsung Refrigerator Icemaker Assembly Replacement (Refrigerator Icemaker)

Ce dont vous avez besoin

  1. Samsung Refrigerator Icemaker Assembly Replacement (Refrigerator Icemaker), Unplug your refrigerator: étape 1, image 1 de 1
    • Unplug your refrigerator before you begin your repair.

  2. Samsung Refrigerator Icemaker Assembly Replacement (Refrigerator Icemaker), Open the refrigerator doors: étape 2, image 1 de 2 Samsung Refrigerator Icemaker Assembly Replacement (Refrigerator Icemaker), Open the refrigerator doors: étape 2, image 2 de 2
    • Open both French doors for the refrigerator compartment.
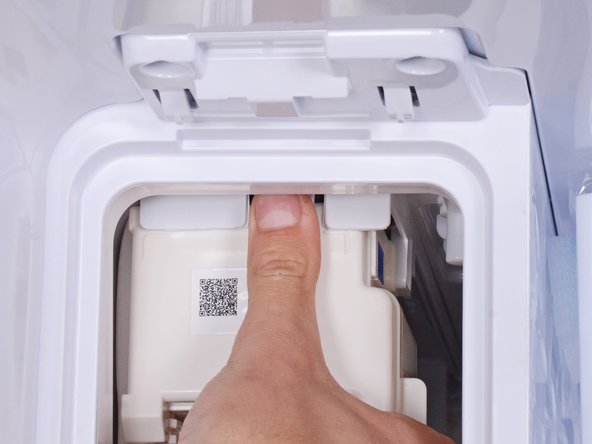
  3. Samsung Refrigerator Icemaker Assembly Replacement (Refrigerator Icemaker), Remove the ice bucket: étape 3, image 1 de 1
    • The ice bucket should be located in the upper left side of your refrigerator. It may have "Ice Master" or "Ice Max" on the outside.

  4. Samsung Refrigerator Icemaker Assembly Replacement (Refrigerator Icemaker), Remove the ice bucket: étape 4, image 1 de 3 Samsung Refrigerator Icemaker Assembly Replacement (Refrigerator Icemaker), Remove the ice bucket: étape 4, image 2 de 3 Samsung Refrigerator Icemaker Assembly Replacement (Refrigerator Icemaker), Remove the ice bucket: étape 4, image 3 de 3
  5. Samsung Refrigerator Icemaker Assembly Replacement (Refrigerator Icemaker), Check the ice bucket condition: étape 5, image 1 de 1
    • Check for cracks or fractures in the ice bucket and auger assembly. Replace the bucket as needed.

    • Check the gasket around the edge of the bucket. If the gasket's ripped, cracked, rolled or has become too rigid, the bucket won't seal properly and cause condensation to seep in and freeze.

  6. Samsung Refrigerator Icemaker Assembly Replacement (Refrigerator Icemaker), Unfasten the cable cover panel: étape 6, image 1 de 2 Samsung Refrigerator Icemaker Assembly Replacement (Refrigerator Icemaker), Unfasten the cable cover panel: étape 6, image 2 de 2
    • Remove the wire harness screw securing the cable cover panel.

  7. Samsung Refrigerator Icemaker Assembly Replacement (Refrigerator Icemaker), Remove the cable cover panel: étape 7, image 1 de 3 Samsung Refrigerator Icemaker Assembly Replacement (Refrigerator Icemaker), Remove the cable cover panel: étape 7, image 2 de 3 Samsung Refrigerator Icemaker Assembly Replacement (Refrigerator Icemaker), Remove the cable cover panel: étape 7, image 3 de 3
    • Use your fingers to slide the cable cover panel towards the front of the refrigerator to unlatch it.

    • Remove the cable cover panel.

    • During reassembly, make sure this panel clips fully in place, or the ice tray won't slide in properly.

  8. Samsung Refrigerator Icemaker Assembly Replacement (Refrigerator Icemaker), Disconnect the icemaker harness: étape 8, image 1 de 2 Samsung Refrigerator Icemaker Assembly Replacement (Refrigerator Icemaker), Disconnect the icemaker harness: étape 8, image 2 de 2
    • The exact configuration of the connectors may vary on your refrigerator.

    • Disconnect the left-most yellow connector:

    • Squeeze the locking tab with your fingers.

    • Rock the connector gently side to side to disconnect it.

    • Use your fingers or a screwdriver to guide the wire harness out of the wall clips.

  9. Samsung Refrigerator Icemaker Assembly Replacement (Refrigerator Icemaker), Unfasten the air tunnel: étape 9, image 1 de 1
    • Remove the ice maker screw securing the air tunnel flap.

  10. Samsung Refrigerator Icemaker Assembly Replacement (Refrigerator Icemaker), Remove the icemaker assembly: étape 10, image 1 de 3 Samsung Refrigerator Icemaker Assembly Replacement (Refrigerator Icemaker), Remove the icemaker assembly: étape 10, image 2 de 3 Samsung Refrigerator Icemaker Assembly Replacement (Refrigerator Icemaker), Remove the icemaker assembly: étape 10, image 3 de 3
    • A plastic clip holds the air tunnel flap in place.

    • Use a flathead screwdriver to pry and loosen the air tunnel flap from the plastic clip.

  11. Samsung Refrigerator Icemaker Assembly Replacement (Refrigerator Icemaker): étape 11, image 1 de 2 Samsung Refrigerator Icemaker Assembly Replacement (Refrigerator Icemaker): étape 11, image 2 de 2
    • Use your fingers to pull the air tunnel flap down enough to access the internals.

  12. Samsung Refrigerator Icemaker Assembly Replacement (Refrigerator Icemaker): étape 12, image 1 de 2 Samsung Refrigerator Icemaker Assembly Replacement (Refrigerator Icemaker): étape 12, image 2 de 2
    • Use a flathead screwdriver to gently pry the refrigerant loop down by 1–1.5 cm.

    • During reassembly, use your fingers to push the refrigerant loop back up.

  13. Samsung Refrigerator Icemaker Assembly Replacement (Refrigerator Icemaker): étape 13, image 1 de 3 Samsung Refrigerator Icemaker Assembly Replacement (Refrigerator Icemaker): étape 13, image 2 de 3 Samsung Refrigerator Icemaker Assembly Replacement (Refrigerator Icemaker): étape 13, image 3 de 3
    • A plastic clip holds the icemaker in place.

    • Use your fingers to press and release the plastic clip.

    • This clip is stiff and may require substantial force.

  14. Samsung Refrigerator Icemaker Assembly Replacement (Refrigerator Icemaker): étape 14, image 1 de 2 Samsung Refrigerator Icemaker Assembly Replacement (Refrigerator Icemaker): étape 14, image 2 de 2
    • Pull the front edge of the icemaker assembly down slightly to loosen it.

    • Be careful not to bend the refrigerant loop too much as you pull the front edge, or you'll damage the loop.

    • Carefully slide the icemaker assembly out of its housing.

  15. Samsung Refrigerator Icemaker Assembly Replacement (Refrigerator Icemaker), Removing the Ice Maker: étape 15, image 1 de 2 Samsung Refrigerator Icemaker Assembly Replacement (Refrigerator Icemaker), Removing the Ice Maker: étape 15, image 2 de 2
Conclusion

To reassemble your device, follow these instructions in reverse order.

Be sure to dry any moisture that remains in the ice room before reassembly to prevent repair failure.

Take your e-waste to an R2 or e-Stewards certified recycler.

Repair didn’t go as planned? Ask our Answers Community for help.

nicO

Membre depuis le 04/14/15

15 927 Réputation

88 tutoriels rédigés

Équipe

Global Fixers Membre de l'équipe Global Fixers

Community

33 membres

550 tutoriels rédigés

0 commentaires

Ajouter un commentaire

Nombre de vues :

Dernières 24 heures : 27

7 derniers jours : 152

30 derniers jours : 703

Total : 3,248