Il est possible que cette traduction ne reflète pas les dernières mises à jour du tutoriel source. Aidez à mettre à jour la traduction ou bien consultez le tutoriel source.
Introduction
Si la batterie de votre Sony Xperia Z5 Compact se décharge rapidement après une longue période d'utilisation, vous pouvez suivre ce tutoriel afin de remplacer la batterie vous-même.
Ce dont vous avez besoin
-
-
-
Poussez la prise audio (jack) hors de son logement. Il n'y a pas d'adhésif en dessous.
-
Détachez le connecteur de la nappe du LCD et le connecteur de la nappe principale.
-
Séparez la carte mère du boîtier.
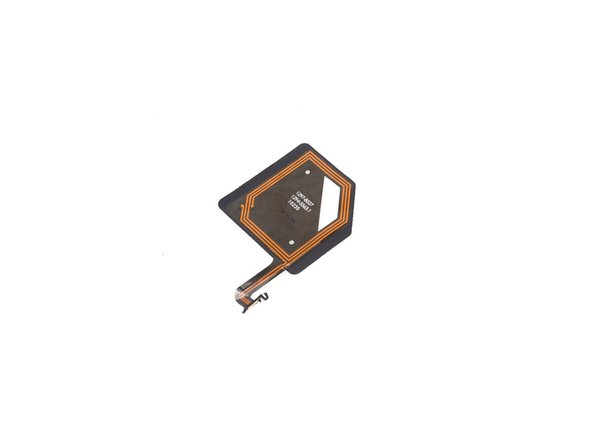
ATTENTION: At the edge of the board (top left beside the battery, see picture 3 in step 8) there are two small contact springs connected to an internal board layer (probably the antenna connection). When loosening the flex cables, these contacts can rub against the edge of the housing - in my case, they were torn off afterwards and lay loose on my work surface.
-
-
-
Débranchez le connecteur de la batterie.
-
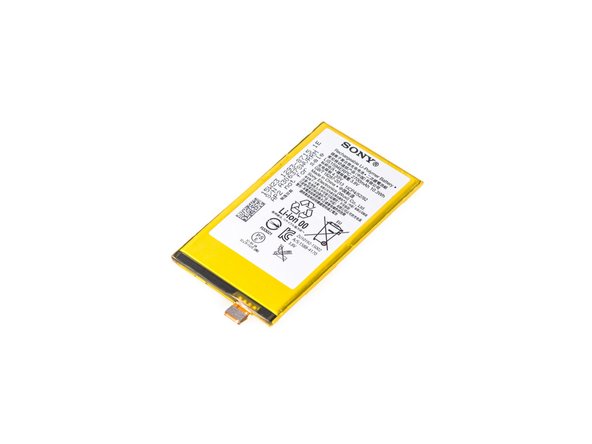
Tirez tout droit sur les extrémités noires des bandes adhésives de la batterie jusqu'à ce qu'elles se détachent.
-
Soulevez et retirez la batterie.
Mark the position of the battery with a fine pencil, as the new battery must be placed exactly in the same position (tolerance: approx. 0.5 mm).
-
-
-
Placez les nouvelles bandes adhésives de la batterie sur la carte mère.
-
Appuyez sur la nouvelle batterie mise en place.
-
Suivez toutes les étapes en sens inverse pour remonter votre téléphone.
As of Sep 2021, the battery adhesive strips are still not in the parts list. I also had to source my own battery adhesives in the middle of the repair.
-


Pour remonter votre appareil, suivez ces instructions dans l'ordre inverse.
Pour remonter votre appareil, suivez ces instructions dans l'ordre inverse.
Annulation : je n'ai pas terminé ce tutoriel.
26 autres ont terminé cette réparation.
Merci à ces traducteurs :
93%


Ces traducteurs nous aident réparer le monde ! Vous voulez contribuer ?
Commencez à traduire ›

18 commentaires
Will the device boot up with no error message after replacing it with new battery? Or do you need some programming before or after replacing it?
There is no error when battery is changed.
Just successfully changed my battery without any issue. Booted up normally and able to do everything I was able to do before.
Thank you for the awesome guide :)
The Sony Experia Z5 Compact is water and dust proof. Will heating the back after putting it back on reseal the phone - or is there another step that needs to be added?
You can watch the repair video on youtube: https://www.youtube.com/user/lagaiPhoneS..., but I fixed it here https://lagaiphone.se/shop/sony-z5-compa... they used the adhesive but no water resistant warranty after repair. so far so good!
Pretty annoying, this mentions NOTHING about the battery adhesive strips to order separately, and neither of the “things to buy” come with them. I just replaced my battery, but it’s just flopping around inside at the moment. Where do I order the battery adhesive strips to adhere the battery to the motherboard? Note for others doing this too, you NEED the adhesive strips separately beside the battery and the back adhesive!
Yeah I ran into the same issue, I found them at https://www.teknikdelar.se/mobilreservde... but that's a Swedish company I think. I made a suggested edit to this post, suggesting the need for strips to be at least mentioned but I got a reply of “just use some tape".
See Hy -
I bought some adhesive strips (there are plenty of them for the iPhone 6/7/8) and cut them with scissors.
It doesn't work for me. Connected the battery as it was and can't get it started and now I'm screwed. Such a waste.. What could possibly be wrong?
Thanks so much for this guide… and people who have commented for extra tips like the battery strips!
Phone booted up perfectly and everything seems to be working. Thrilled that I should have some extra time with my phone before having to get a new one.
All in spent around £10 - Took me about 2 hours to do but I’ve never done anything like this before and some things took me a bit longer to figure out. (I only got one adhesive strip though there are two in there, one seems to be holding okay though.)
I wrote some additional comments for the steps here to help anyone who like me is new to this. (Wasn’t enough characters to do it here.)
Oh I should have read your comments about the flex cable connectors. :+1:
Thank you for this guide, everything worked good for me. I replaced the Camera module and USB connector too,
But I am missing one thing in this manual. How to reconnect the flexcables for lcd and mainboard properly? Is there any special trick, i am really thankful that I somehow not destroyed the cable, nor the connector. But I think I was kind of lucky…
Very nice guide!!!
Two things that weren’t immediately clear to me, so maybe useful for others as well:
- Step 2: the back cover is only glued at the edges
- Step 9: the white part of the main and LCD flex connectors turns upwards to unlock it
I followed everything, and the battery seems to work. A few tips on step 9 would be great, though. But now the display is not showing anything. But it seems the touchscreen still works, I get sounds and vibrations when I press on the parts where the numpad use to be for the decryption of the hard drive. Any Idea on how I could bring this to a full success?
I undertook the battery replacement and put a new charge port in while I was at it.
After putting the phone all back together and powered it up everything appears to work on the screen functions but the phone no longer reads the SIM card or recognises my WIFI. This has rendered the phone unusable. I have tested the SIM in another phone and it is OK. The phone recognises the SIM and does a restart but then does not read the SIM card once it has restarted and displays the message “No SIM card - Emergency calls only”. It is as if the SIM card reader is not working.
I spoke to a technician and he said he wears a wrist band with a wire connected a metal earth to eliminate static electricity in his body going through the phone and short circuiting it causing damage. Could this possibly what has happened to my phone as there was no mention about having the earth yourself while undertaking the battery replacement.
Does anyone have an explanation or solution to my SIM card not reading?
I followed these instructions and managed to complete the replacement with (almost) 100% success. I would however say that most of the disassembly was unnecessary and in my case caused the small problem - namely a bright white spot on the screen probably due to excessive wrestling. It seems to me that nothing beyond the back bracket needs to be removed - everything else can stay and certainly the motherboard. My phone did not have the black adhesive strips mentioned in Step 11 and even if they were there I don’t see why so much disassembly is required.
Take the NFC and back bracket off and pry the battery of the motherboard slowly and carefully. That’s about it!
The guide seems to work great. In addition to the battery, I changed the charging port and re-attached the screen which had detached from one edge of the frame. There was one problem: I couldn’t remove the battery at all. I tried to carefully pull the adhesive strips from under the battery, but both of them just snapped right in the beginning. I think they might have become brittle over time, because I tried to be really careful and pull them straight. I gently tried to pry the battery off, but that would’ve required too much force. Any tips for this situation? Would some heat help? Or should I try and slide something under the battery and saw the adhesive strips off? Any help would be greatly appreciated!
I successfully followed this guide to replace the battery in my Xperia Z5 Compact. The only problem I ran into was the old battery strip snapping when I tried pulling it out. I had to use a heat gun to soften up the old adhesive strip to remove the old battery. The parts list is missing adhesive for the replacement battery, so make sure you have a suitable way to affix the replacement battery to the board. Everything went back together smoothly, and the phone is fully functional. Being completely inexperienced with phone repair, it took me about 90 minutes to complete this guide.