Introduction
Consultez ce tutoriel pour remplacer la RAM.
Le processeur est compatible avec les modules de RAM DDR3 800/1066MHz.
Ce dont vous avez besoin
-
-
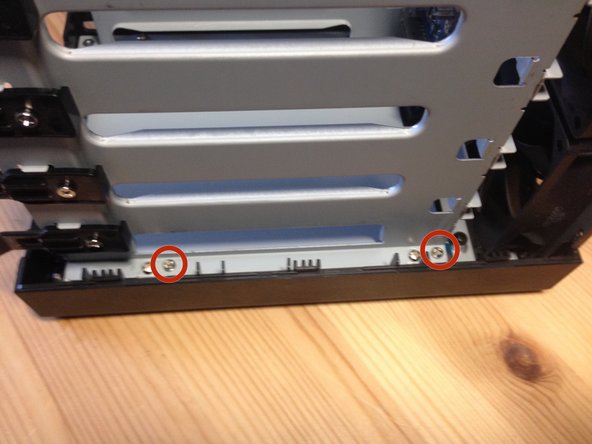
Localisez ces deux languettes (sur le côté gauche à l'intérieur du NAS).
-
Soulevez-les de l'entretoise en métal.
This step could really use a better illustration of the removal technique. The plastic here is extremely stiff and it can be hard to bend it enough to move the tabs.
This is the best technique I found, that will avoid damaging the plastic facing of the case. I am using the iFixit photo as a guide. Take a flathead screwdriver and place it down within the DS412, head facing up. Stick the head in between the metal bar and the plastic casing, and at the midpoint between the two tabs. Apply gentle pressure.
I played around with a flathead screwdriver at first but it scratched the metal and I was worried it might damage the plastic casing.
So I found the least destructive way to remove the plastic casing from the metal cage is, by pushing with all four fingers up against the black plastic inside the housing (so behind the metal bar) while your thumb holds on against the outside of the housing and simultaneously pushes the whole housing to shove the two black plastic tabs over the metal bar.
Please note, the tabs are just to block the outer case from sliding back in the next step — there’s no big trick or force required here, just flex the side of the case enough to get the tabs to slide past the metal bar.
You probably won’t like my solution to this nerve-wracking stage, but simply use a Stanley knife to slice the top of the tabs at an angle and the case can then be slid back relatively easily over the metal bar. It’s my NAS and the screws on the back will hold the case close perfectly well without needing those tabs locking as rigidly as they did before I attacked them. :-)
It’s a daft easy-assembly, difficult-disassembly case.
Coming back to this comment on reassembly: Actually the tabs click back into place very nicely and hold the case in place, just not quite as firmly as before. But still will require a bit of force to remove the cover again. So perfect!
I used 2 plastic (!) tire lifters from the bicycle tool box. They fit under the hooks perfectly and I could easily move back the housing and made no damage whatsoever.
I found the follow YouTube clip helpful:
I did as Richard Lewis:
Slicing the tabs makes for much easier assembly and disassembly.
And that was very helpful later
-
-
-
-
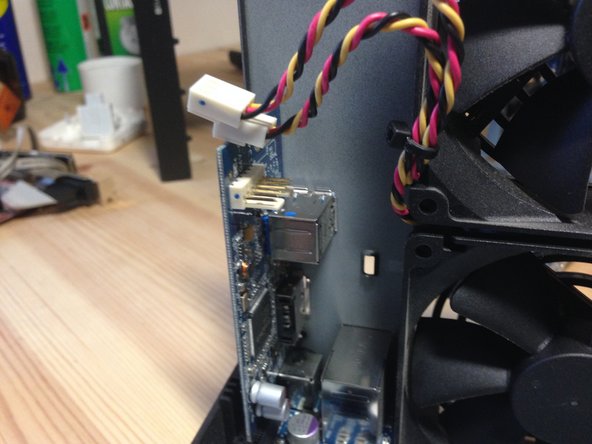
Enlevez la vis fixant la carte E/S.
I made the mistake of placing the I/O board behind the frame when I reassembled. I quickly found out my mistake. This photo was helpful.
-
-
-
Tirez sur ces languettes et enlevez la RAM.
-
Ancienne et nouvelle RAM.
-
Pour remonter votre appareil, suivez ces instructions dans l'ordre inverse.
I used a
CMSO4GX3M1A1333C9 DDR3 4GB PC-1333 CL9 CORSAIR Value Selectmodule.That worked nicely in my setup.
I had to refit it after the system did not boot correctly, so it was nice to be able to get the cover on/off without the tabs on the side.
I found that it was easier to test the DDR module by just assembling the mainboard, ioboard and the backplane (without the screws, the cover and without any disks in the bays).
When powering on the NAS the blue power LED blinks for 3-4 minutes and then the orange status LED starts blinking as there are no disks in the bays, but the good thing is that when you see the blinking orange LED you know that the DDR is actually working.
If your NAS just continues blinking the blue power LED "forever", the DDR module is either not working or you need to refit it in the slot.
-


Pour remonter votre appareil, suivez ces instructions dans l'ordre inverse.
Pour remonter votre appareil, suivez ces instructions dans l'ordre inverse.
Annulation : je n'ai pas terminé ce tutoriel.
35 autres ont terminé cette réparation.
Merci à ces traducteurs :
100%


Ces traducteurs nous aident réparer le monde ! Vous voulez contribuer ?
Commencez à traduire ›
18 commentaires
Hi is it also possible with a Synology ds216play? Or is the RAM not modular in this Drives?
Thank you for the guide, just to ease it up a bit for everybody following, the best way to pull the two tabs from step 4 was to use small spoon (or anything metal) and use it as a crowbar from the inside (do not try to put force from the outer rim, but really from inside of the Synology itself (against the metal beam the tabs are holding to).
Thank you very much.
did these steps and now my DS412+ won't boot anymore. just the blue power light for a few seconds, no hard drive or fan will turn on.
after putting the old RAM in the slot nothing changed. cannot find any error, how do I find out what's wrong here???
This guide was great. Thanks for posting it!
I upgrade to 2gb RAM last night with no problems. I used "Kingston Technology ValueRAM 2GB 1333MHz DDR3 Non-ECC CL9 SODIMM SR X16 Notebook and Portable Memory KVR13S9S6/2" from Amazon.
System is humming along nicely now.
Thank you very much for that excellent description.
With it I was able to fix my dead DS412+ with changing the onboard battery ;-)
Oliver
With the help of this guide and Youtube watch?v=eHCf51AytLM I was able to replace the onboard CR2032 battery in my DS413. Thank you.
I am still getting the dreaded flashing blue power switch light though, which is a different problem.
Without any HDD attached, the power light stays on, and the status light flashes.
Ming
Worked like a charm! Thank you very much.
remember to buy low voltage RAM. this is a must
What do you mean with low voltage RAM Cyrus: 1,35V and not 1,5V?
Can I Use DDR4 or DDR3L So-Dimms or is a pure DDR3-module absolute necessary?
I prefer Kingston or Corsair and 8GB or maybe 4GB and ECC instead of non-ECC.
Here’s a Corsair module that caught my attention: CMSO8GX3M1C1600C11 from Amazon.
Is this a good choice?
Thank you!
Mark -
8 years and the 412+ is still going strong on the original 4TB WD Red drives. 4x the ram will breathe new life and hopefully, get me many more years to come. It’s at least 2x faster with more ram. Just using this guide to clean out years of dust is probably worth it, even if you are upgrading the ram :)
synology ds412+ after upgrade RAM lose all data??
Excellent guide, works also for the DS 415+. Thanks
what a ^!&$@*%%$%*^ case! xD.. I was 40min to try to remove the case... BUT to bring the case back, is the WORST thing i've ever done!