Aller au contenu principal
Pour réparer ensemble - Je crée un compte

TI-36X Pro Solar Panel Replacement

Ce dont vous avez besoin

  1. TI-36X Pro Solar Panel Replacement, Back Cover: étape 1, image 1 de 2 TI-36X Pro Solar Panel Replacement, Back Cover: étape 1, image 2 de 2
    • Remove the calculator's protective cover.

    • Place the calculator face down.

    Demander à FixBot
  2. TI-36X Pro Solar Panel Replacement: étape 2, image 1 de 2 TI-36X Pro Solar Panel Replacement: étape 2, image 2 de 2
    • Using a Phillips #1 screwdriver, remove the six 6mm screws from the back of the case and place them to the side.

    • Start from the notches on the top edge and use your fingers or a prying tool to carefully pry the back cover from the calculator.

    Demander à FixBot
  3. TI-36X Pro Solar Panel Replacement, Battery: étape 3, image 1 de 2 TI-36X Pro Solar Panel Replacement, Battery: étape 3, image 2 de 2
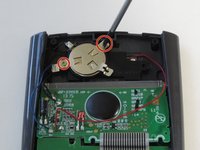
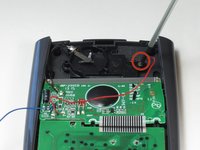
    • Use a Phillips #00 screwdriver to remove the two 7.5 mm screws holding the battery cover to the case.

    • Remove the battery cover without disconnecting either end of the blue wire.

    • Use your finger to move the battery cover to the side.

    Demander à FixBot
  4. TI-36X Pro Solar Panel Replacement: étape 4, image 1 de 1
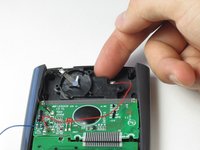
    • Use the flat side of a spudger to remove the battery by lifting the bottom edge.

    • When inserting a new battery, check the polarity (+ or -) and insert the new battery with the + side on top.

    Demander à FixBot
  5. TI-36X Pro Solar Panel Replacement, Solar Panel: étape 5, image 1 de 2 TI-36X Pro Solar Panel Replacement, Solar Panel: étape 5, image 2 de 2
    • Be careful not to disconnect any wires when removing parts from the calculator.

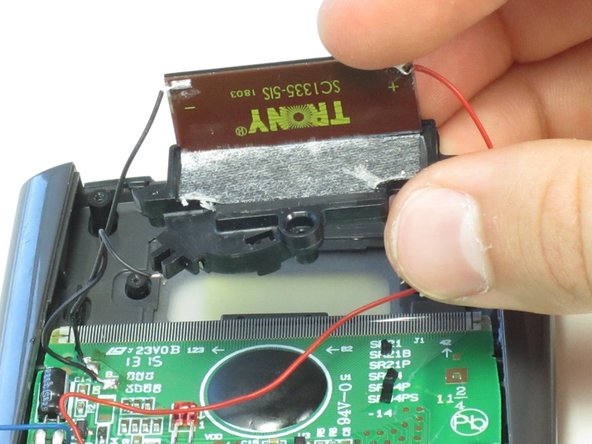
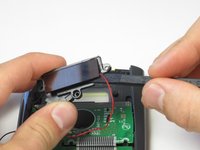
    • To detach the solar panel, use a Phillips #00 screwdriver to remove the 4.5mm screw that connects the solar panel to the calculator.

    • Once the screw has been removed, you may lift the top of the black solar panel cover with your finger and gently pull away from the green circuit board.

    Demander à FixBot
  6. TI-36X Pro Solar Panel Replacement: étape 6, image 1 de 2 TI-36X Pro Solar Panel Replacement: étape 6, image 2 de 2
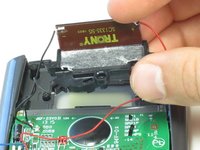
    • Turn the black cover so the solar panel is facing you.

    • Do not use a prying motion when removing the solar panel as this might break it.

    • Insert the flat end of the spudger between the solar panel and the black cover at the corner where the red wire connects.

    • Carefully slide the spudger all the way underneath the solar panel until it detaches from the tape.

    • If the solar panel does not completely disconnect once you have fully inserted the spudger, you can gently pull or pry it the rest of the way off.

    Demander à FixBot
  7. TI-36X Pro Solar Panel Replacement: étape 7, image 1 de 1
    • De-solder and disconnect the red and black wires from the solar panel.

    • You may irreperably damage your calculator if you connect the black and red wires to the wrong sides. Red connects with the "+" and black with the "-" sign.

    Demander à FixBot
Conclusion

To reassemble your device, follow these instructions in reverse order.

3 autres ont terminé cette réparation.

James Roslund

Membre depuis le 04/22/14

191 Réputation

1 tutoriel rédigé

Équipe

Cal Poly, Team 11-52, Amido Spring 2014 Membre de l'équipe Cal Poly, Team 11-52, Amido Spring 2014

CPSU-AMIDO-S14S11G52

4 membres

10 tutoriels rédigés

0 commentaires de tutoriel

Ajouter un commentaire

Nombre de vues :

Dernières 24 heures : 0

7 derniers jours : 6

30 derniers jours : 54

Total : 5,357