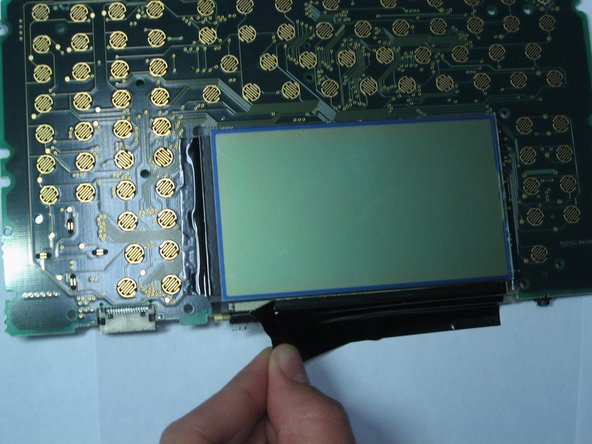
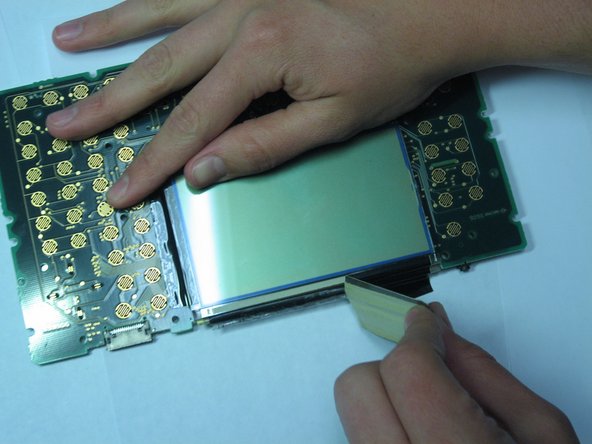
Aller au contenu principal

Texas Instruments TI-92 Display Replacement

Ce dont vous avez besoin

  1. Texas Instruments TI-92 Display Replacement, Back Cover: étape 1, image 1 de 3 Texas Instruments TI-92 Display Replacement, Back Cover: étape 1, image 2 de 3 Texas Instruments TI-92 Display Replacement, Back Cover: étape 1, image 3 de 3
    • The first step to any repair operation is to remove the front cover.

    • Grab the back of the calculator with one hand and the cover with the other.

    • Pull the cover off from one of the sides for easy removal.

  2. Texas Instruments TI-92 Display Replacement: étape 2, image 1 de 2 Texas Instruments TI-92 Display Replacement: étape 2, image 2 de 2
    • Orientate the calculator with the top facing towards you.

    • Slide the locking tab,found on the top part of the calculator, to the unlock position.

  3. Texas Instruments TI-92 Display Replacement: étape 3, image 1 de 2 Texas Instruments TI-92 Display Replacement: étape 3, image 2 de 2
    • "Locking Tab"

    • To remove the back cover, slide the cover away from the locking tab towards the bottom of the calculator until the cover no longer slides.

    • Then with the front of the calculator facing down, pull up on the back cover.

    • The calculator should now be orientated with the front facing down, as shown in picture 2.

  4. Texas Instruments TI-92 Display Replacement, Batteries: étape 4, image 1 de 3 Texas Instruments TI-92 Display Replacement, Batteries: étape 4, image 2 de 3 Texas Instruments TI-92 Display Replacement, Batteries: étape 4, image 3 de 3
    • The Batteries are now exposed and the calculator is face down with the back towards you.

    • Remove the bottom batteries by pressing the battery towards you while pulling it out from the far end.

    • If you can not do the previous step with your finger try using a flat ended tool such as an Ipod opening tool.

    • After the bottom battery has been removed push or slide the other(top) battery towards you until it is fully exposed in the battery slot.

    • Now simply remove the battery.

  5. Texas Instruments TI-92 Display Replacement, Texas Instruments TI-92 Back Case Disassembly: étape 5, image 1 de 3 Texas Instruments TI-92 Display Replacement, Texas Instruments TI-92 Back Case Disassembly: étape 5, image 2 de 3 Texas Instruments TI-92 Display Replacement, Texas Instruments TI-92 Back Case Disassembly: étape 5, image 3 de 3
    • Using a Philips Screwdriver #00 unscrew the twelve 11.8mm screws shown in the picture and located on the back of the calculator.

  6. Texas Instruments TI-92 Display Replacement: étape 6, image 1 de 1
    • Unscrew the 19mm screw located near center of the back of the calculator.

    • Remove the panel being held by the screw.

  7. Texas Instruments TI-92 Display Replacement: étape 7, image 1 de 1
    • Using the same Phillips screwdriver, unscrew the remaining three 11.8mm screws.

  8. Texas Instruments TI-92 Display Replacement: étape 8, image 1 de 2 Texas Instruments TI-92 Display Replacement: étape 8, image 2 de 2
    • Using the Ipod Opening Tool pull up on both sides of the rectangular module while keeping the rest of the calculator flat on a surface face down

    • You may get a lot of resistance from the module. Do not use too much force as you risk damage. Use small amounts of force to work the module out.

  9. Texas Instruments TI-92 Display Replacement: étape 9, image 1 de 2 Texas Instruments TI-92 Display Replacement: étape 9, image 2 de 2
    • Pull out the rectangular module when it is finally loose enough.

  10. Texas Instruments TI-92 Display Replacement: étape 10, image 1 de 2 Texas Instruments TI-92 Display Replacement: étape 10, image 2 de 2
    • Now pull up on the back cover of the calculator while holding the rest of it flat on a surface.

    • Be careful not to tilt the front of the calculator at this point. The keyboard buttons are now unsupported and will fall out of place.

  11. Texas Instruments TI-92 Display Replacement, Motherboard: étape 11, image 1 de 3 Texas Instruments TI-92 Display Replacement, Motherboard: étape 11, image 2 de 3 Texas Instruments TI-92 Display Replacement, Motherboard: étape 11, image 3 de 3
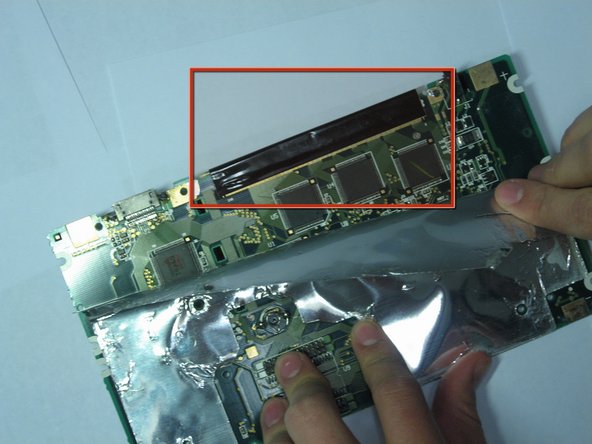
    • Pull the motherboard up while holding the rest of the calculator firmly in place

    • The motherboard has now separated from the rest of the calculator

  12. Texas Instruments TI-92 Display Replacement, Display: étape 12, image 1 de 1
    • Place the motherboard flat on a surface with the LCD screen facing down.

    • Using a #00 Philip Screwdriver remove the screw located on the left side of a spring-like object located near the center of the motherboard.

  13. Texas Instruments TI-92 Display Replacement: étape 13, image 1 de 2 Texas Instruments TI-92 Display Replacement: étape 13, image 2 de 2
    • Lift up on the material covering the motherboard starting from the upper right corner. Peel foil back only about half way down.

    • Make sure to slowly lift up on the plastic of the covering material and not the foil or the foil will rip.

  14. Texas Instruments TI-92 Display Replacement: étape 14, image 1 de 2 Texas Instruments TI-92 Display Replacement: étape 14, image 2 de 2
    • Now slowly lift up the black tape located at the top of the calculator.

    • You will need to replace tape if removed so if you do not have this replacement part do not attempt to remove it

  15. Texas Instruments TI-92 Display Replacement: étape 15, image 1 de 3 Texas Instruments TI-92 Display Replacement: étape 15, image 2 de 3 Texas Instruments TI-92 Display Replacement: étape 15, image 3 de 3
    • Tilt the calculator up from the front so that you can see the LCD screen

    • Finish removing the black tape on this side of the motherboard.

  16. Texas Instruments TI-92 Display Replacement: étape 16, image 1 de 1
    • Do not know next step

Conclusion

To reassemble your device, follow these instructions in reverse order.

Une autre personne a terminé cette réparation.

Daniel Maldonado

Membre depuis le 04/14/10

240 Réputation

9 tutoriels rédigés

Équipe

Cal Poly, Team 15-51, Garner Spring 2010 Membre de l'équipe Cal Poly, Team 15-51, Garner Spring 2010

CPSU-GARNER-S10S15G51

5 membres

9 tutoriels rédigés

0 commentaires

Ajouter un commentaire

Nombre de vues :

Dernières 24 heures : 0

7 derniers jours : 12

30 derniers jours : 33

Total : 8,353