Aller au contenu principal

Xbox One X Power Supply Replacement

Ce dont vous avez besoin

  1. Xbox One X Power Supply Replacement, Remove the sticker: étape 1, image 1 de 2 Xbox One X Power Supply Replacement, Remove the sticker: étape 1, image 2 de 2
    • Use blunt tweezers to peel off the sticker covering the right-side screw on the back of the console.

    • Before starting this guide: Turn off the device. Then, unplug any cables from the console.

  2. Xbox One X Power Supply Replacement, Remove the external screws: étape 2, image 1 de 1
    • Use a T10 Torx screwdriver to remove the two 12.6 mm–long screws located on the back of the console.

  3. Xbox One X Power Supply Replacement, Slide the upper case horizontally: étape 3, image 1 de 2 Xbox One X Power Supply Replacement, Slide the upper case horizontally: étape 3, image 2 de 2
    • Rotate the console 90 degrees.

    • Pull the front of the upper plastic case horizontally toward the front of the console until it comes to a stop. This slides the clips out of the slots on the upper plastic case.

  4. Xbox One X Power Supply Replacement, Lift the upper case off the lower case: étape 4, image 1 de 2 Xbox One X Power Supply Replacement, Lift the upper case off the lower case: étape 4, image 2 de 2
    • Rotate the console 90 degrees so that the back is facing you.

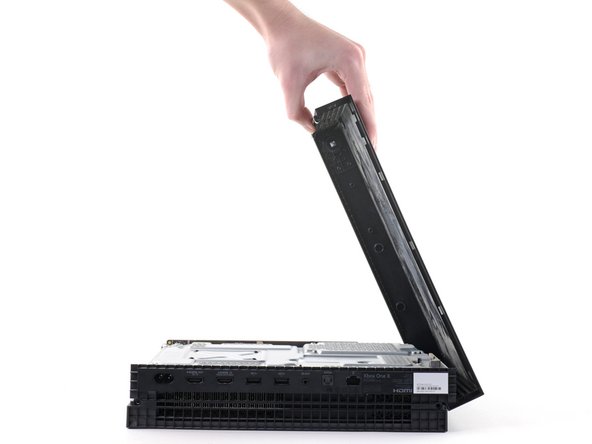
    • Lift up the left side of the upper plastic case (as viewed from the back of the console), stopping when it won’t lift any further.

  5. Xbox One X Power Supply Replacement: étape 5, image 1 de 3 Xbox One X Power Supply Replacement: étape 5, image 2 de 3 Xbox One X Power Supply Replacement: étape 5, image 3 de 3
    • While continuing to hold the left side of the upper plastic case, push up on the right side to move the right-side screw boss out of the way.

    • If pushing up on the case doesn't work, try moving it in different directions until it can swing open.

    • Swing the upper plastic case open to 75 degrees.

  6. Xbox One X Power Supply Replacement: étape 6, image 1 de 2 Xbox One X Power Supply Replacement: étape 6, image 2 de 2
    • Push the upper plastic case down and away from the console to remove it completely.

  7. Xbox One X Power Supply Replacement, Disconnect the ribbon cable: étape 7, image 1 de 3 Xbox One X Power Supply Replacement, Disconnect the ribbon cable: étape 7, image 2 de 3 Xbox One X Power Supply Replacement, Disconnect the ribbon cable: étape 7, image 3 de 3
    • Use the pointed end of a spudger, an opening tool, or your fingernail to flip down the small, hinged locking flap on the ribbon cable ZIF connector on the front circuit board.

  8. Xbox One X Power Supply Replacement, Disconnect the ribbon cable: étape 8, image 1 de 1
    • Use blunt tweezers to pull the ribbon cable down out of the connector.

  9. Xbox One X Power Supply Replacement, Remove the front circuit board screws: étape 9, image 1 de 1
    • Use a T8 Torx screwdriver to remove the three 13.3 mm screws securing the front circuit board to the upper metal case.

  10. Xbox One X Power Supply Replacement, Remove the front circuit board: étape 10, image 1 de 2 Xbox One X Power Supply Replacement, Remove the front circuit board: étape 10, image 2 de 2
    • Pull the front circuit board straight out away from the upper metal case and set it aside.

    • Grip the board on either side of where it is plugged in to avoid bending and damaging it.

  11. Xbox One X Power Supply Replacement, Remove the upper metal case screws: étape 11, image 1 de 1
    • Use a T10 Torx screwdriver to remove the six 47.7 mm screws securing the upper metal case to the lower plastic case.

    • Use a T8 Torx screwdriver to remove the two 7.5 mm screws securing the press connector to the upper metal case.

  12. Xbox One X Power Supply Replacement, Detach the press connector: étape 12, image 1 de 2 Xbox One X Power Supply Replacement, Detach the press connector: étape 12, image 2 de 2
    • Insert the flat end of a spudger underneath the press connector on the side opposite of the ribbon cable.

    • Use the spudger to lift the press connector up and away from the upper metal case.

    • Don't push the spudger all the way to the socket. Prying up the socket may damage it.

    • To re-attach press connectors like this one, carefully align and press down on one side until it clicks into place, then repeat on the other side. Do not press down on the middle. If the connector is misaligned, the pins can bend, causing permanent damage.

  13. Xbox One X Power Supply Replacement, Remove the lower plastic case: étape 13, image 1 de 3 Xbox One X Power Supply Replacement, Remove the lower plastic case: étape 13, image 2 de 3 Xbox One X Power Supply Replacement, Remove the lower plastic case: étape 13, image 3 de 3
    • Flip the console over.

    • Hold on to the lower plastic case because it is no longer attached to the metal case.

    • Lift the lower plastic case up from the metal case and set it aside.

  14. Xbox One X Power Supply Replacement, Remove the lower metal case screws: étape 14, image 1 de 1
    • Remove the two T10 Torx screws securing the lower metal case:

    • One 7.7 mm screw

    • One 11.4 mm screw

  15. Xbox One X Power Supply Replacement, Remove the lower metal case: étape 15, image 1 de 1
    • Lift the lower metal case up off the upper metal case and internal components.

    • The disc drive may lift up with the lower metal case. Hold it down during this step.

    • Set the lower metal case aside.

  16. Xbox One X Power Supply Replacement, Unscrew the power supply and fan: étape 16, image 1 de 1
    • Flip the console over.

    • The disc drive is only attached to the motherboard by two cable connectors. Hold the disc drive when flipping the console over to avoid damaging it.

    • Use a T10 Torx screwdriver to remove the following screws securing the power supply and fan to the upper metal case:

    • Two 11.4 mm screws

    • Two 11.4 mm screws

    • One 11.4 mm screw

  17. Xbox One X Power Supply Replacement, Loosen the disc drive: étape 17, image 1 de 2 Xbox One X Power Supply Replacement, Loosen the disc drive: étape 17, image 2 de 2
    • Flip the console over.

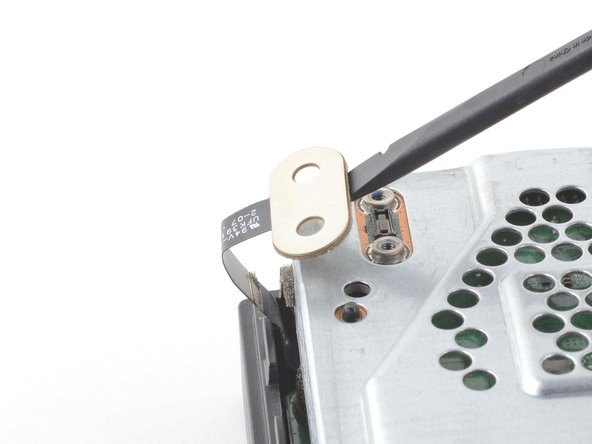
    • Lift the disc drive up so that its metal tab is unhooked from the power supply.

    • The disc drive is plugged into the motherboard. Don’t bend the wires more than necessary to avoid damaging them.

    • Place the disc drive on the upper metal case so that it sits over the hard drive. You'll need enough space to unplug the power supply from the motherboard.

  18. Xbox One X Power Supply Replacement, Unstick the foam tape near the power supply: étape 18, image 1 de 3 Xbox One X Power Supply Replacement, Unstick the foam tape near the power supply: étape 18, image 2 de 3 Xbox One X Power Supply Replacement, Unstick the foam tape near the power supply: étape 18, image 3 de 3
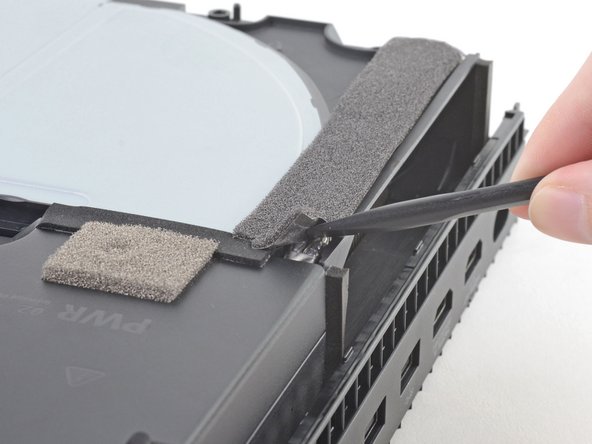
    • Insert the flat end of the spudger underneath the dark grey foam tape starting at the corner closest to the power supply and edge of the console.

    • Lift up the corner.

    • Slowly push the spudger through to the other side of the tape until you can see the flat end emerge.

    • Remove the spudger slowly. There are two grey cables underneath the foam tape. Try to avoid hitting them with the spudger so that you don't damage them.

  19. Xbox One X Power Supply Replacement, Move the power supply: étape 19, image 1 de 2 Xbox One X Power Supply Replacement, Move the power supply: étape 19, image 2 de 2
    • Lift the power supply directly upward to unplug it from the motherboard.

    • Move the disc drive further away from the power supply if you need more space.

  20. Xbox One X Power Supply Replacement: étape 20, image 1 de 2 Xbox One X Power Supply Replacement: étape 20, image 2 de 2
    • Lift the power supply so that the cables are at a 90 degree angle.

    • Avoid pulling or bending the cables more than necessary to prevent damage.

  21. Xbox One X Power Supply Replacement: étape 21, image 1 de 2 Xbox One X Power Supply Replacement: étape 21, image 2 de 2
    • While holding the power supply above the console, move the two grey cables out of the plastic hook on the fan case.

  22. Xbox One X Power Supply Replacement: étape 22, image 1 de 1
    • Set the power supply on the table.

  23. Xbox One X Power Supply Replacement, Unplug the fan from the motherboard: étape 23, image 1 de 2 Xbox One X Power Supply Replacement, Unplug the fan from the motherboard: étape 23, image 2 de 2
    • Unplug the bundled cable connector connecting the fan to the motherboard by pulling directly upward.

  24. Xbox One X Power Supply Replacement, Remove the fan: étape 24, image 1 de 2 Xbox One X Power Supply Replacement, Remove the fan: étape 24, image 2 de 2
    • Lift the fan case up to remove it from the console.

  25. Xbox One X Power Supply Replacement, Remove the power supply socket from the case: étape 25, image 1 de 2 Xbox One X Power Supply Replacement, Remove the power supply socket from the case: étape 25, image 2 de 2
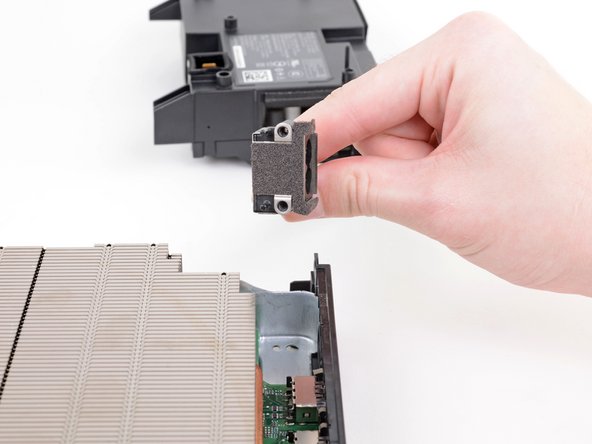
    • Lift the power supply socket out of the upper metal case.

Conclusion

To reassemble your device, follow these instructions in reverse order.

Take your e-waste to an R2 or e-Stewards certified recycler.

Repair didn’t go as planned? Try some basic troubleshooting, or ask our Xbox One X Answers community for help.

36 autres ont terminé cette réparation.

Kyle Smith

Membre depuis le 02/01/21

40 872 Réputation

123 tutoriels rédigés

8 commentaires

Hi all,

Did anyone have any struggles with step 7, disconnecting the ribbon cable? my cable was extremely tight, and take a lot of effort to get the cable out. I’m yet to take delivery of the new power module, but am a little concerned about the ribbon cable being damaged hence the difficulty to get out, or the potential to damage when inserting the ribbon cable back in… any suggestions welcome!

Matthew Chadwick - Réponse

Hi,

The ribbon cable in step 7 uses a ZIF connector and should be easy to remove from the connector slot. The cable may bend slightly when you pull it out and reinsert it, but avoid bending it as much as possible.

Kyle Smith -

Thanks much for this guide - made it super easy to disassemble!

Azarius - Réponse

An Excellent guide! Thank you very much for the detailed step by step and extra supporting pictures! I'm happy to report that my OneX is back up and running.

AJ Gotch - Réponse

Ajouter un commentaire

Nombre de vues :

Dernières 24 heures : 33

7 derniers jours : 193

30 derniers jours : 966

Total : 37,445