Cette version peut contenir des modifications incorrectes. Passez au dernier aperçu vérifié.
Ce dont vous avez besoin
-
-
Desserrez l'unique vis Phillips au centre de la trappe d'accès.
-
Retirez la trappe d'accès de votre iMac.
-
-
-
Collez une ventouse sur un angle de la vitre et une autre ventouse sur l'angle opposé.
-
-
-
Retirez les 12 vis suivantes par lesquelles le cadre avant est fixé au boîtier arrière :
-
Huit vis Torx T8 13 mm.
-
Quatre vis Torx T8 25 mm.
-
-
Cette étape n’est pas traduite. Aidez à la traduire
-
be sure to tuck the microphone cable and connector into the void next to the camera board.
-
Gently guide the microphone connector and cables through the ±1in long slot at the right of the iSight camera. Once the bezel is properly assembled, gently push the microphone connector and cable into the bezel through that slot.
-
-
-
Débranchez le connecteur du capteur de température LCD de sa prise sur la carte mère en le tenant bien droit.
-
Si nécessaire, libérez le câble du capteur de température LCD qui passe derrière la carte mère.
-
-
-
Pendant que l'écran est levé, débranchez les quatre câbles inverter.
-
Si vous changez de disque dur et avez une paire de mains libres à disposition, il est possible de retirer le disque dur en débranchant seulement le connecteur de l'écran et celui de la température LCD à l'étape précédente.
-
-
Cette étape n’est pas traduite. Aidez à la traduire
-
Disconnect the left speaker cable connector from the audio board by pulling it straight away from its socket.
-
-
Cette étape n’est pas traduite. Aidez à la traduire
-
De-route the left speaker cable from the channel in the CPU fan. Continue completely de-routing the cable through the undersides of the IR board and heat sink.
-
-
-
Cette étape n’est pas traduite. Aidez à la traduire
-
Disconnect the ambient temperature sensor cable by pulling its connector straight up off the logic board.
-
-
Cette étape n’est pas traduite. Aidez à la traduire
-
If necessary, de-route the ambient temperature sensor cable from under the power button cables.
-
-
Cette étape n’est pas traduite. Aidez à la traduire
-
Remove the single 28 mm T10 Torx screw securing the left speaker to the rear case.
-
Lift the left speaker up and out of the rear case. Don't try to slide the speaker out, since there is a plastic mounting pin under the top end of the speaker housing that holds it in place.
-
-
Cette étape n’est pas traduite. Aidez à la traduire
-
Disconnect the power button and CPU fan by lifting their connectors straight up off the logic board.
-
-
Cette étape n’est pas traduite. Aidez à la traduire
-
Disconnect the SATA data cable from the logic board by carefully pulling it straight away from its socket.
-
-
Cette étape n’est pas traduite. Aidez à la traduire
-
Pull the SATA data cable out of its channel in the logic board and tuck it aside near the left edge of the rear case.
-
-
Cette étape n’est pas traduite. Aidez à la traduire
-
Disconnect the DC-in cable by simultaneously depressing both locking arms and pulling its connector away from the socket on the logic board.
-
-
Cette étape n’est pas traduite. Aidez à la traduire
-
Use the flat end of a spudger to pry both AirPort antenna connectors up off the AirPort card.
-
-
Cette étape n’est pas traduite. Aidez à la traduire
-
Move both AirPort antennas toward the lower edge of your iMac, out of the way of the logic board.
-
-
Cette étape n’est pas traduite. Aidez à la traduire
-
Use the flat end of a spudger to pry the Bluetooth antenna connector up off the Bluetooth board.
-
-
Cette étape n’est pas traduite. Aidez à la traduire
-
Pull the camera cable connector straight up out of its socket on the logic board.
-
-
Cette étape n’est pas traduite. Aidez à la traduire
-
Pull the right speaker cable connector straight up out of its socket on the audio board.
-
-
Cette étape n’est pas traduite. Aidez à la traduire
-
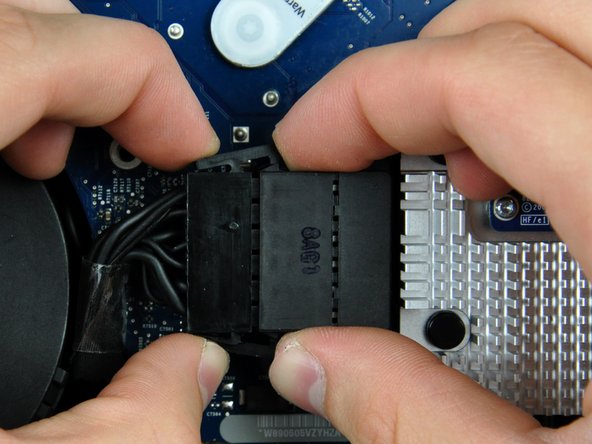
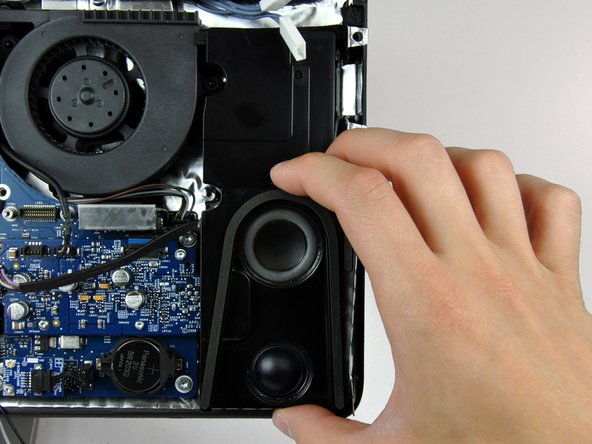
Remove the single 12 mm T10 Torx screw securing the right speaker to the rear case.
-
Lift the right speaker up and out of the rear case, to clear the plastic mounting pins underneath it.
-
-
Cette étape n’est pas traduite. Aidez à la traduire
-
Lift the optical drive fan connector straight up out of its socket on the logic board.
-
-
Cette étape n’est pas traduite. Aidez à la traduire
-
Use the flat end of a spudger to pry the optical drive cable clip up off the optical drive connector.
-
Lift the optical drive cable clip off the logic board.
-
-
Cette étape n’est pas traduite. Aidez à la traduire
-
Push the optical drive cable connector toward the top of your iMac to disconnect it from the logic board.
-
-
Cette étape n’est pas traduite. Aidez à la traduire
-
Lift the microphone cable connector straight up out of its socket on the audio board.
-
-
Cette étape n’est pas traduite. Aidez à la traduire
-
If necessary, remove the piece of tape securing the thermal sensor and fan cables to the chassis.
-
-
Cette étape n’est pas traduite. Aidez à la traduire
-
Disconnect the following three cables from the logic board:
-
Hard drive thermal sensor.
-
Optical drive thermal sensor.
-
Hard drive fan.
-
-
Cette étape n’est pas traduite. Aidez à la traduire
-
Remove the following 13 screws securing the logic board to the rear case:
-
Six 7.2 mm coarse-thread T10 Torx.
-
Two 6.8 mm T8 Torx. When reinstalling these two screws, don't overtighten them, as the plastic tabs they hold down are thin and brittle, and can crack.
-
Three 7 mm fine-thread T10 Torx.
-
Two 24 mm T10 Torx.
-
-
Cette étape n’est pas traduite. Aidez à la traduire
-
Lift the logic board out of the rear case, minding any cables that may get caught.
-
-
Cette étape n’est pas traduite. Aidez à la traduire
-
Disconnect the heat sink temperature sensor connector by pulling it straight up from its socket on the logic board.
-
-
Cette étape n’est pas traduite. Aidez à la traduire
-
Flip the logic board over so it is heat sink side down.
-
If necessary, remove the clear tape covering the heat sink bracket.
-
-
Cette étape n’est pas traduite. Aidez à la traduire
-
Remove the four fine-thread 5 mm T8 Torx screws securing the heat sink to the logic board.
-
-
Cette étape n’est pas traduite. Aidez à la traduire
-
Remove the 4.3 mm T10 Torx screw securing the heat sink to the heat sink bracket.
-
-
Cette étape n’est pas traduite. Aidez à la traduire
-
Gently press the heat sink away from the heat sink bracket to separate it from the logic board.
-
Lift the logic board off the heat sink.
-


Annulation : je n'ai pas terminé ce tutoriel.
22 autres ont terminé cette réparation.

2 commentaires
GPU Heatsink not Work ( is empty ? ) GPU has 128° and shot down - who can i by new Heatsink or how can i fixit
-
GPU Heatsink ist defekt ( sensor hat 128° ) und schaltet sich dan ab - wo bekommt man einen neuen Heatsink oder wie Reparieren
Je suis arrivé par deux fois a changer le CPU et la je m'aperçois que l'iMac ne démarre plus (pas de booool) et ensuite je me rend compte que j'ai pris un proc compatible iMac 8,1 penryn (E8335 1066 FSB) alors que je suis en 7,1 (T7300 800 FSB)...en regardant les commentaires donc c'est un T9300, ou tout autre Intel Penryn a 800 FSB pour passer a Sierra