Introduction
Utilisez ce guide pour remplacer ou mettre à niveau votre disque dur afin de disposer de davantage d'espace de stockage.
Ce dont vous avez besoin
-
-
Retournez votre iMac sur une table en plaçant le bas de l'appareil face à vous.
-
Desserrez l'unique vis Phillips au centre de la trappe d'accès.
-
Retirez la trappe d'accès de votre iMac.
-
-
-
Collez une ventouse au niveau d'un angle de la vitre et une autre ventouse à l'angle opposé.
A good alternative to the two heavy duty suction cups is a regular household plunger.
Also, 2" wide packing tape. Maybe a 6 or 8" piece, folded in the middle to give you say, a 1-2" "handle". Make a pair of these. They look like a capital T but with a short vertical part (the handle), and a wide top I the sticky wings). Get the good 3M tape, it's strong, and it peels off clean without leaving any glue from the screen.
for me one household plunger did the trick!
-
-
-
Soulevez délicatement la vitre de l'iMac.
-
Lors du remplacement de la vitre, assurez-vous qu'il n'y a rien entre la vitre et le châssis. Les nappes pourraient s'abîmer ou fissurer la vitre.
Another approach that worked for us was to get 4 small plastic wedges (the kind used in iphone screen replacements). Working one corner at a time you can use a cheap suction cup to pry just that corner up enough to slide the wedge in. Then proceed to the next then next, etc. Once all 4 have the wedges under them the glass should be away from the body all the way around, then just carefully lift it the rest of the way up.
-
-
-
Retirez les 12 vis suivantes par lesquelles le cadre avant est fixé au boîtier arrière :
-
Huit vis Torx T8 13 mm.
-
Quatre vis Torx T8 25 mm.
I would strongly suggest taping the screws down on a piece of paper towel or cloth in the same order you take them out, as there are different lengths in no particular order and they don't all fit into just any hole. Unless you keep track of which hole each screw belongs, there is no other way of knowing. I stress taping because I didn't tape mine down and after bumping the table I was working on they scattered, leaving me to guess.
Even better, use an ice cube tray to keep the screws from each step together.
As a rule with iFixit repairs, for years I've been printing the guides, applying scotch magic tape near each picture (which allows me to reutilise the paper prints in the future), neatly putting the appropriate screw next to their picture and taping them down with scotch magic tape.
Even if I have to wait for spare parts, this allows me to neatly file the guide + screws in a copy safe and a binder (or in a cardboard filing box together with the rest of the parts) for later reassembly. Hardly any mistake possible...
I think the caption on the picture is wrong here for 24" iMacs - it says: "On the 24" iMac Intel Model A1225, the bottom center two screws are long (26mm), four on sides (two left, two right) are medium (18mm), and the remaining 6 (four top, two bottom corners) are short (14mm)." I think actually bottom centre two are long, then all the rest are medium apart from the two either side of the CD/DVD drive
I print out the steps. Get a roll of scotch tape ready. Every screw, or set of screws I remove, I lay on some tape, and then tape them to the number on the directions. Then you have each screw labeled, with direction, and in order, or reassembly. Just working backwards in the directions.
I agree with @HBloomfield’s comment overall, but to add to that comment, mine was a little different.
(2) Long: bottom center
(4) Medium: bottom left and right; on either side of the CD/DVD drive
(6) Short: everything else
-
-
-
Soulevez avec précaution le bord supérieur du cadre avant hors du boîtier arrière.
-
Après avoir libéré le bord supérieur du cadre avant, faites pivoter ce dernier vers le support et sortez-le du boîtier arrière.
-
Pour accéder au reste de l'ordinateur, déplacez le cadre avant en le faisant pivoter et posez-le au-dessus du bord supérieur de l'iMac.
Contrary to the pictures, to lift the front bezel off, start at top of the computer screen lifting up while apply a little bit of pressure to the foam in the upper corners of the screen. This will give you the leverage needed to get the bezel to lift up. Be careful to not pull to fast, as the camera cable is still attached.
-
-
-
Débranchez le connecteur du câble du microphone, en retirant la bande adhésive si nécessaire.
During reinstallation of the LCD panel, be sure that the iSight microphone cable does not become trapped behind the panel.
I actually didn't have to remove the cable. With the iMac laying on its back, just rotate the front bezel (bottom edge rotating around top edge) so that it's laying upside down, above the iMac. When reassembling, just rotate back into place.
-
-
-
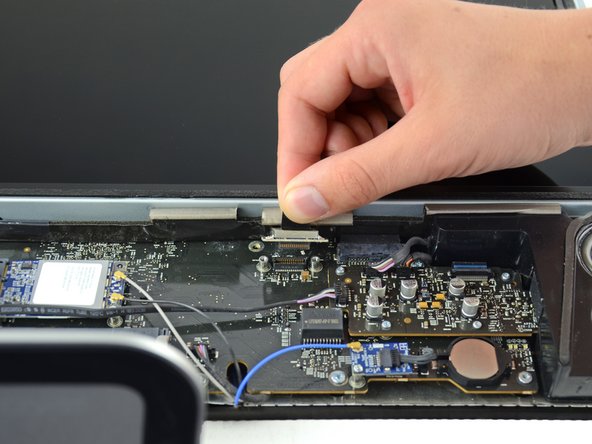
Retirez les deux vis Torx T6 5,3 mm du connecteur LCD.
-
Tenez fermement la languette sur le dessus du connecteur et tirez-la vers le haut pour sortir le connecteur de la prise.
remove the 8 screws (torx) that is holding the screen.
I actually had to use my 6H torx. my 4/5/6’s wouldn’t grab. Whether its from stripping or whatever the 6H worked fine.
-
-
-
-
Placez une main de chaque côté en dessous de l'écran et soulevez-le suffisamment pour pouvoir accéder aux connecteurs à l'intérieur de l'ordinateur.
-
Tout en tenant l'écran d'une main, localisez et débranchez le câble du capteur thermique de l'écran de son connecteur.
I had great success with just propping the top edge of the LCD display up with a box about 8" long. By doing so, I didn't have to remove the thermal sensor wire or the power cable.
The thermal sensor connection is more of a pain than it seems. It's a cramped area and it's not clear when it's properly plugged in during reassembly. It may *feel* like it's in, but then pops free at the slightest touch. I guarantee that if as soon as you start up, fans running max speed instantly is the indication this is the issue. If you're ok with that, then fine, but otherwise, you'll have to pull it apart again.
Unplugging the thermal sensor connection is easier said than done, but using the spudger here is very
helpful
Brian Tsai has it RIGHT! I purchased the OWC SSD and bracket (NewerTech AdaptaDrive). Using the bracket box to support the LCD screen up on the upper left corner and getting adequate illumination it was really easy to change out the drive. Note - i used a knife to pop off the thermal sensor OFF THE DRIVE (not the PCB) as in Step 21, used the knife to pry off the connectors as in Step 16. I suspect you don’t even have to do Step 7.
-
-
-
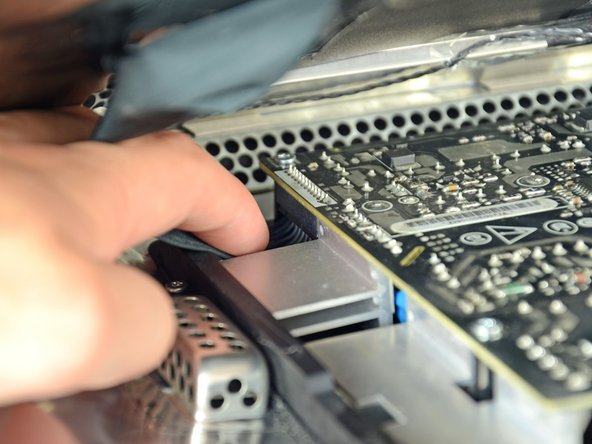
Tout en continuant de tenir l'écran, appliquez une pression vers le bas sur le connecteur du câble d'alimentation avec deux doigts afin de le débrancher de sa prise.
When putting this back together it can be extremely difficult to plug this cable back in without removing a guard that is held in by 2x T8 Torx screws just next to it.
I will suggest to remove the other end of the socket which is connected to the display panel. You can never imagine how difficult it will be to plug in on the main body, unless you know well about it.
I didn't realize these comments were HERE? Poor web design if you can't see comments in an obvious way. Step 10 will cause you the most trouble in reassembling the computer and I knew it as soon as I popped that connector out off the board. Its really f*cking hard to get that connector hooked back up in the way it should be and I have small hands. I managed to get it at least partly pushed in after several tries. Over all it took over half an hour to get it back in there right and scared the !@#$ out of me because I didn't think I could get it done. Those stupid little plastic things won't help you here, the connector really needs to be pushed hard to get it back in. I ended up using a big beefy screw driver for slotted screws, about a ten inch long screwdriver. I used the blade on each end of the connector and was able to give it a good hard push on one end, then pushed on the other end, slowly rocking the connector back into full flush contact. Be real careful you aren't pushing on the ribbon at all.
Having done this procedure 6+ times now, I can tell you it's much easier if, instead of holding the panel up by the "bottom" as illustrated in the guide, instead raise it by the "left" side. It gives you (me) much more room to get fingers behind the connector.
May have been obvious to some, but this little adjustment didn't jump out at me until the 2nd or 3rd rebuild.
There are four screws holding the power supply in place. Two different thread types so make note! Then lifting the power supply enough to easily plug the power cable back in is MUCH less of a problem. Then put the four screws back and proceed on.
That´s exactly how I managed reassembling this connector very easily: Open the four screws, that hold down the platine and then lift it up a little bit.
info -
It isn't that hard if you start by hold the display panel up perpendicular to the case on the side of this challenging connector. From here you'll be able to connect the cable, then follow through with the two other connectors (two screws on the last one). Worked great for me.
By far this was the most difficult cable to reconnect. I enlisted a second person to hold the display after I unscrewed the power supply (Torx 10, 4 screws) and was able to give my fingers adequate room to securely reattach it. There's no need to do this when disconnecting the power supply, but it would take more nimble fingers than mine to reattach it without loosening the power supply.
Do not remove this cable....! Too hard to get back there... I had to screw and lift up the whole platine to get the f**** cable back there....
EASIER IS:
# just remove the mic-cable (step6),the Thermal sensor (step9) the LCD-connector (step 10)...
# then let someone lift up (works also alone) the screen on the right side (there where Superdrive is)...
# remove Drive and Replace!!!!!
# Reconnect the easy cables....
agree! this cable is really tricky ...
Johann -
This step is TOTALLY UNNECESSARY on a 24" model!
Skip it; you have enough space to lift the panel.
You don't need to do this step at all - you can leave the panel connected to the circuit board while you replace the hard drive. I did this while replacing the drive on my 24" iMac, just resting the panel on a box I had put next to the iMac on my desk, so that the panel stayed at the same level but was just moved and rotated sideways, with the cable still connected.
I had great success with just propping the top edge of the LCD display up with a box about 8" long. By doing so, I didn't have to remove the thermal sensor wire or the power cable.
The power cable actually has a fair amount of play in it IF you peel back the thin black tape that affixes it to the LCD panel side to expose the power cable connector on the LCD side.
Note: SERIOUSLY:
- Disconnect the temp sensor from the iMac
- Lift up the screen from the RIGHT side (as if the iMac were standing up, facing you) to a vertical position
- Peel back the tape on the back of the LCD to expose the power supply connection
- Pull the connection from the LCD
- Attachment is the reverse
MUCH easier
-
-
-
Soulevez et retirez l'écran de l'appareil.
There is (what it looks like) a display ribbon cable attached that is hard to disconnect.
-
-
-
Pour retirer le support du disque dur, pressez le milieu du support contre le côté du disque dur tout en faisant pivoter l'extrémité gauche vers le haut.
-
Après avoir libéré le côté gauche, faites pivoter le support vers la droite du disque dur.
-
Soulevez le support du disque dur hors du châssis.
Prying the plastic bar that locks the HDD into place was probably the most difficult part of the operation, for me. It just didn't want to let go, and until you've actually removed one, it's not exactly clear how it's holding on. The left side basically has a thin wedge on the back that wedges in between the rubber grommet and the mounting bracket
Actually this step is quite easy, provided you follow exactly the instructions presented here. :)
-
-
-
Le cas échéant, décollez le petit morceau de ruban adhésif qui recouvre les câbles du capteur de température du disque dur et du lecteur optique.
If there is some clear tape holding the excess play in the HDD thermal sensor wire, against the body back, peel it up to free the wire and give yourself as much free play as possible. When reassembling, tape back to the body.
Mine was completely different. There was some black foam with the sensor underneath, held in with a plastic bracket that is attached (glued?) to the hard drive.
-
-
-
Débranchez le câble du capteur de température de sa prise sur la carte mère en le tenant bien droit.
I found it was not necessary to do this step if you do step 20 first - i.e disconnect the temperature sensor cable from the hard drive, but not the logic board
As HBloomfield said, you do NOT have to remove the sensor from the iMac body. Instead, remove the sensor from the HDD while it is still connected to the body.
If the sensor is covered with a 4mm black foam square, use your index fingernail to scrape off one of the corners where there is adhesive. If you pull on just the foam part, it will tear the foam.
-
-
-
Insérez l'extrémité plate d'un spudger entre le câble de données SATA et le bord du disque dur.
-
Faites tourner le spudger pour séparer le câble de données SATA du disque dur.
-
Débranchez le câble de données SATA du disque dur.
-
Sortez le disque dur de votre iMac en veillant à ne pas coincer le câble du capteur thermique.
I honestly didn't find the spudger to be necessary for most of this replacement. It is a nice little tool that makes one or two steps easier, but it is far from necessary. I imagine an old stylus you may have laying around would do just as good a job. I would definitely suggest putting the iMac on it's stand straight up to remove the hard drive bracket from it's post, as it sits very tightly in there. I found it popped out a LOT easier on it's stand than laying down, which was next to impossible. You do have to do some careful manuevering with your partner in order to accomplish this, but it's worth it. Take it slow.
When replacing, the SATA data cable did not extend to the new drive.
THIS. A hundred times THIS. I wanted to put in an SSD, and was miffed to see that the SSD was to be placed in the middle of the 2.5" to 3.5" adapter. Unfortunately, that means that the SATA cable did not reach. I tried three different adapters, all the same. I even tried to BUILD an adapter myself from flat pieces of metal (I wouldn't recommend it). In the end, I got a SATA extension cable and simply taped the SSD into the case where the HDD used to be. We'll see if any problems crop up. Since it's very light though and doesn't produce much heat I don't think there should be a problem.
You will need a dock that puts the connectors in the same place if you want to use an SSD. I've had decent luck with the Icy Dock.
I have stopped using brackets for most SSD replacements. I bought some circular hook and loop dots with strong adhesive and merely velcro the drive to the case. The cables are long enough to allow the drive to sit flat against the case if you turn the drive upside down after attaching it. Otherwise, the data cable is too short. SSDs are so light that there is no reason for over-engineering the attachment. Most tape is not strong enough but two velcro dots work great.
-
-
-
Retirez les deux vis Torx T10 avec leurs œillets en caoutchouc du disque dur.
One of the screws came out easily but the other took a great deal of convincing. To get it out I tightly wrapped a medium-thick rubber band around it to improve grip. I then applied downward pressure with my palm, and with my other hand, rotated the screwdriver. If at first you don’t succeed, try taking a break for a few minutes to let your grip strength return. You’ll get it eventually!
-
-
-
Retirez le morceau de ruban mousse qui recouvre le capteur thermique du disque dur.
There was no tape on the drive you sent me...
Citation de andymcdonell :
There was no tape on the drive you sent me...
Transfer the piece of foam tape from the old drive to your new drive. If it is no longer sticky, it is fine to use a strip of electrical or duct tape to hold the foam tape down against the drive.
-
-
-
Pour retirer le capteur thermique du disque dur, utilisez la pointe d'un spudger pour soulever la partie centrale de la bride du capteur, tout en tirant doucement sur le câble.
I found these instructions to be a little unclear. What you are looking at after removing the foam, is a bracket that is basically holding down the thermal sensor at the end of those wires coming out(which you can't see because it's UNDER the bracket). I found the bracket to be fairly easy to just pull up and off. The spudger (or even a tiny flathead screwdriver) can easily accomplish this if it's glued on tight. Once the bracket comes off, the thermal sensor is freed, and in my case fell away from the bracket. Just try to keep those pieces together in the order they came off. Fortunately, as easy as the bracket came off, it was easily pushed back onto the new hard drive with no trouble at all. The foam was pretty sticky still as well, although I had to double tape one side of it to secure it over the bracket.
-
-
-
À l'aide d'un spudger, retirez le petit morceau de mousse EMI collé sur le dessus du disque dur.
-
Si vous installez un nouveau disque dur, nous avons un guide d'installation OS X.
Make sure you don't forget this step! I forgot this step, got everything back together, then had to take it all apart again to affix this! Not fun. That said, the second time went MUCH faster, and I found myself appreciating this design a lot more. It is much less daunting now, and is much easier than upgrading the RAM in a Mac Mini.
I followed this to replace hard disk with an SSD. These instructions and comments pretty much cover it. Only had to disconnect #7 cable and a little cable near the center of the system board; flipping/rotating bezel/screen avoided other disconnects. I used a permanent marker to label bezel holes "L" and "VL" (long and very long) to put those screws back properly.
My main problem: I expected a 2.5" hard disk but found a 3.5". Micro Center talked me into an IcyDock 2.5" --> 3.5" adapter, defective (ended up just taping the SSD down). Between that and not loading OS on the SSD before installing (basically: attach SSD via USB, boot while pressing command-R) meant I got to do this disassembly/assembly several times.
Worth it to buy a bottle of air to blow out dust, a 3.5" external enclosure (for the former internal hard disk), and maybe a CR2032? coin battery while you're at it. Group permissions on the hard disk's user files will be broken afterwards, easily fixed.
i can not install osx on the new disk
don't assume the usb pen i have to install the osx can you help me?
What is the purpose of this piece of foam and is it necessary when replacing the hard drive with an SSD?
Is this really needed? I have changed HDD to SDD on my old iMac 2009 and cannot install OS from bootable USB because after clicking on the selected bootable device I see a white screen with a picture of the directory and a question mark in the middle. Could it be related somehow?
I suspect you experienced the same issue I had. I had to extract the hard drive I put in, format it for mac use, and reinsert it. Transmac is useful for that on any WIndows machine assuming you don’t have another mac to work from.
(I know this response is waaay late but I figured better late than never.)
-


Pour remonter votre appareil, suivez les mêmes instructions dans l'ordre inverse.
Pour remonter votre appareil, suivez les mêmes instructions dans l'ordre inverse.
Annulation : je n'ai pas terminé ce tutoriel.
206 autres ont terminé cette réparation.
Merci à ces traducteurs :
100%

Fabienne Detoc nous aide à réparer le monde ! Vous voulez contribuer ?
Commencez à traduire ›


17 commentaires
Exellent instructions....
I just installed a new HD on my iMac 8,1. Intalled the OS from original disc, it was 10.5.2, I don't know how to upgrade the OS.
I did software update, but only got 10.5.8. ¿what can I do? I would like to install Yosemite at least...
Any help?
You need to get to 10.6.8 via physical media, then app store update from there. I have read that Apple will send you a dvd for no cost, but the official price is $19.
I has a 8.1 as well , running Ubuntu 22.04 is great ! Stop obsolete OSX
Fonctionne tres bien car collé dessus et donc toujours froid
I just replaced the original HDD with a SSD in my early 2009 iMac. Worked like a charm except now my fans run at about 3000 RPM and the computer is not even hot. I double checked the heat sensor and all is where it should be. Any ideas how to get the fans to quiet down?
When the fans spin like crazy, it’s because it can’t see a sensor that it’s expecting. Double check, not only the location but that they’re connected securely into the logic board. I’d spend extra attention on the temp sensor that sits on the hard drive (since that’s the one you moved over from the old hard drive). Double check the wires into the connector as well that they didn’t get damaged when unplugging it.
I like to upgrade the HDD in an early 2009 EMC 2267 to a SSD. It’s not my computer, my son’s. I was going to upgrade it next month when visiting him. I’m having a problem making a El Capitan bootable USB drive. I can’t get the Install application from the App Store. Will I be able to use my bootable High Sierra USB drive to run Disk Utility to format the SSD and then Restore from Time Machine?
Ren - 06/14/2018
Hey Ren! I may be a bit late, but there is a way to actually install High Sierra on your son’s computer. I have it installed on 4G RAM and 2.66GHZ processor and it works wonderfully. Here’s the link to the guide, I highly recommend you do this: http://dosdude1.com/highsierra/ . Kind of a poorly formatted article but it’s comprehensive and helpful. Best of luck!
I made it! Excellent guide! I followed all steps except the one with the powercord, since I read in the comments that it wasn’t really necessary. And it wasn’t, so it’s good to read comments too! :)
Thank you so much for this guide!
Hi everybody! Excellent instructions!!
I need help: I have an 2007 imac hard drive that I would like to install to a 2009 imac as a second drive, taking away the optical drive. Is it possible? Does the 2007 hard drive fit in that space? in that case, do I need an adaptor? is there any video or instructions how to do this?
I will appreciate any help about this.
Thanks in advance and kind regards!
Great instructions and very helpful in bringing a trusty old 2009 iMac back to life. I installed a 2.5’’ SSD in a 3.5’’ cage and reinstalled the thermal sensor - works perfectly, the machine is wonderfully quiet and - giving the fans a thorough cleaning in the process runs at a speed that makes it absolutely usable again, albeit only at 10.11.6. Thanks a lot for this guide.
Did you have to buy a thermosensor adapter? I have a early 2009 imac 24”. I’m hearing there is no pin to connect to so users are having to use software to regulate the fans.
Lance N -
High cpu rpm fan speed? Mine was the lcd thermal sensor not seated when reinstalling screen. Reconnected and she runs silently. Just my two cents.
Hi everybody! I’ve just completed -together with my son, very excited to do it!- the replacement with a new 500 GB Kingston SSD on a 24” early 2009 iMac, and those instructions have been excellent and perfect, making us feel easy and confident. We had also the opportunity to clean the secular dust from a decade of honest work of internal fans. Before installation, we put the SSD in a convenient case to make it work as an external USB disk, then used Carbon Copy Cloner to clone the internal original HDD, then check if the clone was properly working by selecting the external USB SSD disk for Boot. Everything being OK, we finally performed the installation -btw adding 4 more GB to the RAM- and now the 11 years old iMac runs like a rocket! Thanks a lot for this simple and complete guide!
The grid won't fall off by itself. You'll have to help it. Use the smallest screwdriver you have; the Torx 6 worked fine for me. It should enter in one of the many holes composing the grid. Use it as a lever to ploy the grid a little bit. You may catch it with your fingers and that's it.
Be carefull not to damage the hole by a too strong leverage.
Laurent - Réponse
much more safer to use duct tape, instead of torx 6. (glue it along the length of the grid and pull). it will loose instantly and smooth;)
Hofmann78rus - Réponse
Anyone know a guide to replace the plastic piece this screw connects to? I accidentally forgot this step - went to remove the front bezel and bent the plastic piece the access door connects to.
Jason Augustin - Réponse