Cette traduction a été générée automatiquement et n’a pas encore fait l’objet d’une relecture humaine. Vous parlez cette langue ? Relisez-la.
Introduction
Retirez la façade en verre pour accéder aux composants internes de votre iPod Touch.
Ce dont vous avez besoin
Vidéo d'introduction
-
-
-
L'image de gauche (vitre avant déjà retirée) montre l'emplacement des clips métalliques (en rouge) qui s'enclenchent sur le châssis en plastique. Dans les prochaines étapes, essayez de faire levier pour soulever la vitre avant au niveau des espaces situés entre ces clips.
 Demander à FixBot
-
-
-
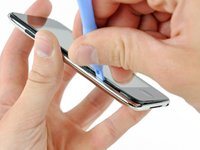
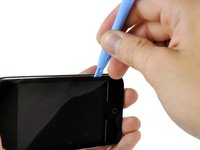
Insérez délicatement un outil pour ouvrir entre la façade en verre et le contour en plastique, près des boutons de volume.
-
Faites pivoter l'outil vers l'extérieur de l'iPod pour faire levier sur la façade en verre.
-
-
-
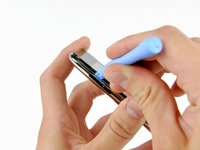
Insérez l'outil pour ouvrir l'iPod entre la façade et son contour en plastique, puis faites levier à plusieurs endroits le long du bord gauche du Touch.
-
-
-
-
Continuez à faire levier sur le bord gauche jusqu'à ce que les bords supérieur et inférieur commencent à se soulever hors du Touch.
-
Une fois que les bords supérieur et inférieur sont légèrement sortis du Touch, utilisez l'outil pour ouvrir afin de vous assurer que le contour en plastique est détaché des clips situés à l'intérieur du Touch.
-
-
-
Continuez à faire levier, en vous concentrant maintenant sur le détachement du contour en plastique des clips métalliques internes.
-
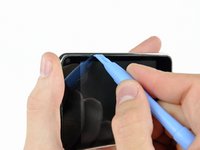
Faites levier le long du bord supérieur du Touch pour séparer davantage la façade du reste de l'appareil.
-
-
-
Faites levier sur la façade avant le long du bord droit en utilisant la méthode décrite aux étapes précédentes.
-
Continuez sur tout le périmètre de la façade avant jusqu'à ce qu'elle soit légèrement soulevée du panneau arrière.
-
-
-
Soulevez le panneau avant hors du boîtier arrière, en faisant attention à la nappe qui le maintient encore près du coin supérieur gauche du Touch.
-
-
-
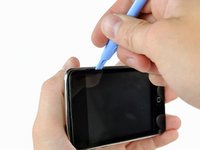
Utilisez l'extrémité plate d'une spatule (spatule) (ou un outil pour ouvrir) pour faire levier très délicatement sur le connecteur de la nappe de la vitre tactile afin de le débrancher de la carte mère supérieure.
-
-










Pour remonter votre appareil, suivez ces instructions en sens inverse.
Annulation : je n'ai pas terminé ce tutoriel.
97 autres ont terminé cette réparation.

6 commentaires de tutoriel
When prying up - make sure that you lift the black plastic frame. I got trouble because on side I managed to lift the glass of the plastic frame on one side, and lifted the plastic frame out of the clips on the other sides, making it very hard to get the panel out. When I at last succeeded it was because the plastic frame broke in the lower right corner – when I had lifted the panel off the right side of the plastic frame was still attached (it needed to break at the top too before I could lift of the panel completely).
will i because to put the panel back on easily?
Patience and a can of compressed air are mandatory. The inside of my iPod Touch was pretty dusty after two years in my pocket. Before putting on the new digitizer, everything needs to be clean.
Also, I used my spudger to pry half the broken frame out of the left gutter (see Michael above). Doing that without damaging the screen was the hardest part.
I'm getting ready to do this and have the old screen partially off to let things dry out. I am, however, unclear on what to pry on to release the ribbon. From past experience with other iPod products, I'm thinking it is a small clamp that needs to be pried up. Is that the case and, if so, is it located where the picture indicates? I think the clamp is under the small grey plastic cover.
