Info : Vous modifiez un tutoriel prérequis. Toutes les modifications apportées affecteront les 14 tutoriels qui comprennent cette étape.
Traduction de l’étape 15
Étape 15
Loosen the battery
-
Use a spudger to pry the battery up from the rear case. The battery is attached with an adhesive strip around the perimeter of the battery.
| - | [* black] Use a spudger to pry the battery up from the rear case. The battery is attached with an adhesive strip around the perimeter of the battery. To prevent the battery from bending during the removal process, we recommend against using just the plastic pull-tab . *Note: Removing the battery is NOT necessary for replacing the GPS antenna. It merely gives you more space for removing the headphone assembly (which is also unnecessary to completely remove). |
|---|---|
| - | [* icon_reminder] The iPhone's battery is attached to the rear case with a mild adhesive. This adhesive usually comes out attached to the battery. If your replacement battery already includes an adhesive backing, you're all set. If your replacement battery doesn't have an adhesive backing, you'll want to transfer the adhesive from your old battery to the new one. |
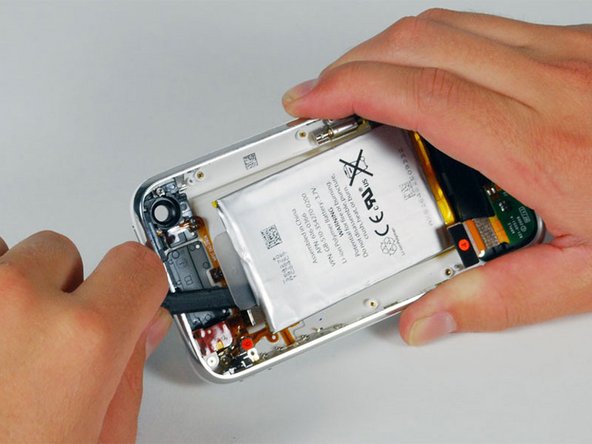
| + | [title] Loosen the battery |
| + | [* black] Use a spudger to pry the battery up from the rear case. The battery is attached with an adhesive strip around the perimeter of the battery. |
| + | [* icon_note] To prevent the battery from bending during the removal process, we recommend against using just the plastic pull-tab. |
| + | [* icon_note] Removing the battery is NOT necessary for replacing the GPS antenna. It merely gives you more space for removing the headphone assembly (which is also unnecessary to completely remove). |
| + | [* icon_reminder] The iPhone's battery is attached to the rear case with a mild adhesive. This adhesive usually comes out attached to the battery. If your replacement battery already includes an adhesive backing, you're all set. If your replacement battery doesn't have an adhesive backing, you'll want to transfer the adhesive from your old battery to the new one. |
| + | [* icon_note] If the battery isn't detaching from the rear case, apply a few drops of high concentration (over 90%) isopropyl alcohol under the edge of the battery. Wait about one minute for the alcohol solution to weaken the adhesive. Use the flat end of a spudger to gently lift the battery. Allow the alcohol to air dry before installing your new battery. |
| + | [* icon_caution] Don't try to forcefully lever the battery out. If needed, apply a few more drops of alcohol to further weaken the adhesive. Never deform or puncture the battery with your pry tool. |
| [* icon_note] You can use a hair dryer or heat gun on its lowest setting to heat the back of the case. This will help loosen the adhesive bond before using the spudger to separate the battery from the case back. | |
| + | [* icon_caution] Caution: Overheating the iPhone may ignite the battery. |
Vos contributions sont faites dans le cadre de la licence open source Creative Commons.