Introduction
Mettez à jour votre espace de stockage avec un nouveau disque dur.
-
Insérez un outil d'ouverture en plastique dans la jointure entre l'avant et l'arrière de l'iPod.
-
Insérez un autre outil d'ouverture en plastique dans la jointure entre l'avant et l'arrière de l'iPod, laissant au moins 2,8 cm d'espace entre les deux outils.
-
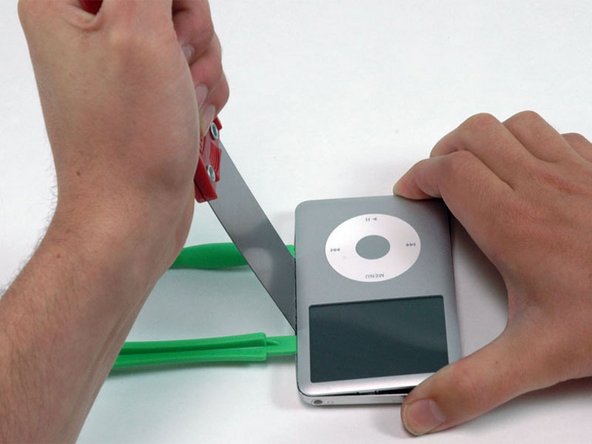
Dans un angle, insérez soigneusement le couteau à mastic sur environ 3 mm dans la jointure entre les deux outils d'ouverture.
-
Une fois que le couteau à mastic a dégagé le rebord de la coque arrière, faites pivoter le couteau afin qu'il soit vertical et appuyez soigneusement (mais fermement) tout droit vers le bas dans l'espace entre les outils d'ouverture.
-
Poussez avec vos doigts sur la coque arrière derrière le couteau à mastic pour minimiser la déformation. Pliez doucement le couteau à mastic, comme indiqué sur l'image, pour assurer que la plupart des attaches métalliques de ce côté de l'iPod sont désengagées.
-
Retirez le couteau à mastic de l'iPod et réinsérez-le plus près du coin de l'iPod, en le pliant comme précédemment.
-
Insérez un outil d'ouverture en plastique à côté de la prise casque, dans la jointure entre l'avant et l'arrière de l'iPod.
-
Près du centre de l'écran, insérez soigneusement un spudger métallique dans l'espace créé par l'outil d'ouverture en plastique.
-
Ouvrez le seul clip en haut de l'iPod avec le spudger en métal.
-
Près de l'autre coin supérieur, insérez un outil d'ouverture dans la jointure entre l'avant et l'arrière de l'iPod.
-
De l'autre côté, insérez un outil d'ouverture dans la jointure entre l'avant et l'arrière de l'iPod.
-
Retirez l'outil d'ouverture en plastique du coin supérieur et insérez-le dans la jointure entre l'avant et l'arrière de l'iPod, laissant au moins 2,8 cm d'espace entre les deux outils (comme de l'autre côté).
-
Dans un angle, insérez soigneusement un couteau à mastic sur environ 3 mm dans la jointure entre les deux outils d'ouverture.
-
Une fois que le couteau à mastic a dégagé le rebord de la coque arrière, faites pivoter le couteau afin qu'il soit vertical et insérez-le soigneusement (mais fermement) tout droit dans l'iPad via l'espace entre les outils d'ouverture.
-
Poussez avec vos doigts sur la coque arrière derrière le couteau à mastic pour minimiser la déformation. Pliez très légèrement le couteau pour assurer que la plupart des attaches métalliques de ce côté de l'iPod sont désengagées.
-
Insérez délicatement un spudger métallique dans la zone près du têtu clip métallique.
-
Poussez délicatement le spudger métallique vers le bas en le faisant un peu jouer, jusqu'à ce qu'il touche le fond de la coque arrière.
-
Commencez délicatement à ouvrir le clip du panneau frontal.
-
Continuez à soulever le panneau frontal avec le spudger en métal jusqu'à ce que le clip métallique cède.
-
Saisissez l'ensemble du panneau frontal d'une main et la coque arrière de l'autre.
-
Tout en douceur (DOUCEUR), ouvrez les clips restants de la coque arrière en éloignant le haut des panneaux frontal et arrière l'un de l'autre (pensez que le bas de l'iPod est une charnière) et en prenant soin de ne pas endommager les nappes reliant les deux moitiés.
-
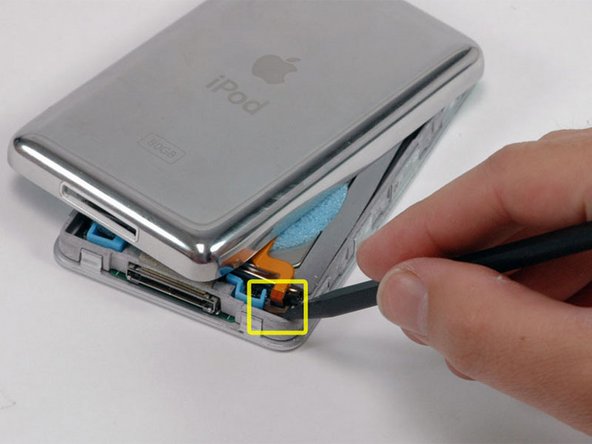
Utilisez un spudger pour soulever le connecteur maintenant la nappe du connecteur. Vous devez juste soulever le clapet de 2 mm pour faire sortir la nappe.
-
Faites glisser la nappe orange de la batterie hors de son connecteur.
If the small battery black/white connector pumps out of the ipod when you are trying to unplug the cable...REMEMBER the "U" black shape is meant to be just in the same direction as the blue plastic "U" beside it. If you plug it back in the wrong way it will display "Charging please wait..." forever!.
:)
How did you get the black battery piece to stay in after it popped out?
I knocked this little bit out too! Any tips to get it back in? Soldering?
-
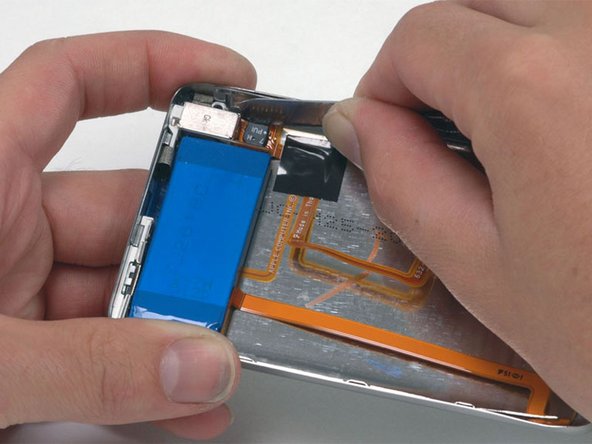
Placez la coque arrière à côté de l'iPod, en prenant soin de ne pas déformer la nappe orange de la prise casque.
-
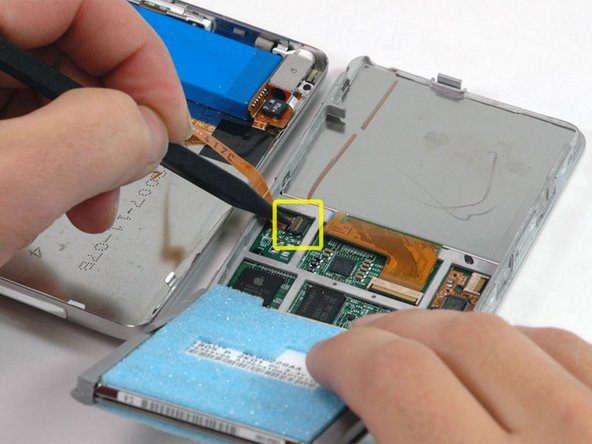
Soulevez le disque dur d'une main afin que vous puissiez accéder à la nappe de la prise casque en dessous.
-
Utilisez un spudger pour retourner la languette en plastique qui maintient la nappe de la prise casque en place. La languette tourne de 90 degrés et laisse sortir la nappe.
-
Faites glisser la nappe orange de la prise casque hors de son connecteur.
-
La coque arrière est maintenant détachée de l'iPod.
-
Maintenant, passons à la réparation des dégâts causés par la libération des parties internes de l'iPod classic ! Il est très probable qu'au moins un des clips métalliques dans la coque inférieure ait été courbé vers le haut. Ces clips doivent tous être orientés vers le bas avant de remonter la coque.
-
Prenez le côté large et plat du spudger métallique et enfoncez le clip vers le bas, en veillant à ne pas déchirer le mince rail en métal de la coque arrière.
-
Posez la coque arrière de côté sur une surface propre et dure. Appuyez dessus avec précaution, mais fermement, pour que le rebord reprenne sa forme initiale.
-
Faites pivoter le disque dur hors du cadre et placez-le de façon que le connecteur soit orienté vers le haut.
-
Utilisez un spudger pour détacher la languette en plastique qui maintient la nappe orange de disque dur en place. La languette tourne de 90 degrés, dégageant la nappe.
-
Faites glisser la nappe orange du disque dur directement tout droit hors de son connecteur.
-
Si vous remplacez le disque dur de votre iPod et qu'il n'est pas livré avec les supports de fixation en caoutchouc et le rembourrage en mousse, transférez ces éléments de votre ancien disque vers le disque de remplacement.
Pour remonter votre appareil, suivez les instructions à l'envers.
Annulation : je n'ai pas terminé ce guide.
242 autre(s) ont terminé cette réparation.
Merci à ces traducteurs :
100%
Ces traducteurs nous aident réparer le monde ! Vous voulez contribuer ?
Commencez à traduire ›
31 commentaires
The instructions worked like a charm. This is not for the faint of heart and requires some modicum of skill, but I saved a buttload of money by doing it myself. You will definitely need the recommended tools.
It worked like a charm... Just need to follow the instructions carefully and you can avoid to spend 200 something € to buy a new iPod!
Thanks iFixit
i couldn't get the plastic opening tool in between the 2 sections. i ended up using two razor blades instead of the plastic tools and the putty knife, i was able to replace the hard drive with very little struggle and almost no cosmetic damage(not that i care what the thing looks like)
Thanks for a highly useful guide. Slowly and methodically, using a single-bladed, razor blade, I was able to open the case, following this procedure. Patience is, indeed, a virtue, in this case.
I was able to successfully replace the hard drive and battery.
The only snag I encountered was that the headphone jack ribbon was glued to circuit board adjacent to the connector under the hard drive. (I just left this ribbon be, not wanting to risk damaging the ribbon.) It was a bit awkward straightening the case edges, but I managed.
Overall, I'd give this guide a grade of "A"....it was nearly perfect and very clear. Bravo!
Well I managed to get it apart, though it wasn't all that difficult with the right tools, but getting it back together has been a nightmare. Just saying "reverse the process" is reall not quite enough in this case. All the little pieces of shock padding keep falling off, it's almost impossible to get the two wires plugged back in as well as keeping them in place, but I got there in the end. Or so I thought . Now my ipod has no sound (except from dock output) - and on investigating I find I have severed the orange cable near the jack itself- either by bending it or catching it on something. So another part to buy. So it's a warning to be very careful.
Yeah. I did it. It wasn't easy, and the results could have been prettier, but I did it.
On opening, I found my plastic tools to be useless. I ended up taking the blade of a cheap Gerber knife to the thing, being careful not to damage the rails. I found that thin grade guitar picks were a great thing to stick in the spaces!
It's a good idea to take a picture of the innards once you open it. The little bumpers can be a bit tricky to reposition when you put it back together. Also you'll want to remove the blue foam padding if possible from the old hard drive and stick it to the new one.
Don't freak out when you get to the ribbons. They're tougher than they look, and they seem to know where to go. I did have to use a pair of needlenose plyers to guide the headphone ribbon back into place.
If you're a stickler for aesthetics, then pay close attention to steps 21-23. Especially 23, or you'll have unsightly gaps along the edges.
The hardest part of this project is taking it apart. Take your time.
This is great instruction.
Could you please add the list of compatible hard drives.
I have a need for larger hard drive and plan is to install 512GB SSD drive for my iPod Classic 160GB 7th Gen. Do you now is there some limitation in HD size in iPod?
The plan is to replace original 160GB hard drive with Samsung PM851 512GB SSD drive
Based on my understanding this adapter works
Mini PCI-E Msata SSD to 40pin ZIF Adapter Card
http://www.ebay.com/itm/Mini-PCI-E-Msata...
with Samsung PM851 512GB mSata Internal Solid state drive SSD
http://www.ebay.com/itm/Samsung-PM851-51...
I guess that I need also new wider back cover for iPod classic.
http://www.ebay.com/itm/upgrade-iPod-Cla...
I'm not sure how much space is needed for Msata to SSD adapter and ssd drive
Any comments?
@Jari
Have you considered using a Compact Flash instead of SSD? i.e. check eBay for "CF to Zif 1.8" HDD SSD IDE Adapter"...
I tried to install Samsung PM851 512GB SSD drive for iPod Classic, but iPod does not detect the drive.
I formatted SSD drive to FAT32 beforehand, but finally I had to intall original 160GB drive back.
Jari -
This was indeed a tough shell to crack! The plastic tools can bend easily and become weak so be careful as you are trying to create the initial gap for the putty knife. Once you get one side unhinged, the rest moves much more quickly!
Upgraded my 80 to a 120 and did the battery while I was at it...now hopefully I can squeeze another 5 years out of my iPod which should be long enough for a Apple to release Touch with a large enough hard drive for all my music!
The guide is very good. Take your time and with patience and perseverance it can be done. I used a kitchen palette knife to prise open the case. I replaced the hard drive and after several attempts at fixing the hard drive cable in place given that the flimsly retainer clip broke first time on the new drive. I used a piece of paper in the slot to keep the cable connected and secure which was then curved back and taped into place to keep the pressure on. Fiddly but sucessful. I now have my ipod up and working. Not bad for a 7 year old piece of kit which has has a few knocks and bashes on the way. So it is worth trying!
Had great success using 6 guitar picks instead of the putty knife. Allowed me to move in smaller sections and caused zero damage to the iPod. Didn't even bend any metal clips mentioned in Step 21! Replacing a damaged drive with 128 GB of flash memory using StarTech 1.8-Inch ZIF to CF Adaptor and Komputerbay Dual Micro SD to CF adaptor. Can use two cheaper 64 GB SD cards to achieve a solid state 7th Gen Classic!
Don't know much about memory technologies but why did you use 2* micro SD cards instead of a 128gb CF card?
A very useful guide -I read through a couple of times before starting. I did not have spudgers, but used a variety of other small tools. It came apart more easily than expected, and the case only needed one clip bending back. There are some minor marks at the joint between case and front, but all works fine.
I don´t have the plastic tools, which I believe are meant to open the device without scratching it. I still haven´t repaired my iPod Classic, but I followed the instructions to open it and identify the hard drive model so I could order a new one. I opened it with a round blade knife and two coffee spoons. :) I wasn´t afraid to scratch the dang thing as it was already badly scratched. It will be my "backup" Classic, as I already got myself a new one (one of the last ones).
Is there a drive bigger than the 160 Gb that will fit? I just need more space. :)
I have a 512gb flash memory iPod Classic. It has a Tarkan adapter in it. Paid $400 for it. Didn't do the work myself. Just paid for, basically, a new iPod.
I would like to try this because my iPod classic died and I'm very upset that it's been discontinued. I have no want for a Touch and I listen to too much music for a low GB. I must ask though where you got the new hard drive? Or what kind of hard drive it is. I've only ever installed a hard drive in an XBox 360 slim and that was just opening a panel and slipping it into a port. Thanks.
Do a flash memory upgrade. Mine is at 512gb now. Replaces the hard drive with flash memory. It has no moving parts and it's lighter!!!
Everything went smoothly. I replaced both the drive and the battery at the same time. I suggest you invest a little $ and buy the necessary tools as I did. Makes everything sooooooo
much easier. Took about an hour but what the heck.....I wasn't doing much else. Now I have my Tunes back! Thanks iFixit.com!
Kenny From San Clemente, CA
Great guide, just take your time and make sure you use the proper tools. Used this guide for my iPod and you can't tell it has been opened whereas I used a different guide in the past for the Mrs's iPod with no where near as good results.
This is a great guide, I was able to change both my hard drive and my battery in a simple 30 minutes since my package arrived. My iPod always worked really hard just to stay powered on, it felt like it was going to explode every time I picked it up, now the iPod is running quietly and smoothly with no problems. And for once I am able to sync all of my music from iTunes onto it.
A few weeks back I saw someone selling a 160 gig Classic on LetGo for $35 and decided to get it. Got home and discovered why the price was so low, the disk could not be accessed when I tried a restore. So I ordered up some parts from Amazon, a ZIF to CF adapter board and a CF to SD adapter. Ran about $20 for the pair. I went to Harbor Freight Tools to see about a putty knife but decided to get a razor blade with handle that I found in the paint scraping aisle where the putty knives were. Turned out this was the only tool I needed to get the clips undone while not uglifying the iPod. I pried on the edge of the back case like the instructions show using the putty knife to do, then a very small amount of persuasion by placing a small flathead screwdriver in the gap and a bit of twisting got it apart.
(cont'd) I put a 32 gig SD card in the adapter for testing, then put the adapter into the ZIF adapter and slid it in. I had a 32 gig solid state Classic to show for my efforts. I synced some music and tried playing through some headphones to see what I got, after all this was a cheapie secondhand 'Pod so had to find out if it'd work. Works great.
I see that Other World Computing has a more elegant part going straight from ZIF to SD, I think I'll try that. The slim 7th gen doesn't look like it'll hold the adapter contraption in there now. I haven't tried closing it yet since I need a bigger SD.
Thank you for the guide! It is indeed very difficult, but not impossible. I followed the directions as closely as possible. I had to use a utility knife to open it. The seam was too tight for the plastic tools. Everything else went fine. If you use extreme care and follow the directions exactly you should be able to do this with no damage to ribbon cables. I did, at times, feel like I was performing microsurgery. :-) All went well in the end and I once again have a working iPod classic - at a fraction of the cost of replacing it. Thanks again for the guide and for the great customer service when ordering the parts.
The instructions were absolutely clear( even if I deduced some of the words from the context) :-) The only difficulty for me, was to put as much power on the putty knife as necessary. Too little and too shy at the beginning. ... but then you get the necessary feeling! Again it's not as difficult as it seems in the beginning. By the 25-th fixing you can open a little fixing shop :-D. Thank you iFixit!!! Thank you all enthusiasts who post here!!!
I was able to successfully install the physical drive, however the volume is not working well-it can be heard faintly if the volume is cranked all the way up-but its all very distorted. Any suggestions?
I was able to do this with an 4" icing spatula without bending the case at all. Great guide. My classic is now 250GB of storage, faster, and lighter. Thanks!
Hi I have 2 questions.
1) I accidentally broke the (brown) connector holding the battery cable to the logic board. What is it called and how can I get a replacement?
2) I exchanged the LCD Color display between 2 ipod classic (one and A1238 80GB with broken screen and the other A1238 160GB perfect screen) the result was a blank whote screen but if i switched it back to the broken screen, I could see the apple logo n startup. How can i solve this problem? Should i buy a new LCD Color display? Are there any difference between the parts?
Please help....
Just replaced my bad hard drive, so far so good. This site was a lifesaver
Great instruction, had two iPods- one with screwed battery, the other one with damaged hard drive: Made one out of two- was easy even though i didn't had the plastic tools, a hair clip is perfect for this job! the iPod is dead, long live the iPod
If you're meticulous, the job can perfectly be done, without any of the recommended tools. I hadn't the time to order them, so I opened my iPod with the large blade of my Victorinox swiss army knife. By just following the instruction I succeeded in releasing all of the metal tabs all around the iPod, and didn't damage any of them. You can clearly hear them "declipsing". I think the blade of the Victorinox is thiner than the putty knife, the only thing you have to take care of, is not to cut the black or silver painting of the front of the case, but if you are used to cut with a knife, you should succeed. Just be aware that it is however a difficult job !
jcfsystems - Réponse
Thank you for these instructions - my dead iPod classic (that died whilst attached to an ipod dock during a heavy thunderstorm which took out the dock too) is now working again. Opening the case took me 40 minutes and 7 plastic case openers not to mention very sore hands but the rest of the process worked fine. thanks again
Stuart Hutchesson - Réponse
Opened it up with MANY super thin nylon guitar picks in less than a minute starting from the two tabs on the bottom - I used the putty knife in my shop for wood filler and patching walls :)
cmguitar - Réponse