Ce tutoriel a des changements plus récents. Passer à la dernière version non vérifiée.
Introduction
Suivez ce tutoriel pour changer votre batterie manette PlayStation 5 DualSense de Sony.
Remarque : Ce tutoriel est pour les manettes DualSense avec un FCC ID finissant par 1. Regardez l'arrière de votre manette pour vérifier votre modèle. Si le vôtre finit par A, votre manette va avoir un design interne différent, mais vous pouvez toujours utiliser ce tutoriel.
Si votre batterie DualSense est gonflée, prenez les précautions appropriés.
Pour des performances optimales, après avoir complété ce tutoriel, calibrez votre nouvelle batterie DualSense.
Ce dont vous avez besoin
-
-
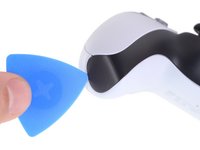
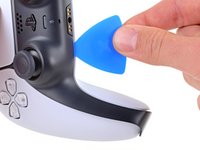
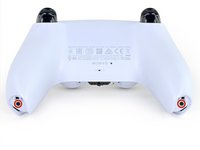
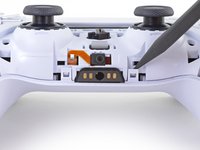
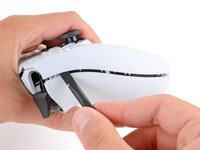
Insérez un médiator en dessous de la partie droite de la garniture centrale pour détacher les clips qui fixent la garniture à la coque de la manette.
-
-
-
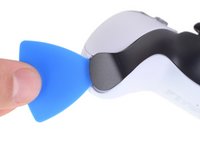
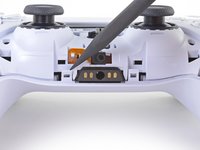
Faites glisser le médiator le long du bord inférieur droit de la garniture centrale pour détacher les clips qui la fixent à la coque.
-
-
-
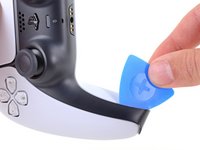
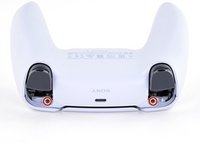
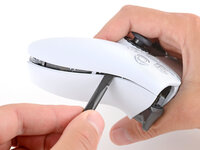
Insérez un médiator en dessous de la partie gauche de la garniture centrale pour détacher les clips qui fixent la garniture à la coque de la manette.
-
-
-
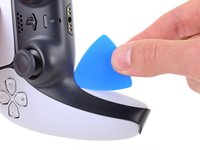
Faites glisser le médiator le long du bord inférieur gauche de la garniture centrale pour détacher les clips qui la fixent à la coque.
-
-
-
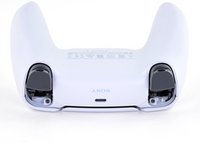
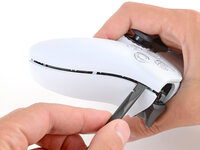
Utilisez vos doigts pour lever les bords inférieurs afin de détacher les clips restants.
-
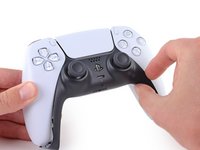
Levez la garniture centrale au-dessus des joysticks pour la retirer.
-
-
-
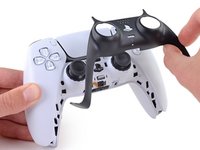
Insérez le côté plat d’une spatule (spudger) dans l’espace au-dessus du bouton L1.
-
Faites levier vers le haut pour enlever le bouton L1.
Tried prying from the front of the buttons as pictured and my spudger broke off in the gap. A video I watched showed them being pried off from the back (between the R1/R2 and L1/L2 buttons) which seemed much easier.
Agree with Lora's comment above. I was able to use an old credit card to take L1/R1 out this way. I pressed down the L2/R2 button to create space to work in, then came in from between L1/L2 and R1/R2. It's easy to pop one of the outer corners first then you can work the credit card around the top and the rest falls out.
-
-
-
Insérez le côté plat d’une spatule dans l’espace au-dessus du bouton R1.
-
Faites levier vers le haut pour enlever le bouton R1.
What I didn't see addressed anywhere (here or in other similar articles) is that replacement R1 / L1 buttons can be differ enough to be un-usable depending on which model your ps5 controller is. The ones I ordered don't fit and now I can't find a way to be sure I get the right ones because few know there's even a difference.
Did you already figured it out? The version the we need yo use?, We are in the same situation here.
Tried prying from the front of the buttons as pictured and my spudger broke off in the gap. A video I watched showed them being pried off from the back (between the R1/R2 and L1/L2 buttons) which seemed much easier.
-
-
-
-
Utilisez un tournevis cruciforme pour retirer les deux vis de 6,4 mm sécurisant les coins de la coque inférieure.
-
-
-
Utilisez un tournevis cruciforme pour retirer les deux vis de 6,4 mm sécurisant les coins de la coque inférieure.
-
-
-
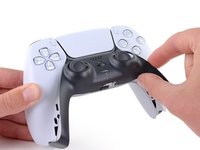
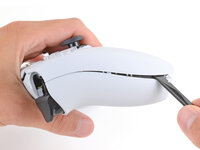
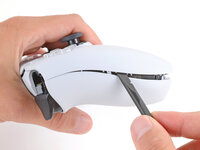
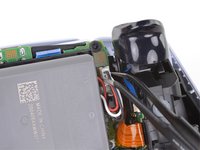
Retirez la coque arrière.
There are four more clips/hooks hidden in the seams along the outer sides of the handles. If you pull open the controller as shown in this step, then you will shear off the two tiny clips which are right next to the R1 and L1 buttons.
Therefore, you should first release those clips by prying the seams open sideways.
I noticed this with the updated design of the controller, not sure whether the hooks are present on the first version.
The hooks are not critical for the integrity of the controller as the two halves are held together by the screws hidden under the buttons. The damage does show that the controller has been taken apart.
Thought I'd clarify: The clips next to the L1 and R1 are on the outer side from the L1 and R1 buttons, I'd suggest zooming in on the picture to see them. They're quite easy to break, but also easy to remove using the plastic spudger along the seam, bending the bottom cover outwards
I am still strugling to find the clips. Could someone point them out in the image with a screen shot or something like that.
I keep getting stuck at this step too with the new DualSense CFI-ZCT1WA revision. The top and bottom shells seem like they are fused together next to L1/R1 but I can't seem to be able to find where these hidden clips are located. My controller is still in warranty so I don't want to break them in case I can't fix my issue.
but also easy to remove using the plastic spudger along the seam, bending the bottom cover outwards
I tried this but it seems that the you need a lot of force and I ended up bending the tip of my spudger. Are you sure it's not the top cover that you need to pry away? The bottom cover has a ridge to make sure it's under the top cover so it's not easy to bend outwards.
@samomio I think there needs to be a step added for these new clips.
Ok, not seeing a lot of motion on this request, so I've uploaded photos of the hooks to imgur.
Here ya go: https://imgur.io/a/7NWmQi5
This guide really needs an update on this. I had a really hard time getting the forward clips to release even after referring to the comments above. Pretty sure I broke them in the end. No big deal but would be great if the iFixit experts could work out a good method for releasing them.
I finally figure it out!!
The hidden clip is very tricky but once you understand how it works it is easy to remove.
Use Sean's picture: https://imgur.io/a/7NWmQi5
What sean is showing, is actually the bottom shell of the seam.
To disassemble
1. Use the flat side of the spudger, pry the bottom seam OUTWARDS near the R1/L1 button hole.
2. (most important) While prying the bottom shell seam outwards, push your thumb on the upper shell and push outward as well (you can do this by applying pressure from the removed R1/L1 button hole towards the seam. And then it will disassemble automatically
And that's it!
updated instruction:
I finally figure it out!!
The hidden clip is very tricky but once you understand how it works it is easy to remove.
Use Sean's picture: https://imgur.io/a/7NWmQi5
What sean is showing, is actually the bottom shell of the seam.
To disassemble
1. Use the flat side of the spudger, pry the bottom seam OUTWARDS near the R1/L1 button hole.
2. (most important) While prying the bottom shell seam outwards, hold your thumb on the upper shell as anchor and then use your other finger to pry the bottom edge of the controller up away from the shell. If you are doing the first step, then don't worry about breaking the clip, just force it open. And then it will disassemble automatically
And that's it!
Yes! Thanks a bunch Penn. That did the trick! Much appreciated
Sean -
I managed to do it just by pulling harder than what I was already doing. And I don't think I broke anything. So, for me at least, the technique described in this guide worked.
The video linked below clearly shows how to open the controllers with the extra clips near the L1/R1 areas.
See a video here by How To X on YouTube... https://youtu.be/djIvRoclr_E?si=dKFpQCZe...
I really struggled with releasing the rest of the back panel (close to the shoulder buttons.) What finally seemed to do the trick for me, was doing both sides at once with upward turning motion of the back panel with the shoulder buttons approximately at the axis. Trying to release just one side and then the other felt impossible without potentially breaking the case.
This was what did it for me
-
-
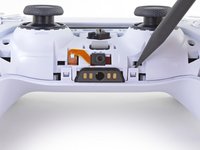
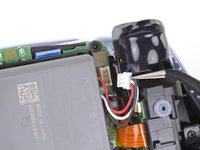
Outil utilisé dans cette étape :Tweezers$4.99
-
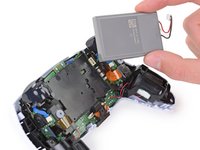
Utilisez une pincette ou vos doigts pour déconnecter la batterie de la carte mère.
Tweezers aren't gonna grip that the way you need.
For those having trouble using tweezers to pull out the connector, you can grab below the lip of the connector and use the controller as a lever to pull it up as seen here Changement batterie manette PS5 DualSense v2
This little trick helped me so much and I believe it should be shown on this guide as well.
-


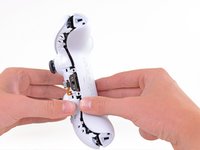


Pour réassembler votre appareil, suivez les étapes ci-dessus en sens inverse.
Amenez vos déchets électronique chez un recycleur certifié.
La réparation DualSense ne s'est pas passée comme prévu? Essayez quelques dépannages basiques ou demandez sur notre Forum pour avoir de l'aide.
Pour réassembler votre appareil, suivez les étapes ci-dessus en sens inverse.
Amenez vos déchets électronique chez un recycleur certifié.
La réparation DualSense ne s'est pas passée comme prévu? Essayez quelques dépannages basiques ou demandez sur notre Forum pour avoir de l'aide.
Annulation : je n'ai pas terminé ce tutoriel.
53 autres ont terminé cette réparation.
Merci à ces traducteurs :
100%


Ces traducteurs nous aident réparer le monde ! Vous voulez contribuer ?
Commencez à traduire ›

11 commentaires
Is there a better battery that can be used rather than the standard battery? This controller dies so fast that I don’t bother disconnecting it ever. I’m pretty sure that’s bad, but It’s frustrating having it die midgame in my second game.
Yes. You can purchase a 2000mah battery replacement. It’s not much of a difference, but lowering your led settings and controller vibration also works wonders for prolonging the battery life.
@NoLife
If you bridge the pins for the red and white battery wires, the controller will power on properly without a battery. This will be easiest with a soldering iron.
I need a new battery for my Dualsense controller, Sony is saying to just buy a new one while I'm not gonna take broken for a answer. So if anyone knows a reliable site where I can get a battery replacement for my dualsense, do recommend
This!!!! I have been searching for a new OEM battery for so long.
Amazon.com has an immense amount of options for OEM spec battery replacement as well as higher-performing options.
Does anyone know how to shop among the immense amount of options for OEM spec battery replacements that are guaranteed safe, contain safe, reliable battery management systems, and are not counterfeit products? I would love to replace my batteries with true OEM, but that seems to be near impossible to track down. Burning down my house with inferior products is just not an option.
Be careful taking the back cover off, I broke the spring on the right trigger on two different controllers doing this. I'm not really sure how to avoid this given that i looked for clips around where the removed bumpers go, and I still couldn't find them. They still work, though a little loose.
Another device that could have easy access to the battery, made more unnecessarily complicated by poor design, probably intentionally.