Introduction
Consultez ce tutoriel pour changer la coque arrière de votre Steam Deck LCD ou bien la retirer en vue d'autres réparations.
Rappelez-vous : Respectez les consignes générales de prévention des décharges électrostatiques (ESD) pendant que vous effectuez votre réparation Steam Deck.
Remarque : les caches des boutons arrière (L4, R4, L5 et R5) font partie de la coque arrière et ne peuvent pas être retirés séparément.
Valve met en garde que le retrait de la coque arrière peut porter atteinte à l'intégrité structurelle de la Steam Deck.
Ce dont vous avez besoin
-
-
Éteignez votre Steam Deck et débranchez tous les câbles connectés.
-
-
Outil utilisé dans cette étape :FixMat$36.95
-
Avec un tournevis cruciforme, dévissez les huit vis qui fixent la coque arrière :
-
Quatre vis à filetage épais de 9,5 mm de long
-
Quatre vis à filetage fin de 5,8 mm de long
there should be a picture of the SD card slot at the start of every Steam Deck teardown. i know the note is there but i generally use the pictures to guide me and forgetting to remove the SD card is a very critical step
I agree, I just broke mine...
What is the the #1 philips used for? Only the #0 is mentioned in the instructions.
I wish they would specify which size to use for which screws.
Mark D -
I found it easiest to use a PH1 for the red screws, and PH0 for the rest (including the internals.)
I used the PH1 bit for this. You can use smaller bits but ideally there should be no play of the bit in the screw head.
I used the PH1 for the 9.5mm screws and PH00 for the 5.8mm screws. The PH0 wanted to strip one of the small ones.
Just a point for knowledge sake, the Four 5.8mm screws on this step are factory installed with a version of locktite. Not sure why but there will be slight resistance when removing the first time.
The screw bit that came with my fix kit just stripped the screws of my steam deck. I guess I should've just sent it in...
Model 1030 SteamDeck uses Torque #6 (CR-V T6) 5.0mm for all 8 screws making it far less likely to damage the screw heads.
Model 1030 is the OLED version, which we have separate guides for! See here: Steam Deck OLED
-
-
-
-
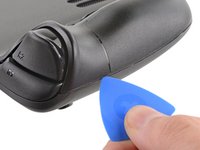
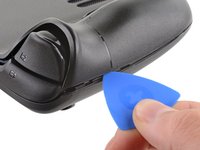
Insérez un médiator dans l'étroit interstice entre la coque arrière et la coque frontale, le long de la poignée droite.
-
Faites levier sur la coque arrière pour la détacher de ses clips.
I found it easiest to start this process at the top of the device near the fan exit.
second that and inserting the pick in the bottom middle and sliding the pick to each side
Sub -
I also found the top near the fan exit to be easier
Thank you for this tip, it definitely was easy starting at the top instead of by the bumper/triggers. After I opened the top I did the bottom and then it was way easier to gently open the sides. be very careful and go slowly to make sure that none of the clips are damaged
Luis B -
this as suggested above:
1. open the top
2. open the bottom
3.gently open the sides
I also started from the middle of the deck and worked my way out since I couldn't get a grip with the pick on the deck's side grips. Since this is a common step for pretty much all guides for opening the deck I think it's also worth noting that you should be careful not to bend the trims/seams where the front and back covers meet with the pick. When I first opened my deck you can definitely see where I nudged the pick in between the covers since I was probably using too much force on the pick itself.
It would be useful to note here that if you want to insert the little blue triangular iFixit opening picks into the right side along the edge, there isn't actually a gap as the directions say, at least not on newer Decks. You'll be making the initial gap using the pick. Brace it on something because you will need to use enough downward force that you're flexing the pick a bit and it'll probably be digging into the skin of a bare hand. With enough force suddenly it will make a click and go in just a bit, and then you're in business.
plastic picks didnt work for me but finger males did the job on prying this open
This step was the hardest by far. First I didn't find an opening at the sides, and it did take a really long time until I finally got it open... Then, when I had the one side opening open it didn't just pop out, I needed to slide all the way to the other side with the pick and open everything. I guess they made it even more drop resistant.
-
-
-
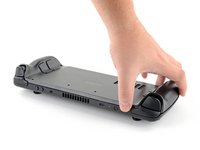
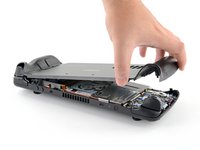
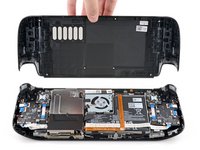
Saisissez la coque arrière au niveau de l'interstice que vous venez d'élargir et soulevez-la pour détacher les longs bords.
-
Enlevez la coque arrière.
If you have an SD card, you will want to take it out. I followed the guide and didn't think about the SD card I had inside. When I went to snap the case back on it clapped shut on the exposed SD card, shearing it in half and leaving the bottom half stuck in the SD card slot. I am still endeavoring to get it out.
you can use the case that comes with the steam deck to support it once the lid is removed
You can get the pry pick inserted easier if you start in the gap for the shoulder buttons. A lego brick separator works well here
-


Pour remonter votre appareil, suivez ces instructions en sens inverse.
Déposez vos déchets électroniques dans un point de recyclage certifié.
La réparation Steam Deck ne s’est pas déroulée comme prévu ? Consultez nos conseils basiques de diagnostic ou notre Forum pour obtenir de l’aide.
Pour remonter votre appareil, suivez ces instructions en sens inverse.
Déposez vos déchets électroniques dans un point de recyclage certifié.
La réparation Steam Deck ne s’est pas déroulée comme prévu ? Consultez nos conseils basiques de diagnostic ou notre Forum pour obtenir de l’aide.
Annulation : je n'ai pas terminé ce tutoriel.
11 autres ont terminé cette réparation.
Merci à ces traducteurs :
100%


Ces traducteurs nous aident réparer le monde ! Vous voulez contribuer ?
Commencez à traduire ›


7 commentaires
Alguien sabe donde puedo comprar los 4 tornillos del medio de la tapa trasera, creo que hacen 1,6x5mm ?
La tapa que venden vienen con los tornillos?
Si pueden ser los originales mejor.
Muchas gracias.
one of my screws stripped what should I do?
Can I use it on OLED steamdeck?
Is this backplate also compatible with the OLED model?
For everyone wondering: it is compatible with the OLED model! I just replaced my backplate with this one and it fits perfectly! :)
Here's a quick guide on how to remove a stripped screw: Comment enlever une vis cassée
Here are Steam Deck back cover screws for sale: Steam Deck Back Plate Screw Set
Best of luck!