Cette traduction a été générée automatiquement et n’a pas encore fait l’objet d’une relecture humaine. Vous parlez cette langue ? Relisez-la.
Introduction
Ce tutoriel vous guide pour retirer le ventilateur d'un Dell Precision 3541. Le ventilateur est une pièce importante de l'ordinateur portable car il empêche l'appareil de surchauffer ; il est donc important de le manipuler avec précaution. Vous n'avez pas besoin de beaucoup d'expérience, juste de quelques outils de base et d'avoir la main sûre. En suivant attentivement les étapes, vous devriez être en mesure de retirer le ventilateur en toute sécurité sans causer de dommages.
Avant de commencer la réparation, éteignez votre ordinateur portable et débranchez le chargeur ainsi que tout périphérique.
Ce dont vous avez besoin
-
-
-
Retournez votre ordinateur portable de façon à ce que le fond soit orienté vers le haut.
-
Utilisez un tournevis cruciforme n°1 pour retirer huit petites vis du cache inférieur.
-
Insérez l'extrémité d'un outil pour ouvrir dans la fente entre le cache inférieur et le châssis de l'appareil.
-
Faites-le glisser sur les bords pour détacher les clips qui le maintiennent en place.
-
Retirez le cache inférieur.
 Demander à FixBot
-
-
-
-
Retirer la batterie par sécurité Sur la batterie, vous trouverez une vis sur le côté droit et deux sur le dessus. Dévissez soigneusement les trois vis et placez-les dans un endroit sûr.
-
Ensuite, repérez une petite nappe noire qui court le long d'une rainure sous la batterie et qui relie un composant séparé de l'appareil au bas de la batterie. Pour ce faire, soulevez la batterie hors de son emplacement ; la nappe devrait alors être visible.
-
Débranchez avec précaution le côté qui est relié à la batterie et retirez la nappe de sa rainure. La batterie sera alors entièrement retirée et vous pourrez commencer à retirer le ventilateur en toute sécurité.
-
-
-
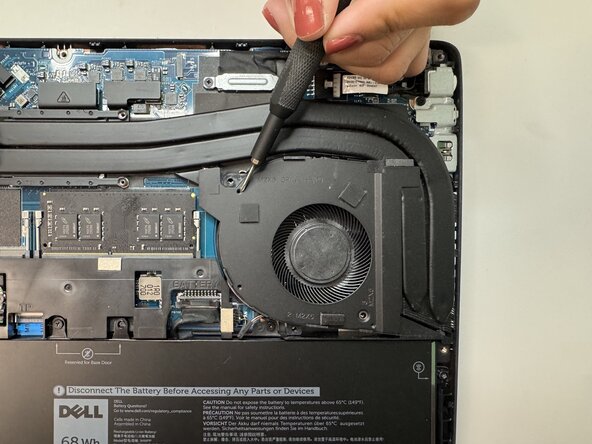
Repérez et dévissez le ventilateur Le ventilateur est situé en haut à droite du bas de l'ordinateur portable.
-
Le ventilateur est situé en haut à droite du bas de l'ordinateur portable.
-
Une fois le ventilateur repéré, vous devriez voir qu'il est maintenu en place par 3 petites vis et 3 vis plus grandes également.
-
Pour dévisser, utilisez un tournevis cruciforme #000 ou de 1,5 mm.
-
Une fois toutes les vis retirées, localisez le câble du ventilateur, qui est un long fil longeant le bas de l'ordinateur et relié au ventilateur.
-
Pour retirer ces vis, vous devez passer à un tournevis cruciforme #00 ou de 2 mm.
-
Ensuite, retirez les 4 vis (2 de chaque côté) du câble pour le détacher, puis retirez délicatement le ventilateur.
-
-




Pour remonter votre appareil, suivez ces instructions en sens inverse. Apportez vos e-déchets à un recycleur certifié R2 ou e-Stewards.

Équipe

Austin Community College, Team 49-4, Cox Spring 2026 Membre de l'équipe Austin Community College, Team 49-4, Cox Spring 2026
AUSTINCC-COX-S26S49G4
3 membres
45 tutoriels rédigés
