Aller au contenu principal

Google Pixel 2 XL Rear Camera Replacement

Ce dont vous avez besoin

  1. Attention : les étapes 1 à 12 sont issues d'un tutoriel marqué comme en cours.

    Google Pixel 2 XL Rear Camera Replacement, Opening Procedure: étape 1, image 1 de 2 Google Pixel 2 XL Rear Camera Replacement, Opening Procedure: étape 1, image 2 de 2
    • If your display glass is cracked, tape over the glass to prevent bodily harm and further breakage. This also makes a smooth surface allowing the suction cup to bond.

    • Apply a suction cup as close to the SIM slot edge of the phone as you can while avoiding the curved edge.

    • The suction cup will not make a good seal on the curved portion of the glass.

  2. Google Pixel 2 XL Rear Camera Replacement: étape 2, image 1 de 3 Google Pixel 2 XL Rear Camera Replacement: étape 2, image 2 de 3 Google Pixel 2 XL Rear Camera Replacement: étape 2, image 3 de 3
    • Pull up on the suction cup with firm, constant pressure and insert an opening pick between the front panel and rear case.

    • This requires a significant amount of force and patience. If you have trouble, rock the suction cup and screen to weaken the adhesive, or apply heat with an iOpener, heat gun, or hair dryer.

  3. Google Pixel 2 XL Rear Camera Replacement: étape 3, image 1 de 2 Google Pixel 2 XL Rear Camera Replacement: étape 3, image 2 de 2
    • In the following steps, extra caution is required in certain areas to avoid damage to the phone:

    • Do not insert the pick more than 0.25 inches (6 mm) into the bottom edge of the phone. If the pick contacts the folded portion of the OLED panel, it can damage the display.

    • Do not cut along the left edge; there are delicate display cables that can be damaged.

    • Only make very shallow cuts in the upper left corner; prying deeply can damage the front-facing camera.

  4. Google Pixel 2 XL Rear Camera Replacement: étape 4, image 1 de 2 Google Pixel 2 XL Rear Camera Replacement: étape 4, image 2 de 2
    • Slide the opening pick down the right side of the phone to separate the display adhesive.

  5. Google Pixel 2 XL Rear Camera Replacement: étape 5, image 1 de 3 Google Pixel 2 XL Rear Camera Replacement: étape 5, image 2 de 3 Google Pixel 2 XL Rear Camera Replacement: étape 5, image 3 de 3
    • In the following steps, use the flat edge of the opening pick, rather than a corner, to cut. This will help prevent inserting the pick too deeply.

    • Slide the opening pick around the lower-right corner and along the bottom edge of the phone.

  6. Google Pixel 2 XL Rear Camera Replacement: étape 6, image 1 de 3 Google Pixel 2 XL Rear Camera Replacement: étape 6, image 2 de 3 Google Pixel 2 XL Rear Camera Replacement: étape 6, image 3 de 3
    • Reinsert the flat edge of the pick at the top-right corner of the phone, and slide it around the corner and the top edge of the phone.

  7. Google Pixel 2 XL Rear Camera Replacement: étape 7, image 1 de 2 Google Pixel 2 XL Rear Camera Replacement: étape 7, image 2 de 2
    • Gently lift the display from the right side of the phone, opening it like a book.

    • If the display doesn't readily lift, do some extra prying to separate the last of the adhesive.

    • Don't try to fully separate the display yet, as fragile ribbon cables still connect it to the phone's motherboard.

    • Carefully lay the display flat on the table next to the rest of the phone, keeping it close to the phone to avoid straining the display and digitizer cables.

  8. Google Pixel 2 XL Rear Camera Replacement: étape 8, image 1 de 2 Google Pixel 2 XL Rear Camera Replacement: étape 8, image 2 de 2
    • Use the corner of an opening tool to pry up and unclip on the lower edge of the digitizer cable connector cover.

    • The clip securing this cover is along the bottom edge.

    • Pry carefully to avoid damaging the cable underneath, or losing the cover itself.

    • Remove the connector cover.

    • Make sure to keep this component so you can reinstall it during reassembly.

  9. Google Pixel 2 XL Rear Camera Replacement: étape 9, image 1 de 2 Google Pixel 2 XL Rear Camera Replacement: étape 9, image 2 de 2
    • Use the point of a spudger to lift the digitizer cable connector up and out of its socket on the motherboard.

    • To re-attach press connectors like this one, carefully align and press down on one side until it clicks into place, then repeat on the other side. Do not press down on the middle. If the connector is misaligned, the pins can bend, causing permanent damage.

    • If any part of your screen doesn't respond to touch after your repair, re-seat this connector, making sure it clicks fully into place and that there's no dust or other obstruction in the socket.

  10. Google Pixel 2 XL Rear Camera Replacement: étape 10, image 1 de 1
    • Use tweezers to remove any tape from the display connector cover.

  11. Google Pixel 2 XL Rear Camera Replacement: étape 11, image 1 de 2 Google Pixel 2 XL Rear Camera Replacement: étape 11, image 2 de 2
    • Insert the point of a spudger into the small hole on the edge of the display connector cover.

    • Use the spudger to pry the cover out of its recess.

    • Remove the connector cover.

    • Make sure to keep this component so you can reinstall it during reassembly.

  12. Google Pixel 2 XL Rear Camera Replacement: étape 12, image 1 de 2 Google Pixel 2 XL Rear Camera Replacement: étape 12, image 2 de 2
  13. Google Pixel 2 XL Rear Camera Replacement, Midframe: étape 13, image 1 de 1
    Outil utilisé dans cette étape :
    Magnetic Project Mat
    $19.95
    J'achète
    • Remove eleven 3.8 mm Phillips screws securing the midframe.

    • Throughout this repair, keep track of each screw and make sure it goes back exactly where it came from.

  14. Google Pixel 2 XL Rear Camera Replacement: étape 14, image 1 de 3 Google Pixel 2 XL Rear Camera Replacement: étape 14, image 2 de 3 Google Pixel 2 XL Rear Camera Replacement: étape 14, image 3 de 3
    • Insert an opening tool into the notch in the midframe near the volume buttons and pry the midframe up and away from the rest of the phone.

    • Remove the midframe.

  15. Google Pixel 2 XL Rear Camera Replacement, Battery Connector: étape 15, image 1 de 2 Google Pixel 2 XL Rear Camera Replacement, Battery Connector: étape 15, image 2 de 2
    • Use the flat end of a spudger to disconnect the battery connector.

  16. Google Pixel 2 XL Rear Camera Replacement, Rear Camera: étape 16, image 1 de 2 Google Pixel 2 XL Rear Camera Replacement, Rear Camera: étape 16, image 2 de 2
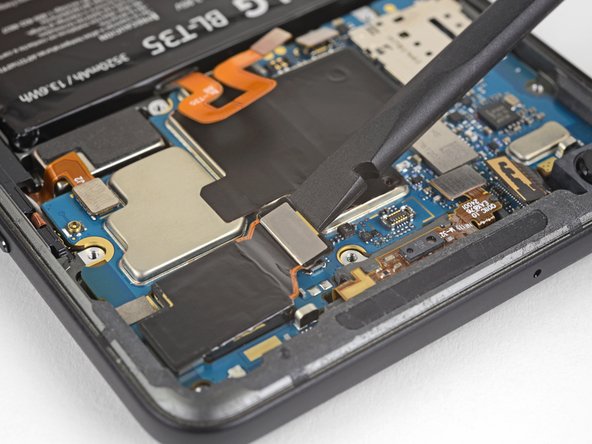
    • Use the flat edge of a spudger to disconnect the rear camera connector.

  17. Google Pixel 2 XL Rear Camera Replacement: étape 17, image 1 de 1
    • Remove the rear camera module.

Conclusion

Compare your new replacement part to the original part—you may need to transfer remaining components or remove adhesive backings from the new part before installing.

To reassemble your device, follow the above steps in reverse order.

Take your e-waste to an R2 or e-Stewards certified recycler.

Repair didn’t go as planned? Check out our Answers community for troubleshooting help.

15 autres ont terminé cette réparation.

Adam O'Camb

Membre depuis le 04/11/15

195 318 Réputation

416 tutoriels rédigés

5 commentaires

Is there a guide for replacing the lens cover? I bought the replacement camera and lens cover, but not sure how to replace the cover. I may not even need a new camera, since my camera is just a little blurry. Any help would be appreciated!

dcmcleod - Réponse

Unfortunately we don’t have a guide for the camera lens cover yet. It’s just adhered to the back of the phone, so you should be able to heat it and carefully pry it up, or push it out from the inside of the phone. Before installing the new lens cover make sure you scrape all the old adhesive off of the phone and clean adhesion surface with isopropyl alcohol. Then you should be able to use the provided adhesive to install the new cover. Try not to touch the clear part of the new cover since fingerprints might be tough to clean off.

Also, I’d probably try just replacing the lens cover first and then testing the camera (without sealing the phone closed) and see if that fixes your issue before you replace the whole camera. Hope that helps, and good luck with the repair!

Adam O'Camb -

I just recently replaced the camera and lens on a pixel 2 xl, after installing and reassembly every time I opened the camera app it just came up dark screen and closed, I cleared cache, memory and even ended up performing a hard reset on the device and nothing helped; also updated the OS and the camera app and nothing helped out. Any suggestions?

Edgar Urena - Réponse

Sorry you're experiencing that. I just did the camera replacement, and didn't need to clear any cache or anything, and it just works

Niels Klassen -

Hi, I've replaced the display on a pixel 2 xl, and all work fine but both camera. I open the camera app and after a black screen the app crasches.

I've bought new back and front camera and replaced but I still have the same issues.

Do you have any suggestions?

Thanks.

Nicola - Réponse

Ajouter un commentaire

Nombre de vues :

Dernières 24 heures : 2

7 derniers jours : 9

30 derniers jours : 44

Total : 11,623