Aller au contenu principal

Lenovo IdeaPad Flex 5-1570 CMOS Battery Replacement

Ce dont vous avez besoin

  1. Lenovo IdeaPad Flex 5-1570 CMOS Battery Replacement, Back Panel: étape 1, image 1 de 2 Lenovo IdeaPad Flex 5-1570 CMOS Battery Replacement, Back Panel: étape 1, image 2 de 2
    • Remove the ten 5 mm Phillips #00 screws that are holding the back panel on.

  2. Lenovo IdeaPad Flex 5-1570 CMOS Battery Replacement: étape 2, image 1 de 3 Lenovo IdeaPad Flex 5-1570 CMOS Battery Replacement: étape 2, image 2 de 3 Lenovo IdeaPad Flex 5-1570 CMOS Battery Replacement: étape 2, image 3 de 3
    • Use a spudger to pry open the back case at the two hinge cutouts.

    • Gently use the plastic opening tool around the edges of the laptop to pry up the clips holding the rest of the back panel.

  3. Lenovo IdeaPad Flex 5-1570 CMOS Battery Replacement: étape 3, image 1 de 2 Lenovo IdeaPad Flex 5-1570 CMOS Battery Replacement: étape 3, image 2 de 2
    • Once all the clips have been disengaged, lift off the back cover.

  4. Lenovo IdeaPad Flex 5-1570 CMOS Battery Replacement, Battery: étape 4, image 1 de 2 Lenovo IdeaPad Flex 5-1570 CMOS Battery Replacement, Battery: étape 4, image 2 de 2
    • Remove the two 5 mm Phillips #00 screws that secure the battery in place.

  5. Lenovo IdeaPad Flex 5-1570 CMOS Battery Replacement: étape 5, image 1 de 3 Lenovo IdeaPad Flex 5-1570 CMOS Battery Replacement: étape 5, image 2 de 3 Lenovo IdeaPad Flex 5-1570 CMOS Battery Replacement: étape 5, image 3 de 3
    • Using your fingers, grasp the entire bundle of wires to pull the battery cable from its connector. This will cut off power to the motherboard.

    • Be sure to apply even pressure across the wires and connector to not damage the battery cable.

    • Remove the battery from the device.

  6. Lenovo IdeaPad Flex 5-1570 CMOS Battery Replacement, Daughterboard: étape 6, image 1 de 2 Lenovo IdeaPad Flex 5-1570 CMOS Battery Replacement, Daughterboard: étape 6, image 2 de 2
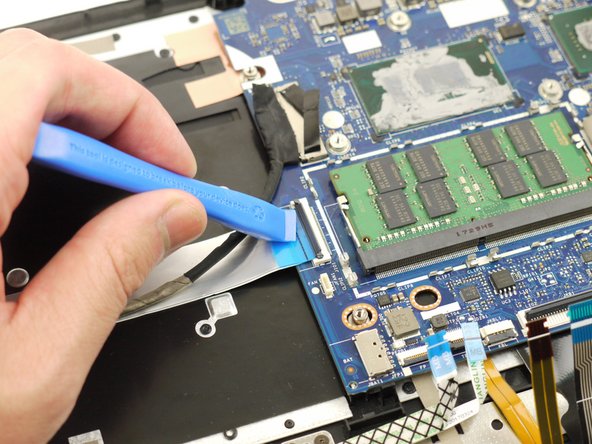
    • Using the plastic opening tool, unlock the connector for the side ports panel and disconnect the cable from the motherboard.

  7. Lenovo IdeaPad Flex 5-1570 CMOS Battery Replacement: étape 7, image 1 de 2 Lenovo IdeaPad Flex 5-1570 CMOS Battery Replacement: étape 7, image 2 de 2
    • Using the plastic opening tool, disconnect the CMOS battery from the daughterboard by pushing it out towards the direction of the CMOS battery.

  8. Lenovo IdeaPad Flex 5-1570 CMOS Battery Replacement: étape 8, image 1 de 1
    • Using the Phillips #00 screwdriver, remove the single 5 mm screw.

  9. Lenovo IdeaPad Flex 5-1570 CMOS Battery Replacement: étape 9, image 1 de 1
    • Using the iFixit Opening tool, remove the silver piece of tape from the device.

  10. Lenovo IdeaPad Flex 5-1570 CMOS Battery Replacement: étape 10, image 1 de 2 Lenovo IdeaPad Flex 5-1570 CMOS Battery Replacement: étape 10, image 2 de 2
    • Lift the daughterboard up and out of the device.

  11. Lenovo IdeaPad Flex 5-1570 CMOS Battery Replacement, CMOS Battery: étape 11, image 1 de 2 Lenovo IdeaPad Flex 5-1570 CMOS Battery Replacement, CMOS Battery: étape 11, image 2 de 2
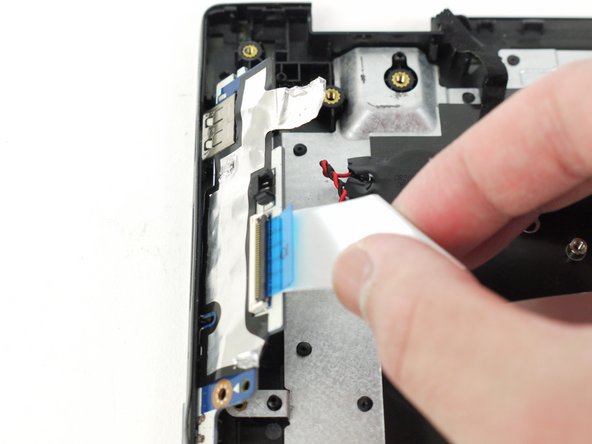
    • Using a plastic opening tool, pry the CMOS battery up and remove it from the device.

Conclusion

To reassemble your device, follow these instructions in reverse order.

Take your e-waste to an R2 or e-Stewards certified recycler.

Justin Ogihara

Membre depuis le 09/18/17

27 182 Réputation

52 tutoriels rédigés

Équipe

EDU Team Membre de l'équipe EDU Team

Staff

7 membres

637 tutoriels rédigés

Un commentaire

What is the point of disconnecting and removing the daughter board when you've already disconnected the CMOS battery? It seems like there are unnecessary extra steps added.

The Ward Family - Réponse

Ajouter un commentaire

Nombre de vues :

Dernières 24 heures : 8

7 derniers jours : 68

30 derniers jours : 263

Total : 7,610