Cette version peut contenir des modifications incorrectes. Passez au dernier aperçu vérifié.
Ce dont vous avez besoin
-
-
Dévissez les dix vis suivantes fixant le boîtier inférieur au boîtier supérieur :
-
Deux vis Pentalobe P5 de 2,3 mm
-
Huit vis Pentalobe P5 de 3,0 mm
-
-
-
Retirez le cache en plastique couvrant la carte de contact de la batterie.
-
-
-
À l'aide d'une pincette, retirez le petit cache en plastique placé en bas à droite de la carte du connecteur de batterie.
when doing this with metal tweezers as instructed in the video, it was difficult to get off and apparently while i was trying to do it, the tweezers went too far under and i believe made contact with the screw underneath? there was a zzz noise, an orange flicker and a little stream of smoke that came out. i freaked out and put everything back together to see if the laptop even still worked, it turned on and everything but died right away (i drained it before doing the repair anyway, so i was surprised it turned on at all).
i finished the battery repair and did several other things while in there. i have charged it all the way as recommended and will use it later on to see how everything is, im hoping that it’s a okay, but could someone explain to me what happened and the possible consequences?
-
-
-
Saisissez l'interposeur avec une pincette.
-
Soulevez l'interposeur et mettez-le de côté.
you must lift it absolutely vertically, or it fouls against the locator pin in the corner- you can easily get the impression that it won’t come over the end of this pin- almost like it’s rivetted in. it isn’t. get a good grip on it with the tweezers in the centre hole & one of the sides, & lift it STRAIGHT up.
I would recommend to use plastic tweezers in order to reduce risk of damage.
Second that. If you have thin heat shrink tubing, form some over the tweezer tips. If the tubing is thin and small enough in diameter you’ll see the serrations of the tweezer tips.
wat is the model this SSD
-
-
-
Avec l'extrémité plate d'une spatule (spudger), faites levier sur le bord droit du connecteur du câble de données de la carte E/S pour le débrancher de sa prise.
-
-
-
Insérez l'extrémité plate de la spatule sous le bord gauche du connecteur du câble de données de la carte E/S.
-
Faites délicatement pivoter la spatule pour débrancher le connecteur de sa prise sur la carte mère.
I also skipped this step as this data cable is not compromising the exchange of battery and less interaction with connectors is less risk of damage..
Diesen Schritt habe ich ebenfalls weggelassen, da das Datenkabel den Austausch der Batterie nicht behindert und weniger Manipulationen an Steckverbindern bedeutet ein geringeres Risiko für Beschädigungen
-
-
-
Avec l'extrémité plate d'une spatule (spudger), soulevez le connecteur du câble du SSD pour le débrancher de sa prise sur la carte mère.
-
Poussez le connecteur de côté pour qu'il ne vous dérange pas.
As per my comment on step 10, this is also not required. When you remove the SSD in step 22, you can just fold it over out of the way.
This step is easy enough that I’d just remove it to be out of the way. I 100% agree with your other comments though. While you’re here, might as well do step 21 and remove the drive, just takes a sec.
I also strongly recommend not to unmount the speaker plugs, just flip them out of the way, same as with the SSD drive. Makes it much less complicated and less risky. It worked perfect for me.
Ich empfehle ebenfalls, die Platinenstecker der Lautsprecher nicht zu lösen sondern die Lautsprecher einfach, so wie das SSD-Laufwerk, einfach aus dem Weg zu legen. Das macht die Sache weniger kompliziert und weniger risikoreich. Es hat bei mir super funktioniert!
-
-
-
Insérez l'extrémité plate de la spatule sous le connecteur de la nappe du haut-parleur droit.
-
Soulevez délicatement le connecteur de la nappe du haut-parleur droit hors de sa prise sur la carte mère.
-
-
-
Dévissez les vis suivantes, fixant le haut-parleur droit au boîtier supérieur :
-
Une vis Torx T5 de 6,8 mm
-
Deux vis Torx T5 de 6,3 mm
If you manage to misplace any screws, particularly one of the speaker retaining screws, look under the speakers - they are magnetic and great at hiding missing screws :)
-
-
-
-
Soulevez le haut-parleur droit et retirez-le du boîtier supérieur.
For those who don’t realize it, the speakers you are removing really are the plastic corner pieces that look like they’re just there to fill the space.
-
-
-
Avec l'extrémité plate d'une spatule (spudger), soulevez le connecteur de la nappe de la prise casque hors de sa prise sur la carte mère.
For an easier, lower-risk repair, skip this step and step 18 - go straight to step 19 and fold the speaker out of the way.
Agreed, this is the way
-
-
-
Insérez l'extrémité plate de la spatule sous le connecteur de la nappe du haut-parleur gauche.
-
Soulevez délicatement le connecteur de la nappe du haut-parleur gauche hors de sa prise sur la carte mère.
It's easier to follow Step 19 & 20 first and then come to Step 18 (this step). Doing so will make it easier to remove that speaker connector easily holding the cable of speaker without having to use a pry tool.
-
-
-
Dévissez les vis suivantes, fixant le haut-parleur gauche au boîtier supérieur :
-
Une vis Torx T5 de 6,8 mm (en haut à droite)
-
Deux vis Torx T5 de 6,3 mm
Be very careful on this step. If you aren’t you can snap the plastic on the corners where the screws go in. Remember to go slowly when spinning the screws back in, it doesn’t take gorilla torque to tighten them, just take it easy!
-
-
-
Avec votre pouce ou un autre doigt, appuyez sur le dispositif en plastique flexible dans le compartiment du SSD pour ouvrir les deux attaches sur le côté avant de l'ordinateur.
-
Tout en continuant à appuyer sur le dispositif flexible, faites pivoter l'ensemble SSD vers le haut pour le faire sortir de son compartiment.
-
-
-
Dévissez trois vis Torx T5 de 2,2 mm de chaque côté de la batterie (six vis au total).
If I were to do this again, I think I would leave unbolting the transverse battery until after ungluing the other four. That way one can tip the laptop on to one of its short sides and so run adhesive remover along the long edge of each battery and let gravity assist penetration without the transverse battery falling out.
I think this is good advice.
I just did one of these that didn’t have these screws installed from the factory. Odd
-
-
-
Pour protéger votre écran, placez une feuille de papier aluminium entre l'écran et le clavier et laissez-la pendant toute la réparation.
You can use a heat gun to remove the adhesive. Remember you can always add more heat so don’t over do it. I put my heat gun on high for less than 10 seconds at a time
Using a heat gun on a lithium-ion battery is not a good idea. You can get away with it if you are careful, but a solvent is much safer. ;)
-
-
-
Maintenant que votre MacBook Pro est paré pour le combat, il est temps de vous préparer.
-
Protégez vos yeux pendant que vous manipulez le dissolvant. (Une paire de lunettes de protection est incluse dans votre kit.)
-
Ne portez pas de lentilles sans mettre de lunettes de protection.
-
Des gants de protection sont également inclus dans le kit. Si vous craignez de vous irriter la peau, enfilez-les.
-
-
-
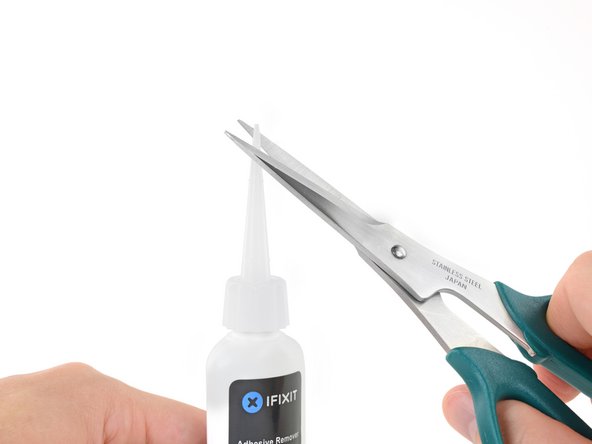
Retirez le bouchon en caoutchouc noir de la bouteille.
-
Utilisez des ciseaux pour couper la pointe scellée de l'applicateur.
-
-
-
Déposez quelques gouttes de dissolvant (environ 1 ml) de façon uniforme sous le contour de la cellule de batterie la plus à gauche.
-
Une petite quantité est plus que suffisante. La bouteille contient plus que deux fois la quantité de dissolvant qu'il vous faut pour enlever toutes les cellules de batterie.
-
Attendez 2 à 3 minutes que le dissolvant liquide pénètre sous la cellule, puis passez à l'étape suivante.
If you use a heat gun be sure to point the heat gun away from the motherboard. After heating for 10 seconds or less use the blunt end of the metal pry tool as you don’t want to puncture the battery. You don’t need much force as after you have enough heat you will hear it unsticking when you pry at it lightly with the BLUNT end of the metal pry tool. Repeat this step on the other side. You don’t need to heat the cells near the motherboard as they are secured with small screws
I replace a lot of glued in Macbook batteries and you really do not need ISO to get them out. These wide blade plastic spudgers are brilliant and cheap. https://www.aliexpress.com/item/32824615... Image here https://imgur.com/a/0Y0Yvyj
May not need it to remove the battery, but it sure helps for removing the leftover residue and black VHB that’s left behind. I found that dousing the VHB and using a metal flat spatula helped.
Some good advice:
Use a iFixit plastic card/credit card (work from the short side of the computer) and stick it under the battery towards the glue strip and hold the card approx 45° (or whatever angle is appropriate) and drip the glue remover on the card so it slides/runs down the card underneath the battery. In this way the glue remover is aimed straight to the glue under the battery to ‘eat its way’ onto the glue. Let it do its job for a minute or two. Then you can dig in the card even more underneath (the angle of the card will obviously be less and less as you get further in; the idea is just to somehow slide the liquid under), add a bit more remover, dig a bit more, etc…
Otherwise the glue remover can get a bit all over the place but this way it is more easily directed towards the glue.
Goo Gone, applied with a pipette, is a non-flammable alternative solution for releasing the adhesive that won’t harm plastics if it seeps past the battery cavities. It does take a bit longer, 30-45 mins, but is much safer. An additional benefit is that the adhesive will be completely separated from the top-case, so cleanup is super quick.
Hi John,
We don’t recommend using Goo Gone because it’s a petroleum distillate based remover, which leaves an oily residue. The residue can prevent replacement adhesive from fully bonding with the surface. Be sure to clean any Goo Gone surface with a detergent-based cleaner.
Isopropyl alcohol and iFixit’s adhesive remover are formulated to evaporate quickly and leave little residue, which allows replacement adhesive to bond properly to the surface.
Note, per my later cleanup, I found that 2-3 drops may not be enough, or else, 2-3 minutes is too long to wait before trying to pry. Once the remover starts to dry, it is not as easy to work the adhesive. I ended up using maybe 1/10 of the bottle overall and most of that was liberally dousing the residue a few times to fully clean the case.
-
-
-
Insérez l'extrémité plate d'une spatule (spudger) ou une carte en plastique sous la cellule de batterie la plus à gauche.
-
Parcourez avec votre instrument le long du bord inférieur de la cellule et commencez à la décoller.
This is the most difficult step. The tip of my spudger got bended and the aluminum case damaged it.
I also broke a spudger trying to do this. Eventually I figured out it is easier to go in diagonally from the corner, just to one side of the screw hole, and lever until you hear the adhesive pad tear and give way.
we use a hair dryer and gently blow hot air in between the battery for a good minute before trying to lift it with a spunger. It worked wonderfully! When lifting, just give it constant force upward and you'll hear the battery slowly breaking away from the macbook, and we don't even see glue residues on our macbook at all. Just be patient. :)
Just a note to say that the above comments were written before the liquid adhesive remover was added to the guide—you should definitely NOT be breaking any spudgers using the current procedure, which requires very little force. I recommend using plastic cards rather than spudgers—it's pretty easy to slide them under each battery cell and separate the adhesive once the solvent has done its work.
This is much easier to do using a plastic card. Just slide the card under the side of the battery and rock it back and forth. The battery will separate pretty quickly with minimal residue.
by a plastic card, do you mean a credit card type thing? thanks in advance.
Exactly—one of these or an old credit card should work fine.
I second this, I also used an old credit card and it totally worked! I did not use any heat or liquid
Some good advice:
Use a iFixit plastic card/credit card (work from the short side of the computer) and stick it under the battery towards the glue strip and hold the card approx 45° (or whatever angle is appropriate) and drip the glue remover on the card so it slides/runs down the card underneath the battery. In this way the glue remover is aimed straight to the glue under the battery to ‘eat its way’ onto the glue. Let it do its job for a minute or two. Then you can dig in the card even more underneath (the angle of the card will obviously be less and less as you get further in; the idea is just to somehow slide the liquid under), add a bit more remover, dig a bit more, etc…
Otherwise the glue remover can get a bit all over the place but this way it is more easily directed towards the glue.
My MBP identifies as late 2012/early 2013, and don’t know where you come up with a separate identity.
Looking at both disassembly procedures, neither shows the aftermarket (probably NewerTech or OWC) battery I found in this MBP.
That’s disconcerting; finds one asking myself - “Am I using the right procedure??”
if you know this might be the case, please add note to this step if the user finds only 4 physical cased batteries.
Tnx!
Use the plastic credit-card shaped card.
-
-
-
Répétez les étapes précédentes pour décoller la cellule adjacente :
-
Déposez quelques gouttes de dissolvant liquide sous la cellule de batterie.
-
Attendez 2 à 3 minutes que le dissolvant liquide pénètre sous la cellule et ramollisse la colle.
-
Introduisez délicatement une spatule ou une carte en plastique en veillant à ne pas endommager la batterie. Décollez la cellule de batterie de l'adhésif la fixant au MacBook Pro.
-
-
-
Changez de côté et répétez la procédure des étapes précédentes pour les deux cellules de batterie à droite du MacBook Pro.
-
N'oubliez pas de mettre une petite quantité de dissolvant liquide sous chaque cellule de batterie et d'attendre 2 à 3 minutes qu'il pénètre sous la batterie avant de soulever la cellule.
Puncturing the battery’s protective covering can lead to release of caustic fumes or fire.
-
-
-
Soulevez tout l'ensemble de la batterie et retirez-la du boîtier supérieur.
-
Avec un peu de chance, vous arriverez à enlever toutes les bandes d'adhésif avec vos doigts.
-
Sinon, imprégnez-les d'un peu de dissolvant, attendez 2 à 3 minutes et raclez-les à l'aide d'un outil d'ouverture en plastique ou un des autres outils de votre kit. Il s'agit d'un travail un peu pénible qui nécessite de la patience.
-
Épongez tous les résidus de dissolvant et laissez votre MacBook Pro sécher à l'air pendant quelques minutes.
-
Calibrez votre nouvelle batterie avant de l'utiliser : Chargez-la à 100%, puis laissez-la charger encore au moins deux heures. Utilisez votre appareil normalement jusqu'à ce qu'il s'éteint à cause d'une batterie vide. N'oubliez pas de sauvegarder votre travail à temps. Attendez au moins 5 heures, puis rechargez la batterie à 100% sans interruption.
During battery replacement take care to position the two left and right battery packs inwards and upwards towards the macbook center such, that there is sufficient space for reinstallation of the two speakers!
I second Fred’s suggestion. I had to “smoosh” the right speaker in since my battery replacement was a little bit too far over. It was fine, but the “heads up” note is warranted.
If you're replacing the top case that includes a new battery, can't you skip removal of the battery?
Yes!! If uppercase Assembly(Includes Trackpad, keyboard, Palmrest & BATTERY) is being replaced, there is no need to remove battery from old uppercase assembly.
When you are at this step and before you put the new battery in, take the time to clean your computer really well. You will be surprised how much dust/dirt and even pet hairs have gotten into your computer. After I removed the battery, I use a little more of the acetone to clean the bays up and after it dried, I used a tiny bit of Isopropyl Alcohol to make sure there was a good clean area for the new bonding. Make sure you clean the fans. Don’t use a toothbrush or anything like that. If your have a Lowes or Home Depot, you can buy a shop vac attachment kit for about $20, it’s well worth it. Don’t use that air in a can crap, it will put moisture on circuits. Take your time, it’s not a hard task to do everything, just use a little patience.
Hi all,
After installing the new batteries, my mac is not powering up… Do i need to charge the battery first and then check again? Have anyone faced similar issue before?
My 1st battery from ifixit came out to be defective and it caused fire at the centre of the long battery. I have got a replacement for the defective piece which i have installed now. However, now i am worried that connecting to power could lead to any potential fire / harm to my mac???
Already i have spent lot of time in this and it would be very upsetting if this battery spoils my mac!!!
Any suggestion people???? thanks in advance!
BR,
Vijay
Hi Vijay!
Uh-oh, we’re sorry to hear about the battery trouble!
Our batteries come with a 1-year warranty, so this would definitely be something we can assist with. Please feel welcome to reach out via help.ifixit.com and provide our Support team with your order number so that they can look into these battery troubles with you.
Thanks!
Hi All,
Just replaced battery, and am typing this on the live MacBook. The unit fired up as soon as I plugged in the power adapter. Nice. The battery percentage indicator said the battery had approximately 85% power charge. Is this normal? If not, what steps should I take to ensure that this battery is properly calibrated?
Cheers,
James
Hi James,
Follow these steps to calibrate your new battery: https://help.ifixit.com/article/265-batt...
ご指摘ありがとうございました!訂正済みです。
Can someone tell me which model is written in the battery? I saw that is written the model a1437. Is this model compatible with the a1425? Thanks
Hi Mizuno,
The battery model is A1437, and it is compatible with the MacBook Pro model A1425.
These instructions are brilliantly concise! Thank you. And thank you everyone for your comments. As a final comment from me, it is much easier to assess the final position of the batteries if you place them gently in position, reinstall the speakers, adjust the battery position if needed and then press them firmly into place.
I did everything in the kit, but my computer won’t acknowledge the battery and is only running on my power adapter. Once I take off the power adapter it shuts down. I also tried resetting the snc, but unsure if it did anything. I reopened up the back to see if I missed anything. The batteries are warm, which means they were running. I’m very confused, anybody else run into similar issues?
My OEM adhesive was particularly persnickety and did not want to come up. I found a pick to be more useful than the flat spudger or the card. I also used several applications of remover and found that working with it wet was much more effective than letting it dry to dissolve the glue. A final few wipes with more remover and the cloth wipe that came with the kit did a good cleanup job.
So I just replaced the battery and reassembled everything and when plugging it into the power supply, the LED is not lighting up and computer is not turning on. Not sure what I did incorrectly as I basically followed the steps in reverse for reassembly after installing the battery. Any advice would be appreciated.
-
-
Cette étape n’est pas traduite. Aidez à la traduire
-
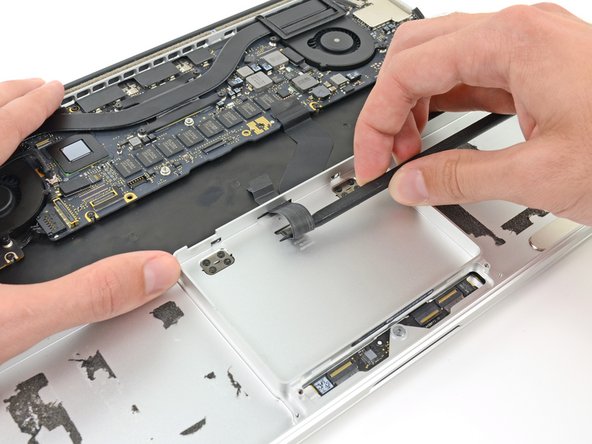
Use the flat end of a spudger to flip up the retaining flap on the trackpad ribbon cable ZIF socket.
It looks like you could skip the entire battery removal procedure if you simply left the trackpad cable in place, disconnected it at the trackpad end, and used the old cable on the new trackpad?
You could try it, but there’s very little slack in that cable. I think you’ll have a hard time disconnecting the trackpad without straining or tearing the cable.
-
-
Cette étape n’est pas traduite. Aidez à la traduire
-
Grasp the plastic pull tab and pull the trackpad ribbon cable out of its socket.
-
-
Cette étape n’est pas traduite. Aidez à la traduire
-
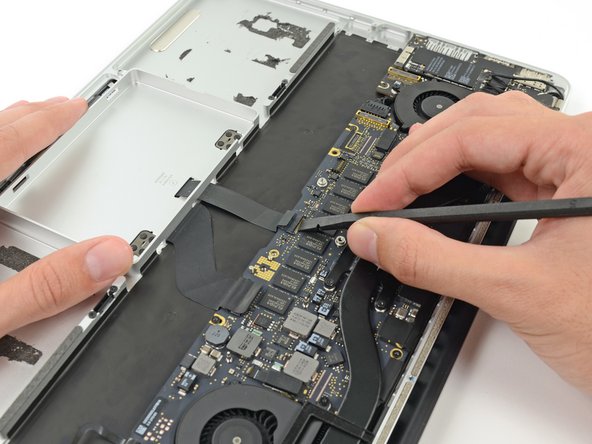
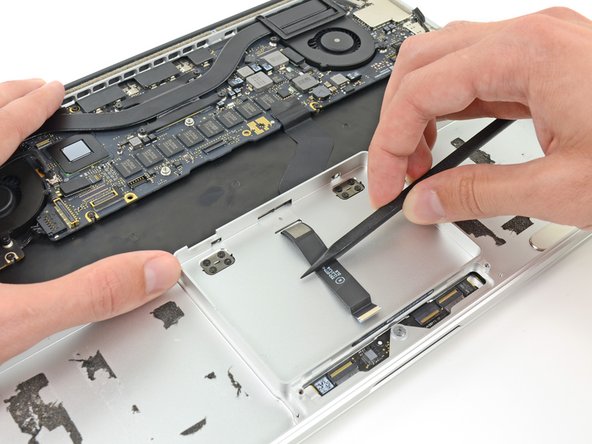
Wedge the spudger between the trackpad ribbon cable and the upper case.
-
Run the spudger along the bottom to release the trackpad ribbon cable from the adhesive securing it to the upper case.
-
-
Cette étape n’est pas traduite. Aidez à la traduire
-
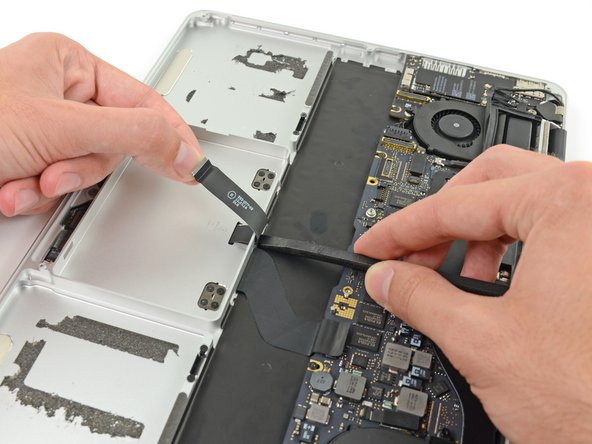
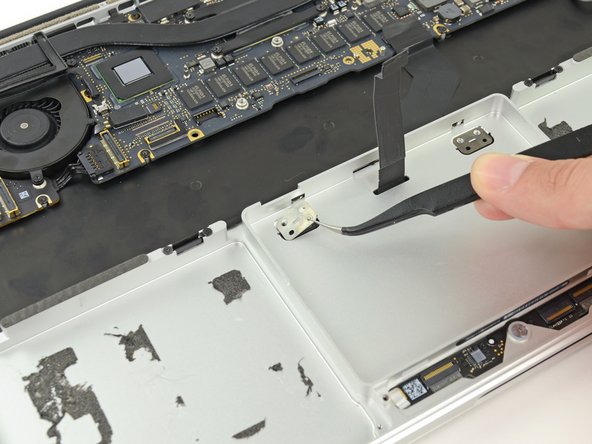
Insert the tip of a spudger in between the trackpad ribbon cable and the upper case inside the SSD assembly cavity to remove the last of the adhesive.
-
-
Cette étape n’est pas traduite. Aidez à la traduire
-
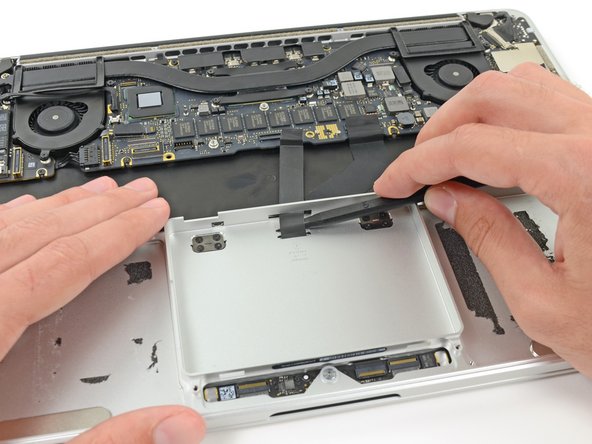
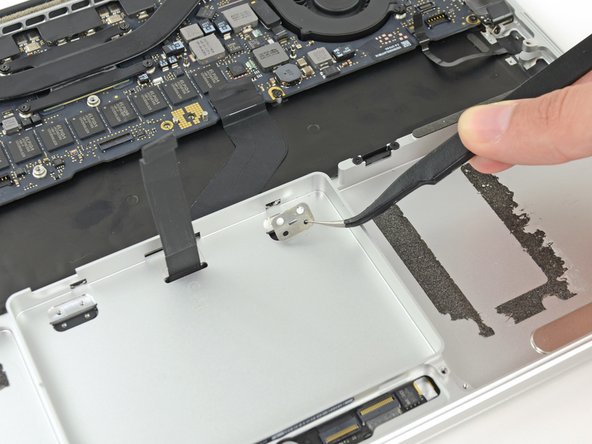
Using the tip of the spudger carefully thread the trackpad ribbon cable out of the notch near the top of the SSD assembly cavity.
-
-
Cette étape n’est pas traduite. Aidez à la traduire
-
Remove the following screws securing the trackpad brackets to the trackpad and upper case:
-
Four 1.9 mm Phillips #000 screws
-
Four 1.4 mm Phillips #000 screws
-
-
Cette étape n’est pas traduite. Aidez à la traduire
-
Use tweezers to remove the two trackpad mounting brackets from the upper case.
-
-
Cette étape n’est pas traduite. Aidez à la traduire
-
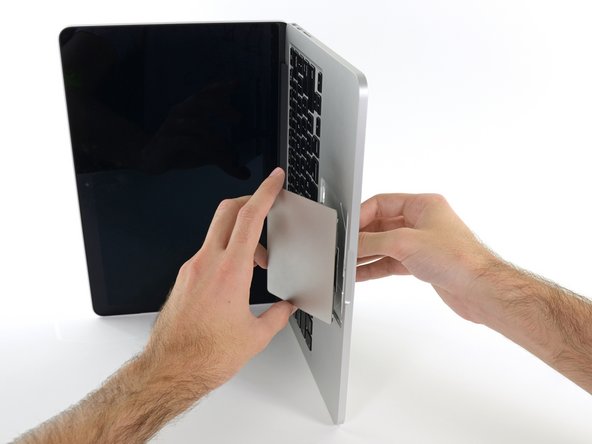
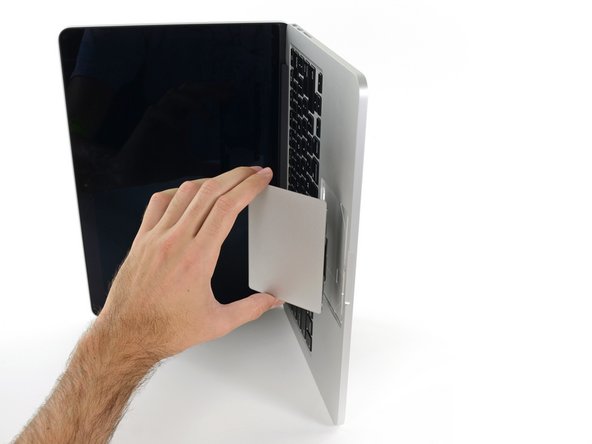
Guide the trackpad ribbon cable through the slot cut in the upper case. This will push the trackpad up out of its recess in the top of the upper case. Guide the trackpad out with your other hand, so it doesn't fall.
-
-
Cette étape n’est pas traduite. Aidez à la traduire
-
Gently pull the trackpad from the upper case, being careful not to snag the ribbon cable.
-


Annulation : je n'ai pas terminé ce tutoriel.
29 autres ont terminé cette réparation.


8 commentaires
This can be done without removing the battery. The touchpad ribbon cable can be disconnected on the logic board, then snaked (gently!!) back out its channel with the battery in place.
It won't thread back through when replacing the touchpad though - it's not stiff enough. Instead, cut a strip of material from a manila folder and thread that through the channel under the battery. Then use masking tape to attach the touchpad cable to the manila strip and pull the strip out towards the logic board. The touchpad ribbon threads through the channel and the masking tape can be removed once it's in place.
Only the battery connector, SSD cable, and SSD carrier need removed.
Steps 24-34 are UNNECESSARY for this repair! Removing the adhesive portion of the battery is not required to remove the trackpad. Just lift up the top part of the battery that is screwed in and unplug the trackpad cable.
I agree with sinwillet’s comments above; I repacked the battery and trackpad and did not remove the speakers entirely or the I/O board data cable
Note that the replacement trackpad may not have the ribbon cable or it may be the wrong length. Ok because you can reuse the ribbon cable on the original trackpad, as Philippe suggested above.
How do you adjust the trackpad sensitivity? EG>.. the silver screw at the bottom?
You just need the proper driver bit (I believe it is a Torx 5/T5 ?) first, follow steps 1-4 to remove the bottom cover, then the set screw is at the lower portion of the unibody frame smack dab in the bottom middle of the trackpad edge. To “tighten” the click (if click is not occurring or too “loose”), turn the set screw 1/8th turn in a clockwise direction. Then test the click t see if it improves, if not go 1/8th turn at a time. If you turn it too much or turn counter-clockwise too much it will release from its mount hole and they are REALLY annoying to try to re-thread.
If don’t have one of those neat project mats, then you can use small pieces of flattened blu-tack to hold the screws. If you arrange them in the shape of your mac book cover, and put the screws down methodically, you can get a one-to-one mapping of the screws to the correct screw holes.
Toby Thurston - Réponse
Or you can use an ice tray where you put the screws and the parts in separate bays in the same order as they come in the instructions.
timofej.se -
This is great! I used a small magnetic white board, and wrote on it to identify the parts as I went. This whole process, from the fast shipment to the great instructions to the complete, high quality, tool kit has been great. I’m typing this comment on my resurrected laptop. Thank you! Sue
Susan Greer - Réponse
It would be a good idea if people recorded in the comments which screws go where so that, if someone lost their screw positions, they could recover them from the comments.
Raymond Shpeley - Réponse