Aller au contenu principal

Motorola Edge Vibrator Replacement

Ce dont vous avez besoin

  1. Motorola Edge Vibrator Replacement, Heat the bottom edge: étape 1, image 1 de 1
    • Completely power off your phone before you begin.

    • Heat an iOpener, then apply it along the bottom edge of the back cover for two minutes.

    • A hair dryer, heat gun, or hot plate may also be used, but be careful not to overheat the phone because the display and internal battery are both susceptible to heat damage.

  2. Motorola Edge Vibrator Replacement, Separate the bottom adhesive: étape 2, image 1 de 3 Motorola Edge Vibrator Replacement, Separate the bottom adhesive: étape 2, image 2 de 3 Motorola Edge Vibrator Replacement, Separate the bottom adhesive: étape 2, image 3 de 3
    • Apply a suction cup to the back of the phone, as close to the center of the bottom edge as possible.

    • Pull up on the suction cup with strong, steady force to create a gap between the back cover and the frame.

    • Depending on the age of your phone, this may be difficult. If you're having trouble, apply more heat to the edge and try again.

    • Insert an opening pick into the gap.

  3. Motorola Edge Vibrator Replacement, Slice the bottom adhesive: étape 3, image 1 de 3 Motorola Edge Vibrator Replacement, Slice the bottom adhesive: étape 3, image 2 de 3 Motorola Edge Vibrator Replacement, Slice the bottom adhesive: étape 3, image 3 de 3
    • Slide the pick back and forth along the bottom edge to slice through the adhesive.

    • Leave the pick in to prevent the adhesive from resealing.

  4. Motorola Edge Vibrator Replacement, Heat the right edge: étape 4, image 1 de 1
    • Apply a heated iOpener to the back cover's right edge for two minutes.

  5. Motorola Edge Vibrator Replacement, Separate the corner adhesive: étape 5, image 1 de 3 Motorola Edge Vibrator Replacement, Separate the corner adhesive: étape 5, image 2 de 3 Motorola Edge Vibrator Replacement, Separate the corner adhesive: étape 5, image 3 de 3
    • Rotate the opening pick around the bottom-right corner of the phone.

  6. Motorola Edge Vibrator Replacement, Separate the right adhesive: étape 6, image 1 de 3 Motorola Edge Vibrator Replacement, Separate the right adhesive: étape 6, image 2 de 3 Motorola Edge Vibrator Replacement, Separate the right adhesive: étape 6, image 3 de 3
    • Insert a new opening pick into the gap you just created.

    • Slide the pick along the right edge of the phone to separate the adhesive.

    • Repeat the heating, slicing, and leaving opening picks for the remaining edges of the device.

  7. Motorola Edge Vibrator Replacement, Remove the back cover: étape 7, image 1 de 3 Motorola Edge Vibrator Replacement, Remove the back cover: étape 7, image 2 de 3 Motorola Edge Vibrator Replacement, Remove the back cover: étape 7, image 3 de 3
    • Remove the back cover, taking care not to damage the components inside the phone.

  8. Motorola Edge Vibrator Replacement, Remove the motherboard's screws: étape 8, image 1 de 1
    • Use a T5 Torx screwdriver to remove the twelve 3.4 mm-long screws securing the motherboard cover.

  9. Motorola Edge Vibrator Replacement, Remove the motherboard cover: étape 9, image 1 de 3 Motorola Edge Vibrator Replacement, Remove the motherboard cover: étape 9, image 2 de 3 Motorola Edge Vibrator Replacement, Remove the motherboard cover: étape 9, image 3 de 3
    Outil utilisé dans cette étape :
    Tweezers
    $4.99
    J'achète
    • Use a pair of blunt tweezers or your fingers to lift up and remove the motherboard cover.

    • The motherboard cover also contains the phone's flash.

  10. Motorola Edge Vibrator Replacement, Disconnect the battery cable's press connector: étape 10, image 1 de 2 Motorola Edge Vibrator Replacement, Disconnect the battery cable's press connector: étape 10, image 2 de 2
    • Use a spudger to pry up and disconnect the battery cable's press connector from the motherboard.

    • To re-attach press connectors like this one, carefully align and press down on one side until it clicks into place, then repeat on the other side. Don't press down on the middle. If the connector is misaligned, the pins can bend, causing permanent damage.

  11. Motorola Edge Vibrator Replacement, Remove the daughterboard's t5 screws: étape 11, image 1 de 2 Motorola Edge Vibrator Replacement, Remove the daughterboard's t5 screws: étape 11, image 2 de 2
    • Use a T5 Torx screwdriver to remove the nine 3.4 mm screws securing the daughterboard.

  12. Motorola Edge Vibrator Replacement, Remove the daughterboard cover: étape 12, image 1 de 3 Motorola Edge Vibrator Replacement, Remove the daughterboard cover: étape 12, image 2 de 3 Motorola Edge Vibrator Replacement, Remove the daughterboard cover: étape 12, image 3 de 3
    • Use a spudger to pry up the plastic daughterboard cover and disconnect it from the rest of the phone.

  13. Motorola Edge Vibrator Replacement, Disconnect the interconnect cable from the daughterboard: étape 13, image 1 de 2 Motorola Edge Vibrator Replacement, Disconnect the interconnect cable from the daughterboard: étape 13, image 2 de 2
    • Use a spudger to pry up and disconnect the interconnect cable's press connector from the daughterboard.

  14. Motorola Edge Vibrator Replacement, Disconnect the fingerprint sensor cable's press connector: étape 14, image 1 de 2 Motorola Edge Vibrator Replacement, Disconnect the fingerprint sensor cable's press connector: étape 14, image 2 de 2
    • Use a spudger to pry up the fingerprint sensor cable's press connector and disconnect it from the daughterboard.

  15. Motorola Edge Vibrator Replacement, Remove the daughterboard screw: étape 15, image 1 de 2 Motorola Edge Vibrator Replacement, Remove the daughterboard screw: étape 15, image 2 de 2
    • Use a T5 Torx screwdriver to remove the single 3.2 mm screw securing the daughterboard.

  16. Motorola Edge Vibrator Replacement, Disconnect the black coaxial cable: étape 16, image 1 de 2 Motorola Edge Vibrator Replacement, Disconnect the black coaxial cable: étape 16, image 2 de 2
    • Use a spudger to pry up the black coaxial cable and detach it from the daughterboard.

  17. Motorola Edge Vibrator Replacement, Disconnect the white coaxial cable: étape 17, image 1 de 2 Motorola Edge Vibrator Replacement, Disconnect the white coaxial cable: étape 17, image 2 de 2
    • Use a spudger to pry up the white coaxial cable and disconnect it from the daughterboard.

  18. Motorola Edge Vibrator Replacement, Remove the daughterboard: étape 18, image 1 de 3 Motorola Edge Vibrator Replacement, Remove the daughterboard: étape 18, image 2 de 3 Motorola Edge Vibrator Replacement, Remove the daughterboard: étape 18, image 3 de 3
    • Use a spudger to pry up and separate the daughterboard from the rest of the phone.

    • When removing and replacing the daughterboard, be careful not to damage any of the cables that attach to it.

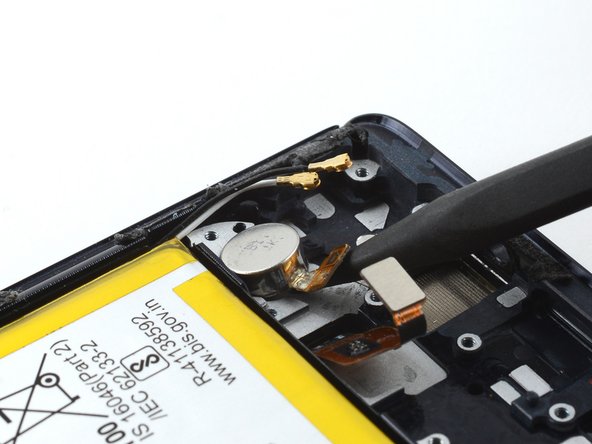
  19. Motorola Edge Vibrator Replacement, Weaken the vibrator's adhesive: étape 19, image 1 de 1
    • Use a drop or two of isopropyl alcohol to weaken the adhesive attaching the vibrator to the phone's frame.

    • Wait thirty seconds for the isopropyl alcohol to weaken the adhesive under the vibrator.

  20. Motorola Edge Vibrator Replacement, Detach the vibrator's ribbon cable: étape 20, image 1 de 3 Motorola Edge Vibrator Replacement, Detach the vibrator's ribbon cable: étape 20, image 2 de 3 Motorola Edge Vibrator Replacement, Detach the vibrator's ribbon cable: étape 20, image 3 de 3
    • Use an opening pick to carefully separate the vibrator's ribbon cable from the frame of the phone.

  21. Motorola Edge Vibrator Replacement, Remove the vibrator: étape 21, image 1 de 3 Motorola Edge Vibrator Replacement, Remove the vibrator: étape 21, image 2 de 3 Motorola Edge Vibrator Replacement, Remove the vibrator: étape 21, image 3 de 3
    • Use a spudger to carefully separate and remove the vibrator.

    • If there's any alcohol solution remaining in the phone, carefully wipe it off with a lint-free cloth or allow it to air dry before installing the vibrator.

    • During reassembly, follow this guide if you are using a pre-cut adhesive card to reinstall the vibrator.

Conclusion

To reassemble your device, follow these instructions in reverse order.

For optimal performance, calibrate your newly installed battery after completing this guide.

Take your e-waste to an R2 or e-Stewards certified recycler.

Repair didn’t go as planned? Try some basic troubleshooting, or ask our Answers Community for help.

Compare your new replacement part to the original part—you may need to transfer remaining components or remove adhesive backings from the new part before you install it.

Jennifer Berg

Membre depuis le 03/21/22

2 655 Réputation

24 tutoriels rédigés

0 commentaires

Ajouter un commentaire

Nombre de vues :

Dernières 24 heures : 2

7 derniers jours : 4

30 derniers jours : 4

Total : 122