Aller au contenu principal

OnePlus Nord 2 5G Screen Replacement

Ce dont vous avez besoin

  1. OnePlus Nord 2 5G Screen Replacement, Eject the SIM card tray: étape 1, image 1 de 3 OnePlus Nord 2 5G Screen Replacement, Eject the SIM card tray: étape 1, image 2 de 3 OnePlus Nord 2 5G Screen Replacement, Eject the SIM card tray: étape 1, image 3 de 3
    • Insert a SIM card eject tool into the small hole in the SIM card tray, located on the upper left edge edge of the phone.

    • Press firmly to eject the tray.

  2. OnePlus Nord 2 5G Screen Replacement, Remove the SIM card tray: étape 2, image 1 de 2 OnePlus Nord 2 5G Screen Replacement, Remove the SIM card tray: étape 2, image 2 de 2
    • Remove the SIM card tray from the phone.

    • When reinserting the SIM card, make sure it's in the proper orientation inside the tray.

    • A thin rubber gasket around the SIM tray provides water and dust protection. If this gasket is damaged or missing, replace the gasket or the entire SIM tray to protect your phone's internal components.

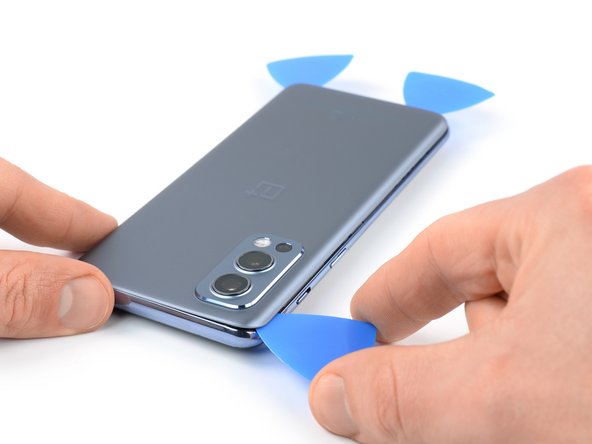
  3. OnePlus Nord 2 5G Screen Replacement, Loosen the rear glass: étape 3, image 1 de 1
    • Prepare an iOpener and apply it to the rear glass for at least three minutes to loosen the adhesive underneath.

    • A hair dryer, heat gun, or hot plate may also be used, but be careful not to overheat the phone—the display and internal battery are both susceptible to heat damage.

  4. OnePlus Nord 2 5G Screen Replacement, Insert an iFlex: étape 4, image 1 de 3 OnePlus Nord 2 5G Screen Replacement, Insert an iFlex: étape 4, image 2 de 3 OnePlus Nord 2 5G Screen Replacement, Insert an iFlex: étape 4, image 3 de 3
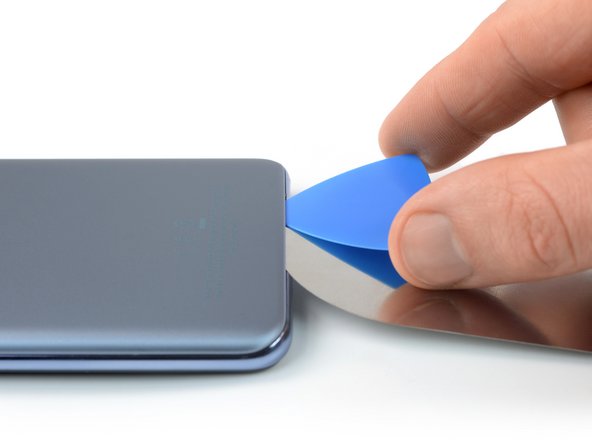
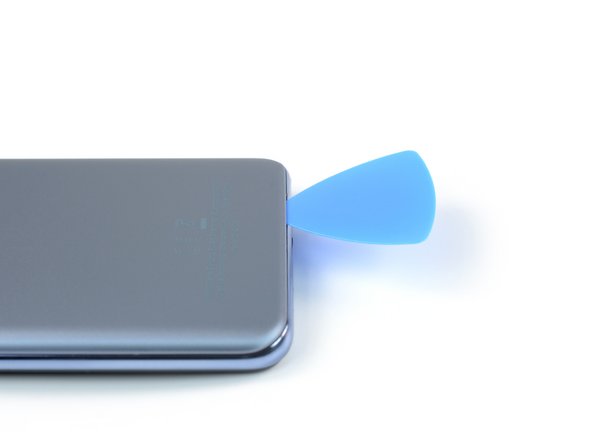
    • Due to its surface, no suction tool will hold onto the phone's rear glass. A thin slicing tool is required to create a gap between the rear glass and the midframe.

    • Insert an iFlex into the seam between the rear glass and the midframe at the bottom edge of the phone to create a gap. This may require some force.

    • Leave the iFlex in place to prevent the adhesive from resealing.

  5. OnePlus Nord 2 5G Screen Replacement, Insert an opening pick: étape 5, image 1 de 3 OnePlus Nord 2 5G Screen Replacement, Insert an opening pick: étape 5, image 2 de 3 OnePlus Nord 2 5G Screen Replacement, Insert an opening pick: étape 5, image 3 de 3
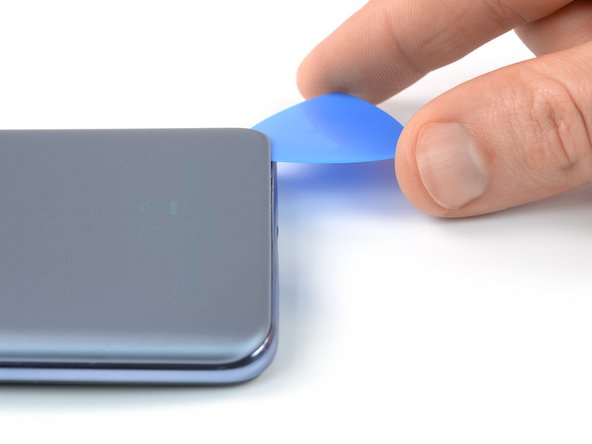
    • Insert an opening pick into the gap you created with the iFlex.

    • Remove the iFlex.

  6. OnePlus Nord 2 5G Screen Replacement, Slice the bottom edge adhesive: étape 6, image 1 de 2 OnePlus Nord 2 5G Screen Replacement, Slice the bottom edge adhesive: étape 6, image 2 de 2
    • Slide the opening pick to the bottom right corner to slice the adhesive.

    • Leave the opening pick in place to prevent the adhesive from resealing.

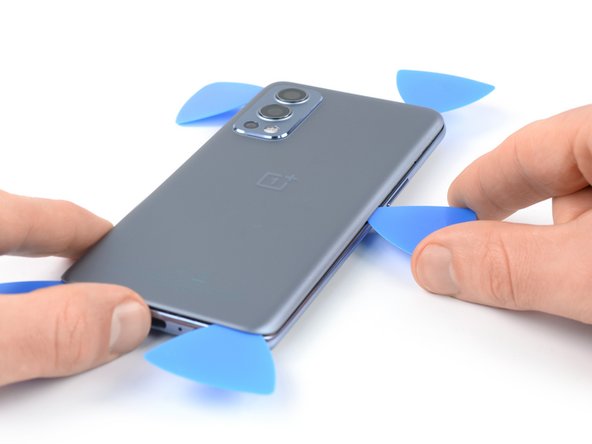
  7. OnePlus Nord 2 5G Screen Replacement: étape 7, image 1 de 2 OnePlus Nord 2 5G Screen Replacement: étape 7, image 2 de 2
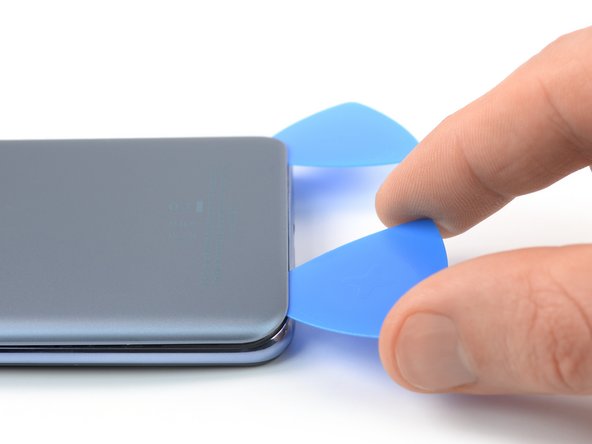
    • Insert a second opening pick at the bottom right corner of your phone.

    • Slide the opening pick to the bottom left corner to slice the adhesive.

    • Leave the opening picks in place to prevent the adhesive from resealing.

  8. OnePlus Nord 2 5G Screen Replacement, Slice the left edge adhesive: étape 8, image 1 de 3 OnePlus Nord 2 5G Screen Replacement, Slice the left edge adhesive: étape 8, image 2 de 3 OnePlus Nord 2 5G Screen Replacement, Slice the left edge adhesive: étape 8, image 3 de 3
    • If the adhesive becomes hard to cut, it has most likely cooled down. Use your iOpener to reheat it.

    • Insert a third opening pick at the bottom left corner of your phone.

    • Slide the opening pick along the left edge of your phone to slice the adhesive.

    • Leave the opening pick in the top left corner to prevent the adhesive from resealing.

  9. OnePlus Nord 2 5G Screen Replacement, Slice the top edge adhesive: étape 9, image 1 de 2 OnePlus Nord 2 5G Screen Replacement, Slice the top edge adhesive: étape 9, image 2 de 2
    • Insert a fourth opening pick underneath the top left corner of the rear glass.

    • Slide the opening pick along the top edge to slice the adhesive.

    • Leave the opening pick in the top right corner to prevent the adhesive from resealing.

  10. OnePlus Nord 2 5G Screen Replacement, Slice the right edge adhesive: étape 10, image 1 de 3 OnePlus Nord 2 5G Screen Replacement, Slice the right edge adhesive: étape 10, image 2 de 3 OnePlus Nord 2 5G Screen Replacement, Slice the right edge adhesive: étape 10, image 3 de 3
    • Insert a fifth opening pick underneath the top right corner.

    • Slide the opening pick along the right edge of the back cover to slice the remaining adhesive.

  11. OnePlus Nord 2 5G Screen Replacement, Remove the back cover: étape 11, image 1 de 2 OnePlus Nord 2 5G Screen Replacement, Remove the back cover: étape 11, image 2 de 2
    • Remove the back cover.

    • Secure the new back cover with pre-cut adhesive or double-sided adhesive tape. After installing the back cover, apply strong, steady pressure to your phone for several minutes to help the adhesive form a good bond—a stack of heavy books works well.

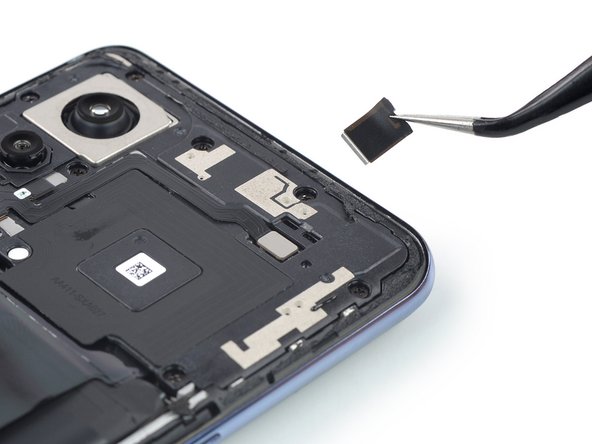
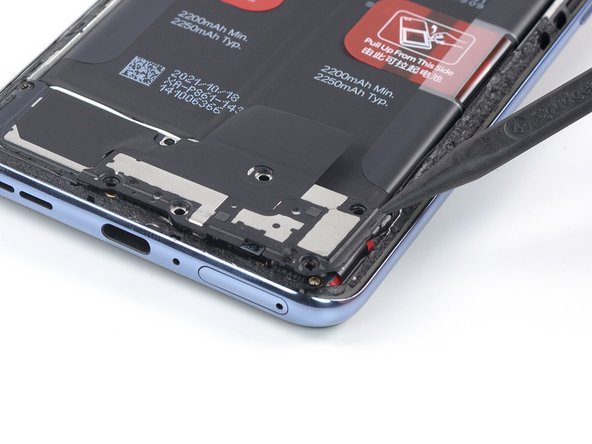
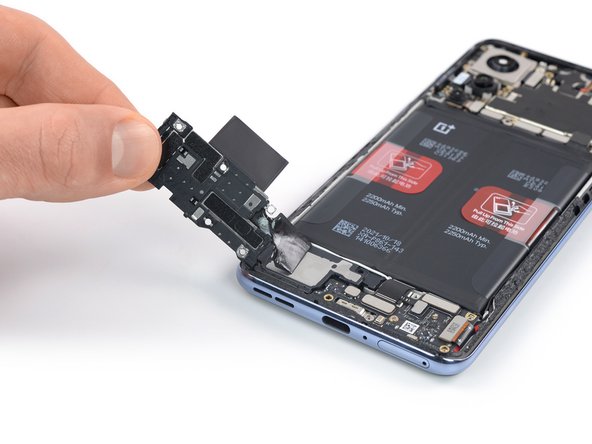
  12. OnePlus Nord 2 5G Screen Replacement, Remove the connector bracket: étape 12, image 1 de 2 OnePlus Nord 2 5G Screen Replacement, Remove the connector bracket: étape 12, image 2 de 2
    • Use a pair of tweezers to remove the metal bracket covering the flash assembly connector.

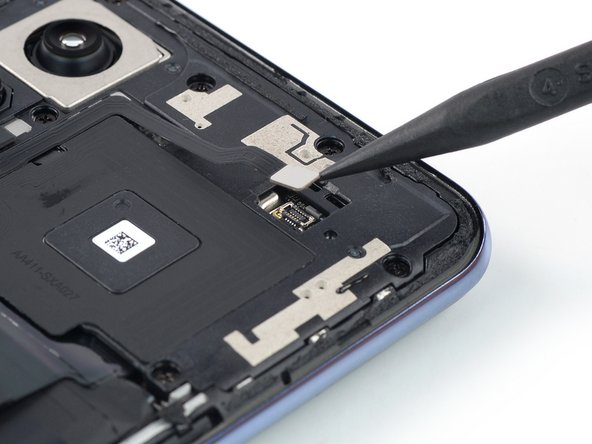
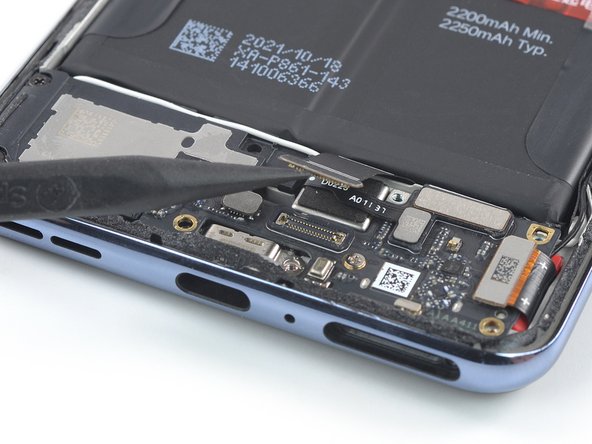
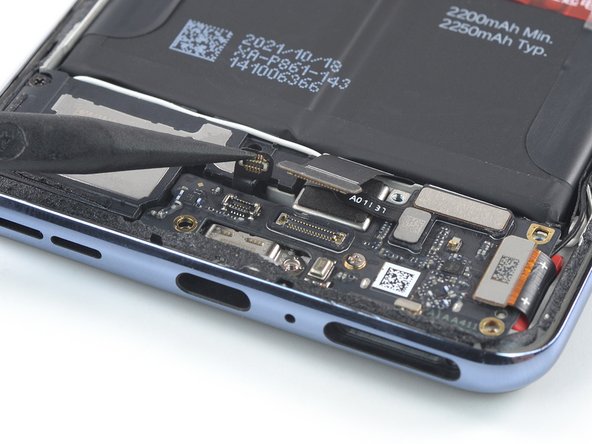
  13. OnePlus Nord 2 5G Screen Replacement, Disconnect the flash assembly: étape 13, image 1 de 2 OnePlus Nord 2 5G Screen Replacement, Disconnect the flash assembly: étape 13, image 2 de 2
    • Use the point of a spudger to disconnect the flash assembly cable by prying the connector straight up from its socket.

  14. OnePlus Nord 2 5G Screen Replacement, Unfasten the motherboard cover: étape 14, image 1 de 1
    • Use a Phillips screwdriver to remove the nine 3.8 mm-long screws securing the motherboard cover.

  15. OnePlus Nord 2 5G Screen Replacement, Pry up the motherboard cover: étape 15, image 1 de 3 OnePlus Nord 2 5G Screen Replacement, Pry up the motherboard cover: étape 15, image 2 de 3 OnePlus Nord 2 5G Screen Replacement, Pry up the motherboard cover: étape 15, image 3 de 3
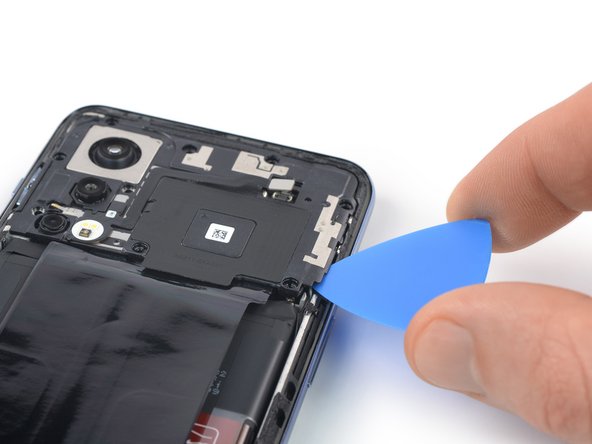
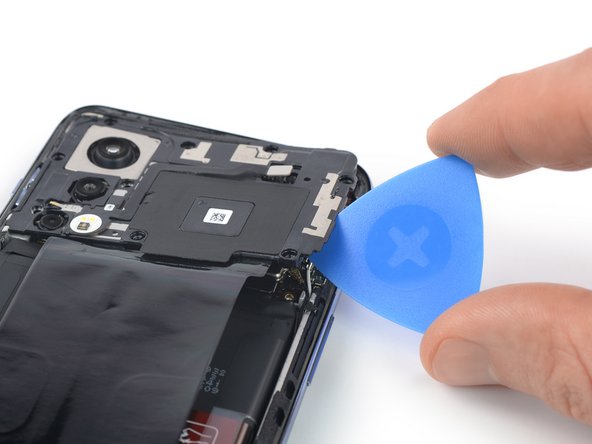
    • The motherboard cover is held in place by plastic clips.

    • Insert an opening pick underneath the bottom right edge of the motherboard cover.

    • Twist the opening pick sideways release the plastic clips and to pry up the motherboard cover.

  16. OnePlus Nord 2 5G Screen Replacement, Remove the motherboard cover: étape 16, image 1 de 2 OnePlus Nord 2 5G Screen Replacement, Remove the motherboard cover: étape 16, image 2 de 2
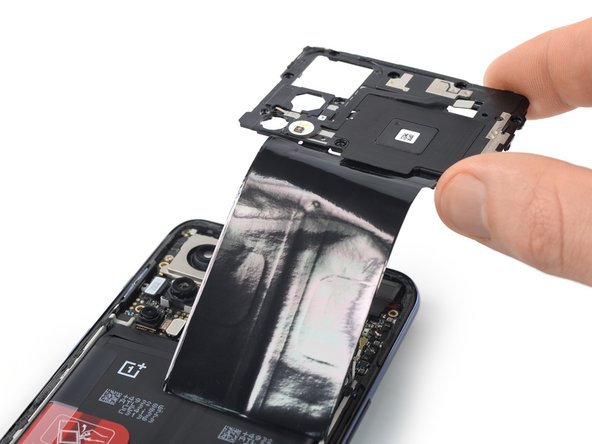
    • Remove the motherboard cover.

  17. OnePlus Nord 2 5G Screen Replacement, Disconnect the battery cable: étape 17, image 1 de 2 OnePlus Nord 2 5G Screen Replacement, Disconnect the battery cable: étape 17, image 2 de 2
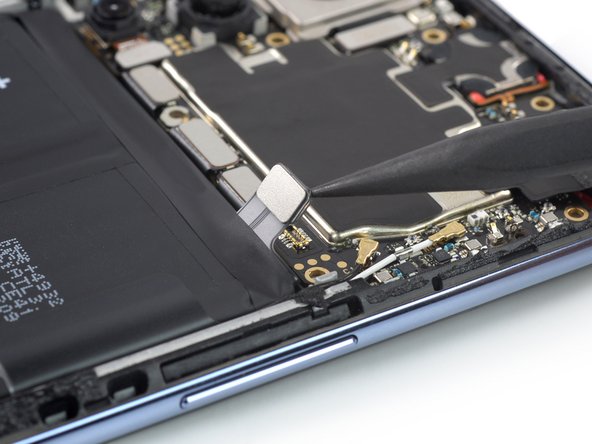
    • Use a spudger to disconnect the battery cable by prying the connector straight up from its socket.

  18. OnePlus Nord 2 5G Screen Replacement, Unfasten the daughterboard cover: étape 18, image 1 de 1
    • Removing the daughterboard cover isn't mandatory to replace the battery. However, doing so reduces the risk of damaging surrounding components.

    • Use a Phillips screwdriver to remove the six 3.8 mm-long screws securing the daugtherboard cover.

  19. OnePlus Nord 2 5G Screen Replacement, Pry up the daughterboard cover: étape 19, image 1 de 2 OnePlus Nord 2 5G Screen Replacement, Pry up the daughterboard cover: étape 19, image 2 de 2
    • Insert the point of a spudger underneath the top right edge of the daughterboard cover.

    • Pry upwards to loosen the daughterboard cover.

    • Don't try to remove the daughterboard cover all the way yet. It's still adhered to the loudspeaker.

  20. OnePlus Nord 2 5G Screen Replacement, Remove the daughterboard cover: étape 20, image 1 de 3 OnePlus Nord 2 5G Screen Replacement, Remove the daughterboard cover: étape 20, image 2 de 3 OnePlus Nord 2 5G Screen Replacement, Remove the daughterboard cover: étape 20, image 3 de 3
    • Fold the daughterboard cover to the left like you would open the front cover of a book.

    • Carefully peel the black tape off of the loudspeaker.

    • Remove the daughterboard cover.

  21. OnePlus Nord 2 5G Screen Replacement, Disconnect the interconnect and the antenna board cables: étape 21, image 1 de 3 OnePlus Nord 2 5G Screen Replacement, Disconnect the interconnect and the antenna board cables: étape 21, image 2 de 3 OnePlus Nord 2 5G Screen Replacement, Disconnect the interconnect and the antenna board cables: étape 21, image 3 de 3
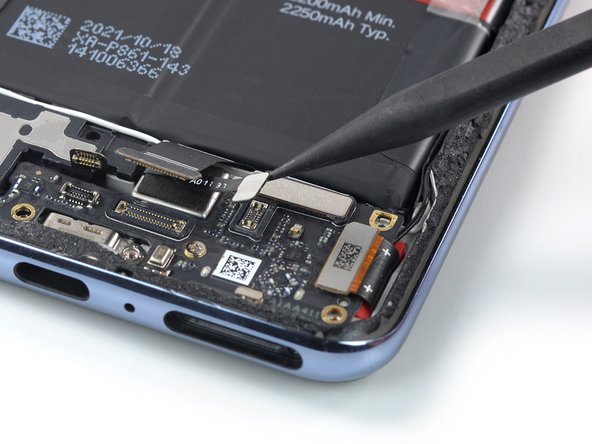
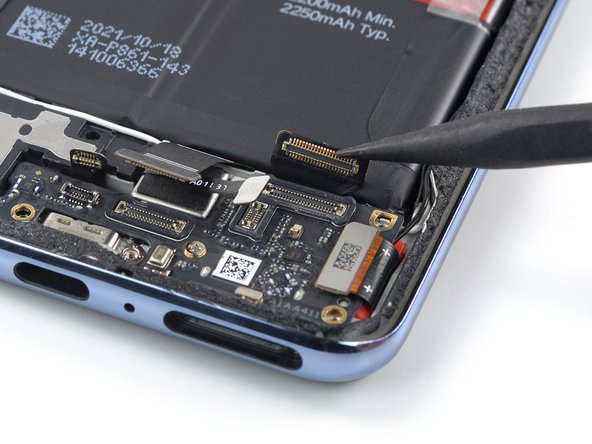
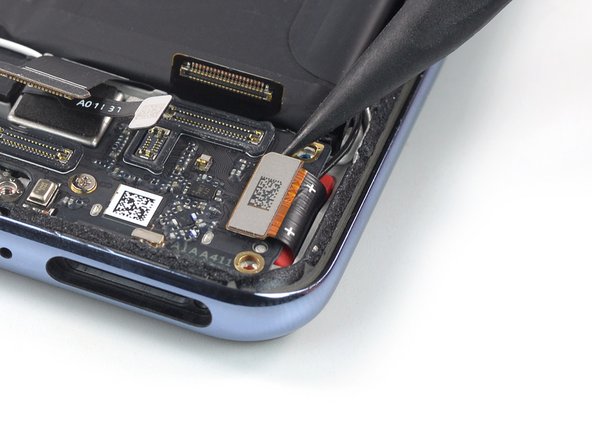
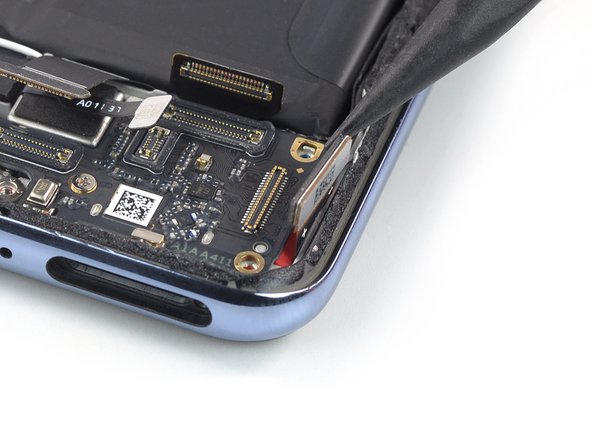
    • Use a spudger to disconnect the interconnect and the antenna board cables by prying the connectors straight up from their socket.

  22. OnePlus Nord 2 5G Screen Replacement, Disconnect the fingerprint sensor and the interconnect cables: étape 22, image 1 de 3 OnePlus Nord 2 5G Screen Replacement, Disconnect the fingerprint sensor and the interconnect cables: étape 22, image 2 de 3 OnePlus Nord 2 5G Screen Replacement, Disconnect the fingerprint sensor and the interconnect cables: étape 22, image 3 de 3
    • Use a spudger to disconnect the fingerprint sensor and the interconnect cables by prying the connectors straight up from their sockets.

  23. OnePlus Nord 2 5G Screen Replacement, Disconnect the display: étape 23, image 1 de 2 OnePlus Nord 2 5G Screen Replacement, Disconnect the display: étape 23, image 2 de 2
    • Use a spudger to disconnect the display cable by prying the connector straight up from its socket.

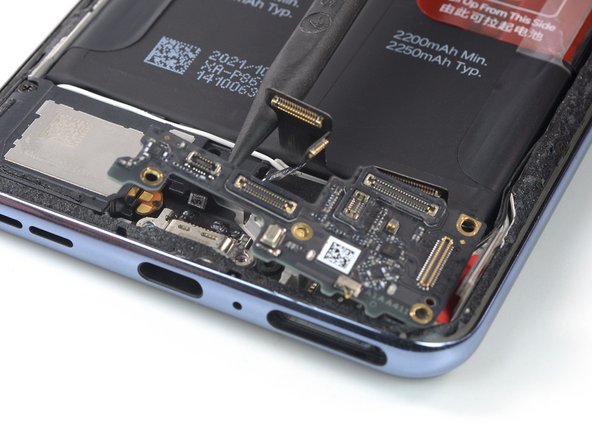
  24. OnePlus Nord 2 5G Screen Replacement, Unfasten the daughterboard: étape 24, image 1 de 1
    • Use a Phillips driver to remove the 2.8 mm-long screw securing the daughterboard.

  25. OnePlus Nord 2 5G Screen Replacement, Pry up the daughterboard: étape 25, image 1 de 2 OnePlus Nord 2 5G Screen Replacement, Pry up the daughterboard: étape 25, image 2 de 2
    • Insert the point of a spudger underneath the top edge of the daughterboard.

    • Pry upwards to loosen the daughterboard.

    • Don't try to remove the daughterboard all the way yet. There's an antenna cable on its bottom that is still connected to it.

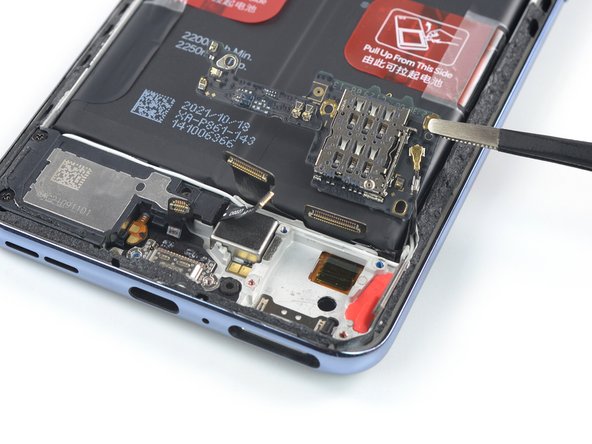
  26. OnePlus Nord 2 5G Screen Replacement, Fold over the daughterboard: étape 26, image 1 de 2 OnePlus Nord 2 5G Screen Replacement, Fold over the daughterboard: étape 26, image 2 de 2
    • Use a pair of blunt nose tweezers to carefully fold the daughterboard over in direction of the battery.

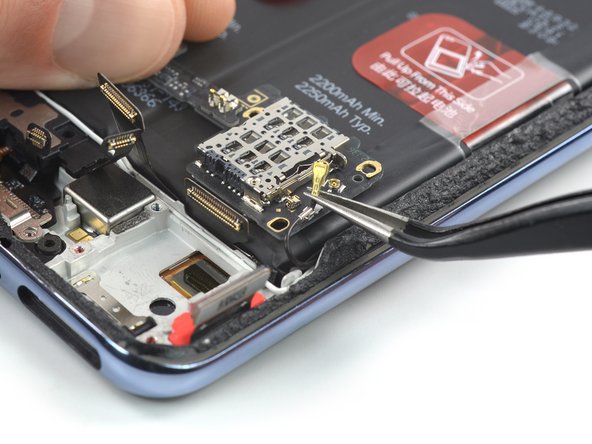
  27. OnePlus Nord 2 5G Screen Replacement, Disconnect the antenna cable: étape 27, image 1 de 2 OnePlus Nord 2 5G Screen Replacement, Disconnect the antenna cable: étape 27, image 2 de 2
    • Slide a one arm of a pair of tweezers under the black antenna cable until they're snug against the metal connector.

    • Disconnect the upper antenna cable by prying it straight up from the daughterboard.

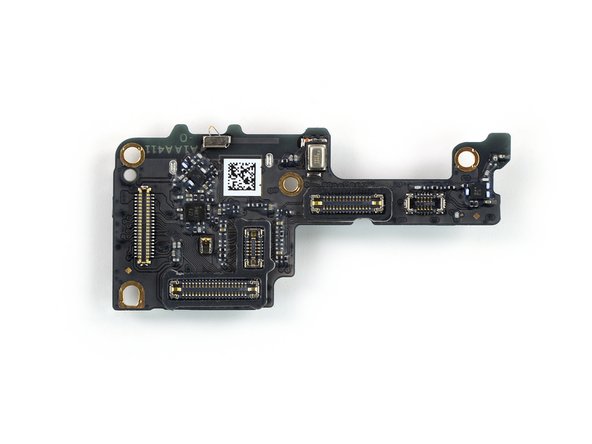
  28. OnePlus Nord 2 5G Screen Replacement, Remove the daughterboard: étape 28, image 1 de 2 OnePlus Nord 2 5G Screen Replacement, Remove the daughterboard: étape 28, image 2 de 2
    • Remove the daughterboard.

  29. OnePlus Nord 2 5G Screen Replacement, Remove the rubber gasket: étape 29, image 1 de 2 OnePlus Nord 2 5G Screen Replacement, Remove the rubber gasket: étape 29, image 2 de 2
    • Use a pair of tweezers to remove the red rubber gasket securing the display cable.

  30. OnePlus Nord 2 5G Screen Replacement, Loosen the display adhesive: étape 30, image 1 de 1
    • Apply a heated iOpener to the screen for 3 minutes to loosen the adhesive underneath.

    • A hair dryer, heat gun, or hot plate may also be used, but be careful not to overheat the device. The edge should feel slightly too hot to touch.

  31. OnePlus Nord 2 5G Screen Replacement, Insert an iFlex: étape 31, image 1 de 3 OnePlus Nord 2 5G Screen Replacement, Insert an iFlex: étape 31, image 2 de 3 OnePlus Nord 2 5G Screen Replacement, Insert an iFlex: étape 31, image 3 de 3
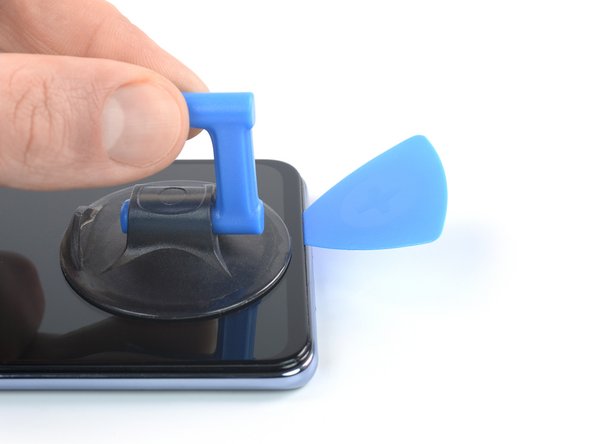
    • Apply a suction handle to the bottom edge of the screen.

    • If your display is badly cracked, covering it with a layer of clear packing tape may allow the suction cup to adhere. Alternatively, very strong tape may be used instead of the suction cup. If all else fails, you can superglue the suction cup to the broken screen.

    • Lift the screen with the suction handle and insert an iFlex to create a small gap between the screen and the phone assembly.

    • Depending on the age of your phone, this may be difficult. If you're having trouble, apply more heat to the bottom edge and try again.

  32. OnePlus Nord 2 5G Screen Replacement, Insert an opening pick: étape 32, image 1 de 2 OnePlus Nord 2 5G Screen Replacement, Insert an opening pick: étape 32, image 2 de 2
    • Insert an opening pick into the gap you created with your iFlex.

    • Remove the iFlex.

  33. OnePlus Nord 2 5G Screen Replacement, Slice the bottom edge adhesive: étape 33, image 1 de 2 OnePlus Nord 2 5G Screen Replacement, Slice the bottom edge adhesive: étape 33, image 2 de 2
    • Slide the opening pick to the bottom right corner of the screen to slice its adhesive.

    • Leave the opening pick in place to prevent the adhesive from resealing.

  34. OnePlus Nord 2 5G Screen Replacement: étape 34, image 1 de 2 OnePlus Nord 2 5G Screen Replacement: étape 34, image 2 de 2
    • Insert a second opening pick at the bottom right corner and slide it to the bottom left corner of the screen to slice the adhesive.

    • Leave the opening pick in place to prevent the adhesive from resealing.

  35. OnePlus Nord 2 5G Screen Replacement, Slice the left edge adhesive: étape 35, image 1 de 3 OnePlus Nord 2 5G Screen Replacement, Slice the left edge adhesive: étape 35, image 2 de 3 OnePlus Nord 2 5G Screen Replacement, Slice the left edge adhesive: étape 35, image 3 de 3
    • Insert a third opening pick underneath the bottom left corner of the screen.

    • Slide the opening pick along the left edge of the screen to slice the adhesive.

    • When slicing near the front facing camera, only insert the opening pick 2.5 mm to avoid damaging it.

    • Leave the opening pick in the top left corner to prevent the adhesive from resealing.

  36. OnePlus Nord 2 5G Screen Replacement, Slice the top edge adhesive: étape 36, image 1 de 2 OnePlus Nord 2 5G Screen Replacement, Slice the top edge adhesive: étape 36, image 2 de 2
    • If the adhesive becomes hard to cut, it has most likely cooled down. Use your iOpener or heat gun for 1–2 minutes to reheat it.

    • Insert a fourth opening pick at the top left corner of the screen.

    • Slide the opening pick along the top edge of the phone to slice the adhesive.

    • Leave the opening pick in the top right corner to prevent the adhesive from resealing.

  37. OnePlus Nord 2 5G Screen Replacement, Slice the right edge adhesive: étape 37, image 1 de 2 OnePlus Nord 2 5G Screen Replacement, Slice the right edge adhesive: étape 37, image 2 de 2
    • Insert a fifth opening pick and slide it along the right edge of the phone to slice the remaining adhesive.

    • Don't try to remove the display all the way yet, the display cables are still threaded through the midframe.

  38. OnePlus Nord 2 5G Screen Replacement, Free the display cable: étape 38, image 1 de 2 OnePlus Nord 2 5G Screen Replacement, Free the display cable: étape 38, image 2 de 2
    • Carefully thread the display cable through the gap in the midframe by lifting the bottom of the phone.

  39. OnePlus Nord 2 5G Screen Replacement, Remove the screen: étape 39, image 1 de 1
    • Remove the screen.

    • During reassembly, follow this guide to install custom-cut adhesives for your device.

Conclusion

Compare your new replacement part to the original part—you may need to transfer remaining components or remove adhesive backings from the new part before you install it.

To reassemble your device, follow these instructions in reverse order.

During reassembly, apply new adhesive where it's necessary after cleaning the relevant areas with isopropyl alcohol (>90%).

Take your e-waste to an R2 or e-Stewards certified recycler.

Repair didn’t go as planned? Try some basic troubleshooting, or ask our OnePlus Nord 2 5G answers community for help.

5 autres ont terminé cette réparation.

Dominik Schnabelrauch

Membre depuis le 11/23/16

203 875 Réputation

682 tutoriels rédigés

Équipe

iFixit Membre de l'équipe iFixit

Staff

135 membres

17 198 tutoriels rédigés

Un commentaire

The procedure to mount it back is the same as dismounting it, but for a begginer like me some advice on how to put glue or tape would be usefull.

Raikoug Bolt - Réponse

Ajouter un commentaire

Nombre de vues :

Dernières 24 heures : 29

7 derniers jours : 204

30 derniers jours : 808

Total : 9,956