Introduction
Consultez ce tutoriel pour remplacer la batterie usée ou morte de votre casque Bose QuietComfort 35.
Si votre batterie est gonflée, prenez les précautions nécessaires. Pour votre sécurité, laissez votre batterie se vider en dessous de 25 % avant de vous lancer. Cela réduit les risques de déclencher un incendie dangereux si jamais vous abîmez accidentellement la batterie pendant la réparation.
Pour ce tutoriel, nous recommandons d'utiliser un sèche-cheveux ou un pistolet à air chaud. Il est possible de démonter le casque à l'aide d'un iOpener, mais c'est plus difficile.
Vous aurez besoin d'adhésif de remplacement et d'un fer à souder pour détacher certains composants lors du démontage, puis les rattacher au moment de remonter l'appareil.
Il se peut que la taille ou la capacité de la batterie de remplacement diffère de l'originale. À notre connaissance, toutes les batteries de remplacement pour QuietComfort 35 sont compatibles avec les casques QuietComfort 35 I et QuietComfort 35 II.
Ce dont vous avez besoin
-
-
Saisissez le coussinet de la coquille gauche et tirez-le délicatement vers le milieu pour le détacher du clip en plastique.
-
Répétez la procédure pour tous les clips autour du coussinet.
-
Enlevez le coussinet de la coquille guache.
-
-
-
-
Insérez l'extrémité plate d'une spatule (spudger) entre le cache de la batterie et la batterie.
-
Séparez délicatement le cache en plastique de la coquille avec la spatule. N'appuyez pas sur la batterie.
What's that white part…I accidentally push it and it's bent down a little bit…is it gonna be a problem?…please help me
-
-
-
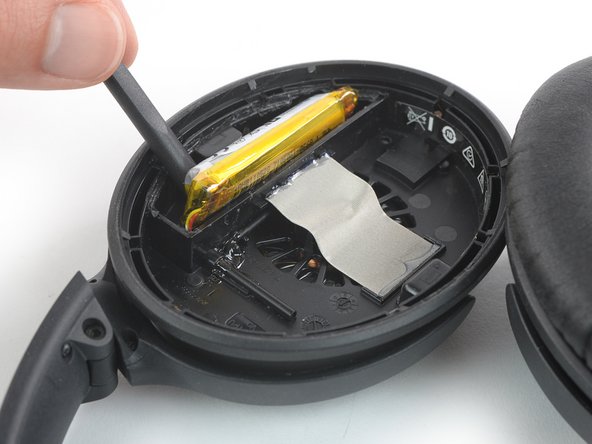
Avec un fer à souder, dessoudez les trois câbles de la batterie du circuit imprimé.
I didn't feel comfortable soldering in such a tight space, so instead, I cut the wires tot he old battery leaving as long of a wire as possible, making sure to cut each wire individually so it wouldn't have any chance of shorting. Then I soldered the long ends of the wire with the long ends of the new battery. Capped it off with the black shrink wrap stuff.
-
-
-
Ôtez la batterie.
Really Bruno? Then I could say that your comment has also mistakes!:
"Hey, its circuit board not curcuit board." is not, it is: "Hey, it's circuit board, not curcuit board."
Thanks Dominik Schnabelrauch, Scott Head and Jeff Stephens for this guide.
-


Si possible, allumez votre casque et testez votre réparation avant de poser du nouvel adhésif et de sceller à nouveau votre appareil.
Pour remonter votre casque, suivez ces instructions en sens inverse.
Pour une performance optimale, calibrez votre nouvelle batterie : chargez-la à 100 % et laissez-la charger pendant au moins deux heures supplémentaires. Puis, utilisez votre casque jusqu’à ce que la batterie soit vide et qu’il s’éteigne. Enfin rechargez-le à 100 % sans interruption.
Déposez vos déchets électroniques dans un centre de recyclage certifié R2 ou e-Stewards.
La réparation ne s’est pas déroulée comme prévu ? Consultez notre Forum pour obtenir de l’aide au diagnostic.
Annulation : je n'ai pas terminé ce tutoriel.
57 autres ont terminé cette réparation.
Merci à ces traducteurs :
100%


Ces traducteurs nous aident réparer le monde ! Vous voulez contribuer ?
Commencez à traduire ›


41 commentaires
Hallo, tolle Beschreibung. Vielen Dank dafür.
kann man bei den Bose 700 NC auch den Akku tauschen ?
Würde mich sehr freuen, wenn das so wäre. Hat da jemand evtl bereits schon Erfahrungen gemacht. Könnte mir vorstellen, dass viele 700 NC jetzt auch in das Alter kommen, in dem der Akku schwach wird.
Fk Bose for making it so difficult! They all care about the environment so much, don’t they?!
Batteries should be easily replaceable by any customer by themselves! Ear pads as well. Bose makes it harder so you would throw away your $300 headphones when battery dies. So much waste, plastic and other harmful stuff.
EU mandated to use USB-C on all devices to reduce the waste. Batteries are more harmful. They should make it mandatory for batteries to be user replaceable on tech like headphones. Manufacturers are making disposable headphones in purpose, obviously. Like AirPods and other similar earbuds. 18-24 months and you’re forced to throw them away. They should offer cheap battery replacement for AirPods and like earbuds as well. Maybe trade in deals. $70-$90 a bud isn’t cheap replacement.
Companies are lying about the love for the environment to make us buy more and add more harmful waste to it.
Actually, you can buy the earpads separately, even from BOSE themselves. I’ve replaced mine 3 or 4 times already and it’s pretty straight forward
Thanks. Replaced my bose qc35 headphone battery. Works perfectly!
Wastage and ‘the environment’ are not quite the same thing. Most, if not all, of the material used to make the device is recyclable. It’s not an issue of damage to the environment for companies to make it difficult, or really, to not make it easy to replace a battery. You’ll find many companies do this in order to make their devices more water-resistant and dust-resistant. It’s not just because the big bad rich guys hate the planet.
If you’ve an issue with waste, contribute your waste to recycling. It’s your fault, not the company who made the product’s fault, if you don’t.
Great guide.
Of course it is. Recycling needs energy. And recycling needs to seperate all the parts and composites. If you really think this earphone can get completly recycled you also think the the Santa Claus who brought this to you is real. Just use Google to see where all this electronic parts are “getting recycled”. Poorest African childs are burning it to get at least the rare materials of it for a tiny bit of money. Leave your beautyful and peaceful bubble where for every problem comes a great technological solution.
"its your fault the product is wasteful, not the company's". oh wonderful, a corporate stooge.
never mind the fact that even if all parts are recyclable, theyre often too uneconomical for anyone to bother. or that companies specifically design for them to poorly repairable, which means theyll end up being thrown away or be damaged while trying to do so.
its reuse, reduce, and then recycle.
and recycling your tech is hardly a solution when the battery needs replacing. what an absolutely braindead take.
SBN -
Sir do you have tutorial to repair bose quitecomfort earbuds with left side not working? thank you
Hi! Is this process needed to be done only for the left ear?
Hi Andrei,
if you want to replace the battery there is only one in the left side of the headphones you need to replace.
that's really important to know as the right ear as well has a shut glued battery compartment.
Florian -
Dit ziet er lastig uit, dat gaat mij niet lukken. Weet iemand een bedrijf die dit doet? Bvd, Hans
Did you find someone to fix your headphones for you?
David V. -
Unfortunately the battery is not available from reputable sources. I found a seller on ebay which sells compatible batteries from the brand vhbw. They look decent, however are available in 350mAh and 600mAh. If I see it correctly on the pictures above, the original battery has 495mAh.
Does anyone have a clue if those are legit and I can just use the 600mAh type?
I just installed the 600mAh from vhbw. It works fine so far.
350mAh, 495mAh and 600mAh are different capacities and the higher is better. What's important is the voltage (3.7V) which should not differ too much.
If vhbw is not lying on its numbers, with the 600mAh you should get more music on a single charge than with the original battery, that's it 😉
Centralsound.co carries the battery
I just installed the 600mAh from vhbw. It works fine so far.
350mAh, 495mAh and 600mAh are different capacities and the higher is better. What's important is the voltage (3.7V) which should not differ too much.
If vhbw is not lying on its numbers, you should get more music on a single charge than with the original battery, that's it 😉
I didn't need to use any heat to lift the battery cover.
I used a thin blade / knife to cut the adhesive between the lid and the headphones on the exposed sides and then managed to carefully pry it open with my fingers.
The adhesive, in my case, was a bit rubbery and thus not too difficult to remove.
Obviously, be very careful with sharp objects around batteries, as stated in the guide also.
To put it back on, I just cut a couple of very tiny pieces of double sided tape. We'll see if that holds up well.
Also, I was wondering if the glue is there to somehow protect the wearer in case the battery does break down and catch on fire.
And thus if you should glue the battery lid shut properly after replacing the battery. Any ideas?
The glue maintains the airtight integrity of the speaker and enhances bass response and noise canceling. You MUST maintain the seal or else sound can leak out. You can get feedback squeal if it leaks where it shouldn't.
I want to know how to do QC45
Please write about QC45
Ifixit is best!
So I surmise that the headphones come with one battery from factory. In the left cup. But there is space for anotherin the right ear cup... any reason i cant have a battery each side and double the life? I guess I'm the guinea pig..
How are you going to run the wires over? you do realize there are 2 folding joints and then the headband to worry about?
Thank you, this was extremely helpful! If anyone is struggling to soften the glue, be patient. Even if it seems like it isn't doing anything, the cap will lift much more easily if you evenly pre-heat the glue as described here. The rest was comparatively easy. Keep in mind that the battery is also glued to the bottom of the case, so be patient and persevere, it'll come off!
OT: I use my BOSE 700 wired. Problem is I still have to charge them for NC and during charging they don't work. Is the a mod to charge and have NC at the same time? ??
There is a way that only developers of the headphones can use to run the headphones while they are still charging. It requires sending a special command I think over serial but you would need to know exactly the protocol used. But the product owners in their infinite wisdom decided against this option because it would be too confusing to the customer.
The only way is to somehow hunt down and make friends with a QA person at Bose who still has access to all the knowledge and hardware to actually enable and send that command.
source: I was there when they made that decision.
Cannibalize an old cell phone, or remote control, or other obsolete electronic waste. Maybe some small electronic device. Maybe use tape around the edges of the aluminum cap, if all else fails
I'm step 3, what is the silver looking ribbon. My dog eat the top cushion, side ear muffs, and took off the silver looking ribbon. I'm able to hear sound and everything else appears to work. I can find replacement parts for everything except for the silver stuf. Anyone have an idea?
Has anyone had any luck with these instructions for the Bose AE2W? Can't find a guide but believe the design is fundamentally the same between these models with the exception of circuitry for noise cancellation, extra switches mics, etc.
Mine appear to have two allen shaped security headed screws in alongside a small Philips head.
I always test the voltage present at the battery wires to confirm that the battery is dead or not holding a charge. It's no fun to replace a good battery with a new one just to have a dead headphones in the end. Sometimes the charging port in the OTHER side or associated flexible circuit boards used as conductors fail.
J'ai remplacé la batterie d'origine SYNERGY AHB110520CPS, 495 mAh, 3.7Vdc, par une batterie vhbw de 600 mAh, elle fonctionne parfaitement.
https://www.amazon.fr/dp/B09L5H4JDH?psc=....
Conseil, éviter de chauffer la trappe de la batterie, il y a un risque d'endommager le haut parleur du casque, c'est plus long mais j'ai utilisé une spatule en acier et l'ai introduit sous la trappe puis j'ai fait levier. Ensuite je nettoie les traces de colle restant. Pour le remontage je colle avec Colle professionnelle B7000 en tube de 15ml et le tour est joué.
Any suggestions on appropriate glue(s) to stick things back together? I would want to use two part plastic glues since that would bond them forever. But I don’t know what else is suitable
%#*!^@, I meant would NOT want to use two part plastic glues…
What glue/ adhesive should I use for this repair?
just some tips after i did this... if you are bad at soldering/ only have cheap soldering equipment, snip the old wires on old battery (negative first (black wire), closer to the battery to have as much available wire) and solder the new battery wires to it. it is much easier to solder 2 wires together (albeit very small and delicate, make sure to use general soldering practices like tinning the wire first, and using as least heat time as possible) than to risk damaging the pcb if you don't know what you're doing. also heat gun is not necessary, you can separate the battery panel with a razor if you're being careful. it is a rubber like adhesive, just go around the perimeter carefully and it will separate cleanly.
as someone else said, it is wise to clean up the old adhesive and use a light adhesive to glue the panel back in place to get a full seal.
First time I've seen a 'Red' Charging light on my Bose QC35's. Gonna fully charge then fully drain, hopefully, I'll have a longer battery life again. Great guide. When re-applying the battery cover, I heated it up sections then pressed and held it down to allow the original glue to set it shut again.
gibts irgendjemand der dies als service anbietet?
no name - Réponse