Introduction
Parfois, les boutons sur votre JBL Charge 3 peuvent s'user ou accumuler les saletés, causant un ou plusieurs boutons à ne plus marcher. Heureusement, les boutons sont facile à nettoyer une fois que la coque est retirée.
Ce dont vous avez besoin
-
-
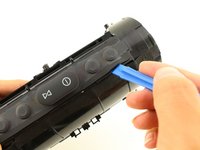
Retournez votre enceinte et insérez l'outil d'ouverture en plastique à la verticale dans le fente de la coque avant.
-
Tirez doucement l'outil vers l'extérieur pour retirer les quatre clips qui maintiennent la coque en place.
-
Répétez cette manipulation pour chacun des quatre coins de la coque avant.
-
-
-
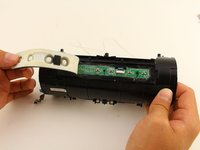
Extrayez délicatement la coque des deux côtés et enlevez-la du châssis de l'enceinte.
@KanGoon Yes, on mine it took the removal of 6 (reasonably obvious) screws to remove that. I’ll try to insert a photo when I reassemble…
Very good guide! Pics and descriptions make this easy!
There is a step missing here. How do you remove the rubber cover that covers the port?
Gibt es eine Möglichkeit diese wieder wasserdicht zu bekommen?
Well, broke off the cover tabs. Have to remove 2 screws first. Might add that to the instructions.🤔
Me too. Saw the screws after I'd popped it off.
It doesn't look fixable. Can't get the cover to stay on anymore. Ideas?
-
-
-
-
Utilisez votre outil d'ouvertur en plastique pour faire levier autour des bords du cache des boutons. Ceci va commencer à séparer l'adhésif du cache.
-
Enlever la cache des boutons avec votre main dès que vous avez assez séparé de votre enceinte pour l'attraper.
-
-
Outil utilisé dans cette étape :Tweezers$4.99
-
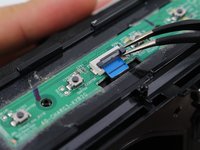
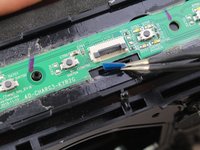
Levez le clapet de vérouillage du connecteur ZIF.
-
Tirez délicatement sur le câble ZIF avec une pincette.
What is the purpose of pulling out the ZIF connector cable with tweezers? What do you do after you you've pulled it out?
-


Pour réassembler votre appareil, suivez ces étapes dans le sens inverse.
Pour réassembler votre appareil, suivez ces étapes dans le sens inverse.
Annulation : je n'ai pas terminé ce tutoriel.
15 autres ont terminé cette réparation.
Merci à ces traducteurs :
100%


Ces traducteurs nous aident réparer le monde ! Vous voulez contribuer ?
Commencez à traduire ›
Équipe

Cal Poly, Team S13-G1, White Fall 2018 Membre de l'équipe Cal Poly, Team S13-G1, White Fall 2018
CPSU-WHITE-F18S13G1
3 membres
26 tutoriels rédigés
4 commentaires
Where do i buy new buttons?
Could you please provide info about where to get the green board?
Next steps are missing.
5.) What happens after the disconnecting the ZIF?
6.) a.) How do you remove the button board? Is that what needs to then be replaced?)
6.) b) Or do I need soldiering skills and learn to attach new buttons to the existing board.
Happy to learn - hoping to be pointed in the right direction...
Sometimes disassemblers forget that the first time they disassembled the item it didn’t want to give up easily: I didn’t like the forces I was having to apply at all, so I switched to two plastic prying tools per “corner” and one in-between them (total 5, you could use plectrums…) before I was happy the the forces were low enough not to break anything.
Frank Puranik - Réponse
the front grill is supposed to be first not the back the back has longer while the front has shorter clip
Water Bass Tester (Water BT) - Réponse
There are two Phillips head screws to remove before prying the cover off
jason - Réponse
Where in south Africa can I buy jbl charge3 port bay replacement
Donovan Fransman - Réponse
There appears to be different versions of the Charge 3. If you find it difficult to pry open a second side the two small screws mentioned by Jason will need to be removed but it also indicates that there will be some additional changes to this tear down that I will try to convey in the comments as well.
john Ramirez - Réponse
Sadly I damaged the latches on my charge 3. There was more to it than just prying the front cover up. First, there is a small latch on both sides that you need to push down before pulling the front cover towards you that release the clips holding the front cover in place. Pull only slightly forward because… Second, in the front cover there are 6 circular notches connected to the front cover in tue four corners including the middle corners, you need to squeeze the front cover a little bit gently removing the notches so they dont break (like mine did).
ralphkeneth_gomz - Réponse
Definitely had to watch about 10 videos and still couldn’t get it to pop out easily.. Took a look at the first picture in the next step and really took note of where the little hole that lets you through to push down the tab is. Once I took a look at that and combined the techniques I’d seen in some of the videos it finally popped off easily. https://www.youtube.com/watch?v=u7i0_nD9... I only watched the first minute of this video but it helped a good bit if anyone else is having trouble.
Rowan Darko - Réponse
How do you know if the speakers or one of them is burned or broken.. i notice that one speaker is playing much less hard then the other one.. I wonder now if maybe there is another problem with my device.. Battery problem?
Bukowski101 - Réponse